Friday, April 04, 2025

Microwavable Mitten Warmers

Step 1: Materials

These mitten warmers can be made quickly and easily. This instructable will show you several different methods so you have lots of options depending on your resources and abilities.

Here is a list of supplies you may choose to use:

Essential items:
- mittens (obviously)
- microwave oven
- dry, uncooked rice or lentils - but not popcorn, that's a bad choice.

Choice of cotton fabric:
- old dish towel
- old sock
- old T-shirt
- etc.

One or two of the following items:
- sewing machine
- needle and thread
- fusible webbing
- string
- rubber bands

Step 2: Option One

Option One Option One  Option One

Use a sewing machine to sew a small bag out of some fabric. These ones I made measure about 8cm (3 inches) by 5cm (2 inches).


Begin with a piece of fabric a little wider than you want the finished bag to be, and a little more than twice as long. The extra width is your seam allowance. By the way, you needn't fuss about with a whole lot of cutting, just snip the edge and rip the fabric. Next fold the piece in half with the inside out, and run them through your sewing machine to sew the two sides together. Then turn them right side out, and fill with rice. Tuck the remaining raw edges inside and stitch the opening shut.

Done.

The final thing to do with all these options, is to microwave your finished mitten warmers for between 30 seconds to a minute. The rice will likely have a fair bit of moisture in it so for the first few heatings, so expect the warmers to come out of the microwave a bit damp. If you use basmati rice, like I did, also expect it to smell delicious! You can pop them into your mitts right out of the microwave and enjoy you toasty fingers!

Step 3: Option Two

Option Two  Option Two Option Two

 What? You say you don't have a sewing machine? Well it doesn't take a rocket surgeon to figure out you can do pretty much the same thing as Option One, but do all the sewing by hand. I used a blanket stitch to close up the top seam on mine.

Step 4: Option Three

 Option Three  Option Three  Option Three

Now if you are like me, you're not a big fan of sewing. Well then, let's try to minimize the amount of sewing you need to do.


Find an old pair of socks that you've worn the heels through, but the toes are still in good shape... and make sure they're clean! Lob off the toes to make pockets with enough room to hold the rice. Fill rice into these pockets, and tuck in the raw edges, placing enough fusible webbing between to span the entire opening. Iron this seam together.

Since microwaving these bags will melt the fusible webbing, you need to stitch along the seam. Socks tend to be quite stretchy and the fusible webbing helps stabilize the fabric while you sew it, however you could do without it if you prefer.

Step 5: Option Four

Option Four   Option Four  Option Four

 Option Four  Option Four

What's that? You say you suffer from [http://www.phobia-fear-release.com/aichmophobia.html" aichmophobia] and don't want to sew anything at all? Try this: Either fill the toes of old socks with rice like the previous option, or make a satchel out of an old dishtowel or T-shirt.

One way to make a satchel is to take a square of fabric and push some of it down into one hand that you can fill with rice. Gather up the loose ends over top and tie off with some string. Try not to make the satchel too tight; keep it a little slack. Then just trim off the excess and use.

Step 6: Option Five

 Option Five  Option Five  Option Five

Option Five  Option Five  Option Five

So you never quite managed to learn the whole tying-string-together thing, eh? Not to worry, use rubber bands instead of string. Wrap the rubber band as tightly as possible around the open end of the sock, or satchel.

Step 7: Option Six
 Option Six

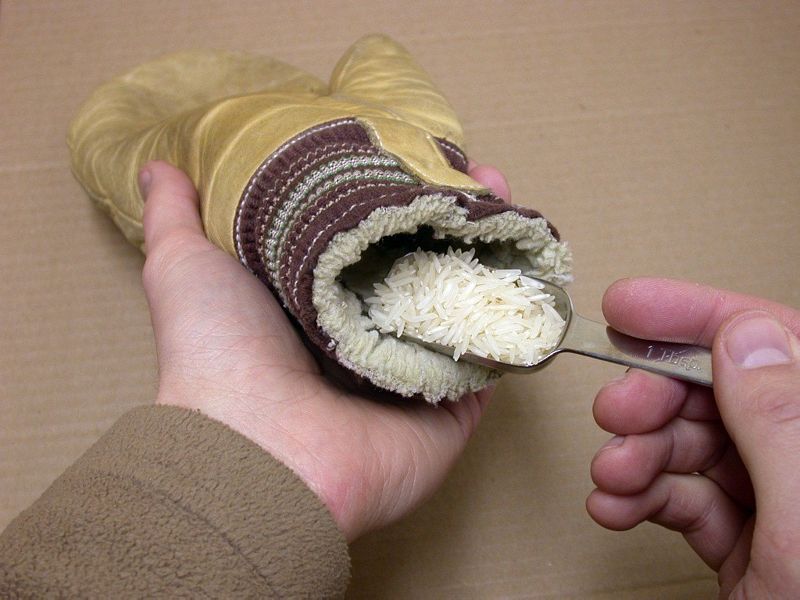
Still too complicated for you? (sigh...) Okay then, just put some rice in a bowl, heat it up in the microwave, and then pour it into your mittens.

Sure the rice will be loose in your mitts and you'll probably loose some if you raise your hand to wave at a friend, but this is absolutely the fastest and easiest mitten warmer I can think of to keep your fingers from freezing when you are outside.


This is only for your information, kindly take the advice of your doctor for medicines, exercises and so on.   

Labels: , , , ,

Friday, October 18, 2024

This Is How Grandma Used to Fight Off a Cough and Cold

 Cold and flu season is upon us! Most of us try our best to avoid the flu by looking for ways to stay healthy and to get better as quickly as possible when any nasty bug gets in our system. While there are many tried and true cold medicines, most taste simply awful. And, when you're already feeling sick, forcing a spoonful of something you do not like is possibly not the best way to go about it. In addition, many of these cold and flu medicines may leave you feeling drowsy.

cough syrup
If it's a cough that you are suffering from, cough drops do not always work. Instead, try this DIY drink, it is promised to be a nightcap that is perfect for soothing a scratchy throat. The key ingredient in this recipe is honey. Alcohol is another ingredient. But if you aren't keen on alcohol, you could simply mix honey and hot water or warm milk and sip that before bed to soothe your throat. If however, you don't mind a bit of alcohol, read on.
cough syrup
In this miraculous recipe, we are adding bourbon to honey. 
 
Here's how: Ingredients: 
2 oz (60ml) Bourbon 
2 oz (60ml) lemon juice (about half a lemon) 
2-4 oz water (60-80ml) (optional)
1 tbsp honey 
 
Directions: 
 1. Combine the first three ingredients in your glass and heat in the microwave for 45 seconds. 
2. Then add the honey, whisking well and return to the microwave for a further 45 seconds. 
3. Sip this cough syrup before bed to ease your cold symptoms.

This is only for your information, kindly take the advice of your doctor for medicines, exercises and so on.   

https://gscrochetdesigns.blogspot.com. one can see my crochet creations  
https://gseasyrecipes.blogspot.com. feel free to view for easy, simple and healthy recipes    
https://kneereplacement-stickclub.blogspot.com. for info on knee replacement
https://cancersupportindia.blogspot.com  for infor on cancer and health related topics
https://GSiyers home remedies.blogspot.com   is the latest addition to my blogs. I'm going to add posts there, do give me your valuable feed back on my blogs. Thanks a lot, take care, be healthy and be happy.

Labels: , , , , , ,

Saturday, August 31, 2019

Make Warm and Spicy Chai Tea at Home!

During the winter months, we commonly search out the tastiest hot drinks that will make us feel warm and cozy. But once you've tired of tea, coffee and hot chocolate, what's there left to drink?

Masala chai is a mixed spice tea that is flavored by brewing black tea with a mixture of aromatic Indian spices and herbs, usually served with milk. Traditionally, the tea is prepared in a process called decoction, in which the spices and tea are boiled together to create the resulting chai tea.
Those who know chai, know that its smell is quite distinguishable. It's a mixture of strong, creamy, smoky and spicy that warms your belly and your heart without even taking a sip. However, in most western countries it is difficult to locate the correct spices to make chai the way the chaiwallahs do, but there are still excellent ways to produce the same warming taste.

Homemade Indian Masala Chai spice mix

Make this dry spice mix and store it, so that you will always have it ready for those cold days when all you want is a cup of something warm.

Recipe makes: about 2 cups

Ingredients:

1/2 cup black pepper, ground
1/2 cup cinnamon, ground
1/2 cup cardamom pods (make sure they are cracked or crack them with a knife)
1/2 cup dried ginger pieces
1/4 cup whole cloves

If you'd like to add some nutmeg or anise, feel free. This makes the taste a little nuttier and richer.
Store the mixture in an airtight container or a mason jar with a lid.

To make the chai, add one cup of filtered water and to two teaspoons of loose black tea or two teabags of black tea. Heat them together in a small pot at medium heat. You want to make the tea strong enough so that it will carry the spices.

tea

While the tea is heating, add about 1/2 teaspoon of the dried chai spice mix (if you opt to use fresh instead of dry ginger, add it now). Once the tea comes to a boil, turn if off briefly or remove the pot from the heat. Then pour in one cup of milk and a bit of sweetener (honey and raw sugar are great). You shouldn't need more than 2 teaspoons.
milk

Place the tea back on the heat and bring it to a boil once again. Stir the tea while it heats, or whisk to give the milk a foamy texture. Turn off the heat and let the tea sit for a minute to finish absorbing all the flavors.To finish, pour the tea into cups using a mesh strainer to keep the loose tea and spices out.
Stir well and savor your creamy and dreamy homemade chai!

THIS IS ONLY FOR INFORMATION, ALWAYS CONSULT YOU PHYSICIAN BEFORE HAVING ANY PARTICULAR FOOD/ MEDICATION/EXERCISE/OTHER REMEDIES.                                                                                                                                                                              PS- THOSE INTERESTED IN RECIPES ARE FREE TO  VIEW MY BLOG-                                                                                           https://gseasyrecipes.blogspot.com/                                                                                                                                                FOR INFO ABOUT KNEE REPLACEMENT, YOU CAN VIEW MY BLOG-                                                                                  https:// kneereplacement-stickclub.blogspot.com/                                                                                                                                       FOR CROCHET DESIGNS                                                                                                   
                    https://gscrochetns.blogspot.com 


Labels: , , , , , , , , , ,

Saturday, August 03, 2019

Suburn relief

Your fragile sunburned skin will benefit from soaking in a mixture of baking soda and water. In a tub of  water add a cup of baking soda and you can also add your favourite body lotion.

THIS IS ONLY FOR INFORMATION, ALWAYS CONSULT YOU PHYSICIAN BEFORE HAVING ANY PARTICULAR FOOD/ MEDICATION/EXERCISE/OTHER REMEDIES.                                    PS- THOSE INTERESTED IN RECIPES ARE FREE TO  VIEW MY BLOG-                                                                                           https://gseasyrecipes.blogspot.com/                                                                                                                                                FOR INFO ABOUT KNEE REPLACEMENT, YOU CAN VIEW MY BLOG-                                                  https:// kneereplacement-stickclub.blogspot.com/                                                                      FOR CROCHET DESIGNS                                                                                                    
                                https://gscrochetdesigns.blogspot.com

Labels: , , ,

Monday, June 24, 2019

Loofahs can be breeding grounds for germs

Warm, moist environments are a breeding ground for germs. Using a loofah practically provides the bacteria for a place to multiply and easy access to your skin. 

Loofahs are supposed to be the Holy Grail for daily exfoliation. They scrub dirt and dead skin off your body and are used with body washes. But we often overlook the fact that all the dead skin off our bodies gets deposited in the loofah’s delicate weave.

Every time the loofah is not dried properly, the organisms trapped in it grow and multiply. "You spread the bacteria that you washed off your body the last time," said a dermatologist. "The loofah is spreading yesterday's dirt back on your body," he said.

A study also found that loofahs can transmit infection causing bacteria, which is harmful for those who are sick and having weak immune systems.

“I wouldn’t recommend using a buff puff or loofah,” adviced another dermatologist. “Loofah sponges are intimate with many unclean areas of the body and then sit around allowing bacteria to multiply within the nooks and crannies of the sponge,” he warned.

Warm, moist environments are a breeding ground for germs. Using a loofah practically provides the bacteria for a place to multiply and easy access to your skin. If you absolutely cannot do without a loofah, make sure to thoroughly clean it before every use. After each use, take it from the damp bathroom and hang it in sunlight or a place with enough airflow for it to completely dry. If you notice a change in colour or it emanating a foul smell, replace it immediately.


THIS IS ONLY FOR INFORMATION, ALWAYS CONSULT YOU PHYSICIAN BEFORE HAVING ANY PARTICULAR FOOD/ MEDICATION/EXERCISE/OTHER REMEDIES.                                    PS- THOSE INTERESTED IN RECIPES ARE FREE TO  VIEW MY BLOG-                                                                                           https://gseasyrecipes.blogspot.com/                                                                                                                                                FOR INFO ABOUT KNEE REPLACEMENT, YOU CAN VIEW MY BLOG-                                                  https:// kneereplacement-stickclub.blogspot.com/                                                                      FOR CROCHET DESIGNS                                                                                                                                                                                     https://gscrochetdesigns.blogspot.com

Labels: , , , , , , , , , , ,

Tuesday, November 27, 2018

The Right Time To Drink Water

After waking up, drink a litre of water slowly sitting down, even if you've not brushed your teeth, as the acids in our stomach are more powerful to take care of  bacteria in our mouth. Of course, when you start drinking water, it is not possible to drink 1 litre, drink as much as you can initially, then slowly increase it. This will help to cleanse your bowels and flush out the toxins from your body.

Before a meal- drink 1 glass of water to dilute the digestive juices and aid digestion.

Before a  shower- It is good to drink a glass of water to lower your blood pressure.

Before going to bed- It is good to drink a glass of water to keep yourself hydrated.

40 minutes after food- It is good to drink warm water to digest the fat from your food.

Drink only when you're thirsty otherwise. 

Always sit down while you drink water.


THIS IS ONLY FOR INFORMATION, ALWAYS CONSULT YOU PHYSICIAN BEFORE HAVING ANY PARTICULAR FOOD/ MEDICATION/EXERCISE/OTHER REMEDIES.                                                                                                                                                                                                                                                                                        PS- THOSE INTERESTED IN RECIPES ARE FREE TO  VIEW MY BLOG-                                                                                           https://gseasyrecipes.blogspot.com/                                                                                                                                                                             FOR INFO ABOUT KNEE REPLACEMENT, YOU CAN VIEW MY BLOG-                                                                                                                             https:// kneereplacement-stickclub.blogspot.com/                                                                                       FOR CROCHET DESIGNS                                                                                                                                                                                                                                 https://gscrochetdesigns.blogspot.com


Labels: , , , , , , , , , , , ,

Friday, October 18, 2013

5 Weird Weight-Loss Tricks That Work

Labels: , , , , , , , , , ,

Thursday, August 29, 2013

15-Best Home Remedies For Common Cold And Cough

Here are 15 best home remedies to fight a cold and cough:-

Ginger tea:
It helps by drying up a running and dripping nose and expels phlegm from the respiratory tract. Also. ginger is known to soothe a common cold to make it bearable and perhaps even speed up the recovery process.

 Milk and turmeric:
Besides ginger tea or masala chai, warm milk and turmeric mixture is a popular and effective way to fight a cough. This mixture is applicable for children and adults too. Turmeric and milk are also healthy ingredients needed for healthy living.Add about 1/2 tsp of turmeric powder in a glass of milk, boil it for about 5 minutes, drink it as hot as possible with little sugar, just before going to bed. Sure to relieve you of cough.

 Lemon, cinnamon and honey
Prepare a syrup of lemon, honey and cinnamon to prevent a common cold. Here’s how to: Put some honey in a pan, fill it to half and use a double boiler until it is thin. Then add a pinch of cinnamon and add lemon. Have this syrup to fight a cold. 

Gargle therapy:
Salt-water gargle is an age-old therapy for cough, but you can also add turmeric to it. Salt and turmeric fight cough and will give you relief that you really need.

 Honey and brandy:
Brandy keeps your chest warm or increases body heat, while honey helps fight a cough. A teaspoon of brandy and honey improves cough.

 Luke Warm Water:
Drink lukewarm water to fight a common cold, cough and sore throat. Drinking warm water reduces the inflammation in the throat. Plus, water helps replenish the fluids in the body and washes out the infection.

 Amla for prevention:
Amla is a strong immunomodulator and protects from the onset of many diseases if taken regularly. It ensures the proper functioning of the liver and improves blood circulation 

Special Spiced tea:
Add tulsi, ginger and black pepper while preparing your tea. These three ingredients play an important role in fighting a common cold and cough.

 Honey, lime juice and warm water:
Lime water or nimbu pani is a perfect dose to improve digestion and for the circulation system. If you add honey to lime water and warm water it can be a solution to controlling cold and cough.

 Flax seeds for cold and cough:
Boil flax seeds until it thickens and strain it. Add a few drops of lime juice and honey. Consume the mixture for cold and cough relief.

 Ginger and salt:
Cut ginger into julians and add salt to it. Chew on these ginger julians to fight cold, cough and a sore throat.

 Ginger- tulsi(basil) mixture:
Take the juice of ginger, crush tulsi leaves to it and add honey. Consume it to get relief from a cough. 

Sauté garlic:
Sauté a few garlic cloves in ghee and consume this when warm. It may sound like a bitter concoction, but it can help you fight the common cold and cough. 

Jaggery(cane/ palm sugar) solution:
Boil water with black pepper, add cumin and jaggery to it. It will give you relief from chest congestion. 

Carrot juice:
It is not a common home remedy to fight a cold and cough, but carrot juice helps to fight a cough. It may be unconventional but it makes an interesting drink. Drink it to prevent cough and reap the benefits of carrot juice


ps- this is only for information, always consult you physician before having any particular food/ medication/exercise/other remedies.

ps- those interested in recipes are free to view my blog-

http://gseasyrecipes.blogspot.com/

for info about knee replacement, you can view my blog-

http://Knee replacement-stick club.blogspot.com/

for crochet designs

http://My Crochet Creations.blogspot.com/

Labels: , , , , , , , , , , , , , , , , , , ,