Friday, April 04, 2025

Microwavable Mitten Warmers

Step 1: Materials

These mitten warmers can be made quickly and easily. This instructable will show you several different methods so you have lots of options depending on your resources and abilities.

Here is a list of supplies you may choose to use:

Essential items:
- mittens (obviously)
- microwave oven
- dry, uncooked rice or lentils - but not popcorn, that's a bad choice.

Choice of cotton fabric:
- old dish towel
- old sock
- old T-shirt
- etc.

One or two of the following items:
- sewing machine
- needle and thread
- fusible webbing
- string
- rubber bands

Step 2: Option One

Option One Option One  Option One

Use a sewing machine to sew a small bag out of some fabric. These ones I made measure about 8cm (3 inches) by 5cm (2 inches).


Begin with a piece of fabric a little wider than you want the finished bag to be, and a little more than twice as long. The extra width is your seam allowance. By the way, you needn't fuss about with a whole lot of cutting, just snip the edge and rip the fabric. Next fold the piece in half with the inside out, and run them through your sewing machine to sew the two sides together. Then turn them right side out, and fill with rice. Tuck the remaining raw edges inside and stitch the opening shut.

Done.

The final thing to do with all these options, is to microwave your finished mitten warmers for between 30 seconds to a minute. The rice will likely have a fair bit of moisture in it so for the first few heatings, so expect the warmers to come out of the microwave a bit damp. If you use basmati rice, like I did, also expect it to smell delicious! You can pop them into your mitts right out of the microwave and enjoy you toasty fingers!

Step 3: Option Two

Option Two  Option Two Option Two

 What? You say you don't have a sewing machine? Well it doesn't take a rocket surgeon to figure out you can do pretty much the same thing as Option One, but do all the sewing by hand. I used a blanket stitch to close up the top seam on mine.

Step 4: Option Three

 Option Three  Option Three  Option Three

Now if you are like me, you're not a big fan of sewing. Well then, let's try to minimize the amount of sewing you need to do.


Find an old pair of socks that you've worn the heels through, but the toes are still in good shape... and make sure they're clean! Lob off the toes to make pockets with enough room to hold the rice. Fill rice into these pockets, and tuck in the raw edges, placing enough fusible webbing between to span the entire opening. Iron this seam together.

Since microwaving these bags will melt the fusible webbing, you need to stitch along the seam. Socks tend to be quite stretchy and the fusible webbing helps stabilize the fabric while you sew it, however you could do without it if you prefer.

Step 5: Option Four

Option Four   Option Four  Option Four

 Option Four  Option Four

What's that? You say you suffer from [http://www.phobia-fear-release.com/aichmophobia.html" aichmophobia] and don't want to sew anything at all? Try this: Either fill the toes of old socks with rice like the previous option, or make a satchel out of an old dishtowel or T-shirt.

One way to make a satchel is to take a square of fabric and push some of it down into one hand that you can fill with rice. Gather up the loose ends over top and tie off with some string. Try not to make the satchel too tight; keep it a little slack. Then just trim off the excess and use.

Step 6: Option Five

 Option Five  Option Five  Option Five

Option Five  Option Five  Option Five

So you never quite managed to learn the whole tying-string-together thing, eh? Not to worry, use rubber bands instead of string. Wrap the rubber band as tightly as possible around the open end of the sock, or satchel.

Step 7: Option Six
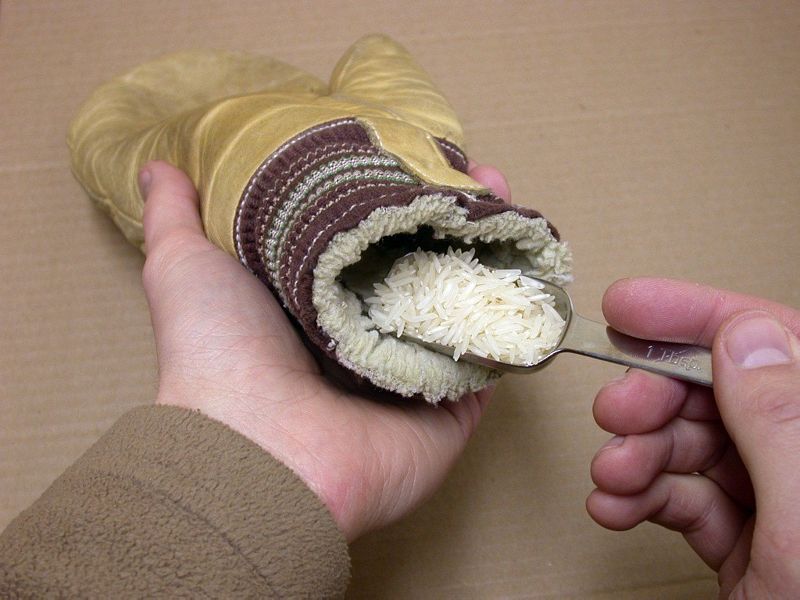
 Option Six

Still too complicated for you? (sigh...) Okay then, just put some rice in a bowl, heat it up in the microwave, and then pour it into your mittens.

Sure the rice will be loose in your mitts and you'll probably loose some if you raise your hand to wave at a friend, but this is absolutely the fastest and easiest mitten warmer I can think of to keep your fingers from freezing when you are outside.


This is only for your information, kindly take the advice of your doctor for medicines, exercises and so on.   

Labels: , , , ,

Monday, August 23, 2021

Myths about Food Safety You Shouldn’t Believe

There are a lot of misconceptions about food safety we have been blindly believing for years now. Perhaps because we are bombarded with so much information and despite having a wealth of information available to us at our fingertips, many of us tend to ignore certain food safety and safe food handling practices. Food storage, cooking, cleaning, and eating are an essential part of our lives and hence it’s important to not be fooled by any misconceptions related to food safety.

Here, we have attempted to debunk some common food safety myths that you should always keep in mind.

Myth 1: If the food looks and smells fine, it’s good to eat
Food Safety Myths, smelling food
A lot of us do this. We just take a whiff of the food we are about to eat, and if it smells and looks fine, we don’t think much about eating it right away. That can be risky, though. 
 
Some bacteria, molds, and yeasts can change the look, flavor, smell, or texture of food, and then it's easy to tell if it’s gone bad. However, harmful bacteria can only be seen under the microscope, and several types of bacteria that do cause illness don’t always affect the taste, smell, or appearance of food. That’s why you must pay attention to how you store food. If, for example, you aren’t sure how long a leftover food has been kept in the refrigerator, then don’t take the risk – just toss it out. Just because that 5-day old milk or soft apple smells okay, doesn’t mean it actually is. 
 
Myth 2: The microwave will kill all bacteria in the food
Food Safety Myths, microwave
Many of us assume that heating food in the microwave oven will instantly kill all bacteria in it and make it safe to eat. 
 
While it’s true that the heat in microwaves can kill bacteria, they can’t be 100% relied upon for your food’s safety. That’s because foods with uneven shapes or variants in thickness might seem cooked by the microwave but they still might be cold spots left in the food, where harmful bacteria can survive. We've all experienced that 'cold spot' at times. So, even if you’re using a microwave to heat the food, it doesn’t automatically mean that it’s safe and you, therefore, must not neglect any aspect of food safety.  
 
Myth 3: You can’t drink milk past the date on the carton  Food Safety Myths, milk
Don’t toss out that carton of milk just because it’s gone by “best before” date. This happens since we often get confused between a “best before” date and a “use by” date. The “best before” date is more a recommendation and most research suggests that properly stored unopened milk is safe to consume up to a week after that date. Opened milk, meanwhile, can last at least 2–3 days past that date. However, milk shouldn’t be taken past its “use by” date, as it could have grown harmful bacteria and can make you sick.
 
Myth 4: The last food you ate is what caused you food poisoning
Apart from some toxins and viruses, most harmful microorganisms usually take a few days to make you sick. Symptoms of food poisoning typically take 1-3 days to develop and can even take as long as three weeks to fully take hold. So don’t be quick to blame your stomach illness on that sushi you had at a restaurant last night for you may have gotten sick from something you ate a few days ago. Also, the underlying cause of the symptoms might not be food poisoning at all. If you feel you have a food-borne illness, seek medical attention.

Myth 5: You don’t need to wash produce if you are going to peel it
Even if you do not plan to eat the skin of the fruit or vegetable, it’s always a good idea to wash it first before consuming it. The reason being that dirt and bacteria can easily be transferred from the surface when peeling or cutting produce, according to the U.S. Food and Drug Administration (FDA). 
 
Here’s another story that will make sure you wash your produce before eating. In 2011, an outbreak of salmonella from cantaloupe was traced to germs clinging to the melon's rinds and transferred to the flesh inside when the fruit was cut. Bacteria can stick easily to the rough surface of fruits like cantaloupes. And even a small amount of bacteria can be dangerous if it reaches the inside of firm fruits such as melons and cucumbers. 
 
Food experts hence recommend scrubbing their rind with a clean vegetable brush and washing your hands with soap and warm water afterward.
 
Myth 6: As long as you cut off the mold, the rest of the food is fine 
Don’t be under the assumption that if you cut or scrape the mold out of food, the remaining part will be safe to eat. That’s not always true. Moldy bread, especially, is better off thrown away as the mold is more likely to be growing beyond the areas you can see. Molds usually extend deep into the food and merely scraping off the visible part won’t make the food safe to eat. 
 
However, molds have a hard time growing inside firm fruits and vegetables. So if you cut off at least an inch around the spot of mold in the affected fruit or veggie, you can still eat it. Just make sure that you wash the knife properly afterward to avoid cross-contaminating your produce.
 
Myth 7: It’s safe to eat raw cookie dough/cake mix
Food Safety Myths, raw cookie dough
While making cookie dough, it's hard to can’t resist licking the batter from the spoon. It might be yummy, sure, but it’s not safe. The Centers for Disease Control and Prevention (CDC) has stated that raw dough can contain germs that make you sick. While there’s a risk of the bacteria in uncooked eggs too, there have been incidents in the recent past of two outbreaks of E. coli infections linked to raw flour as well. The CDC believes that since raw flour hasn’t been treated to kill germs, it might well be contaminated in the field or at other steps during flour production. Bacteria are completely eliminated only when food made with flour is cooked. This is why you should avoid eating raw dough or batter.

Myth 8: Plastic chopping boards are safer than wooden ones
It’s commonly believed these days that plastic cutting boards are much safer than wooden ones. This belief stems from the idea that since they are easier to clean and sanitize, plastic boards are safer to use. Experts say that although plastic boards are definitely easier to clean, cutting on them also leaves lots of grooves where bacteria can hide. And while the wooden boards are tougher to sanitize, there aren’t many deep scratches on their surface and therefore they can actually be more sanitary in the long run.
 
So as long as you are thoroughly sanitizing both the chopping boards, there’s not much difference between them. A good way to clean both types of boards is to pour a solution of 1 gallon of water mixed with 1 tablespoon of bleach on their surface and let them dry. This will stop moisture-loving bacteria from growing on them.

This is only for your information, kindly take the advice of your doctor for medicines, exercises and so on.   

https://gscrochetdesigns.blogspot.com. one can see my crochet creations  
https://gseasyrecipes.blogspot.com. feel free to view for easy, simple and healthy recipes    
https://kneereplacement-stickclub.blogspot.com. for info on knee replacement

Labels: , , , , , , , , , , ,

Sunday, May 17, 2020

6 Surprising Face Mask Cleaning Mistakes to Avoid

Cloth face masks have quickly become a new and essential piece of the wardrobe, and people are still learning their way around this new addition to their daily life. We have already explained how you can determine if your face mask needs replacing, and we have shown you how to make a cloth face mask at home. In this article, we’ll focus on cleaning face masks effectively, as it turns out, there are several wrong ways to do so, which could ultimately make your mask less effective at protecting yourself and others from the Novel Coronavirus. We’ll highlight 6 common face mask laundry mistakes and explain what you can do instead.

1. Cleaning Your Face Mask Too Rarely


Reusing your cloth face mask throughout the day is fine, especially if you’re having an active day full of errands and keep running in and out of the house. However, you must wash your mask every day and every time you contaminate the face mask by touching it with your hands, for example. Reusing the mask too much without washing will render it less effective at protecting you and others from the Novel Coronavirus, and it will also increase your risk of skin rashes and irritation from a face mask.

Needless to say, this means that you should own several face masks and wash these regularly to always have at least two clean masks on hand. Get in the habit of replacing your masks daily, as well as carrying an extra clean mask in your bag just in case.

2. Not Using Detergent When Cleaning Your Masks
Soap remains one of the most effective killers of the Novel Coronavirus, as well as other germs and grime that accumulates on the mask throughout the day. Baking soda and vinegar, on the other hand, cannot destroy the virus on their own, so you have to use some sort of detergent when cleaning your masks, just like you do with your other clothes.
You can wash your face masks together with clothing of similar colors, but we recommend putting your face masks in a laundry bag if you decide to do so to avoid stretching out the elastics or causing snags. Dermatologists point out that you can also use cleaners that contain hydrogen peroxide to destroy any trace of the virus, and also that you should choose hypoallergenic detergents for your face masks if you find that regular detergents irritate your skin.

3. Washing Your Masks in Cold Water
Heat also kills many germs, including the SARS-CoV2 virus that causes COVID-19. Doctors point out that water hot enough can kill the Novel Coronavirus in just 10 minutes, but the temperature must be at least 140°F (60°C). If you rarely wash your clothes at such high temperatures because you’re afraid they will lose color or shrink, no need to worry, a combination of detergent and slightly less hot water will also be able to exterminate the virus.

4. You’re Overdoing It With the Bleach

It’s definitely true that bleach can annihilate COVID-19, but using too much of it isn’t always a great idea, as it can make cloth fibers thinner and weaker, and if you’re not careful, it can bleach out your clothing or face masks, rendering them unusable. With different cleaning options available, you should reserve bleach as a last resort.
If you do want to use bleach, here are the proportions you ought to follow: dilute 1 teaspoon of bleach in 4 cups of water and soak your mask in the solution for 1 hour to render it germ-free. For more information on how to handle bleach when disinfecting your home, click here: How to Kill Germs with Bleach in a Few Easy Steps.

5. You’re Microwaving Your Masks

There is a popular face mask hack circling around the internet these days that suggests you can disinfect your face mask by simply microwaving it like you would with a kitchen sponge. However, this hack isn’t as effective as people make it out to be, and in addition to that, it can be dangerous.
If you have any kind of underwire or metal pieces in a face mask, which is rather common both in disposable and reusable face masks, it can potentially melt and cause sparks in a microwave, and even cause a fire and ruin your microwave oven. Instead, simply wash your reusable masks in the washing machine or by hand using detergent or bleach, and avoid reusing single-use face masks.

6. Just Air-Drying Your Face Masks

Air-drying face masks isn't bad per se, but if you're looking for maximum effectiveness, we recommend using the dryer on the maximum setting to sanitize the masks completely, as any humid areas could potentially harbor germs. If you don’t own a dryer, you can also iron the masks after air-drying completely. When it comes to storing clean face masks, doctors recommend having a separate clean container or bag for the masks.


This is only for your information, kindly take the advice of your doctor for medicines, exercises and so on.     

https://gscrochetdesigns.blogspot.com. one can see my crochet creations  
https://gseasyrecipes.blogspot.com. feel free to view for easy, simple and healthy recipes    
https://kneereplacement-stickclub.blogspot.com. for info on knee replacement

Labels: , , , , , , , , , ,