Saturday, March 23, 2019

Doctors Wired a Prosthetic Hand Directly Into a Woman’s Nerves

In a world first, doctors in Sweden  a prosthetic hand directly into a woman’s nerves, allowing her to move its fingers with her mind and even feel tactile sensations.

The hand is an enormous step up from existing prostheses, which often rely on electrodes placed on the outside of the skin — and it could herald a future in which robotic devices interface seamlessly with our bodies.

Nerve Case

Researchers created the prosthetic hand as part of DeTOP, an ambitious European research program on prosthetic limbs.

Surgeons anchored the hand to the woman’s forearm bones using titanium implants. They connected an array of 16 electrodes directly to her nerves and muscles, allowing her to control the hand with her mind — and, according to photos, use it to tie shoelaces and type on a laptop computer.
“The breakthrough of our technology consists on enabling patients to use implanted neuromuscular interfaces to control their prosthesis while perceiving sensations where it matters for them, in their daily life,” said the researchers.

Electronics wired straight into a human nervous system allow for mind-bending new ways to interact with technology. A video released by the Swedish researchers even shows the woman using the implant to flex a virtual hand on a computer screen — before the actual physical hand was installed.
For decades, cyborg limbs like those depicted in “Star Wars” or “Neuromancer” seemed relegated to the realm of science fiction. New research shows that they’re already here — just not yet widely available.

THIS IS ONLY FOR INFORMATION, ALWAYS CONSULT YOU PHYSICIAN BEFORE HAVING ANY PARTICULAR FOOD/ MEDICATION/EXERCISE/OTHER REMEDIES.                                    PS- THOSE INTERESTED IN RECIPES ARE FREE TO  VIEW MY BLOG-                                                                                           https://gseasyrecipes.blogspot.com/                                                                                                                                                         FOR INFO ABOUT KNEE REPLACEMENT, YOU CAN VIEW MY BLOG-                                                  https:// kneereplacement-stickclub.blogspot.com/           

                   FOR CROCHET DESIGNS                                                                                                                                                                                                  https://gscrochetdesigns.blogspot.com


Labels: , , , , , , , , , , , , , , ,

Saturday, March 02, 2019

Type 2 diabetes -acupressure points to help treat diabetes and control blood sugar levels

Type 2 diabetes is one of the most widespread lifestyle diseases in the world. It affects millions in India alone. Type 2 diabetes requires the patient to be extremely particular about what they eat to make sure their blood sugar levels stay normal and under control. A spike in blood sugar can be quite dangerous for the person.
A healthy diet and exercise to control weight is the key to keep diabetes and its symptoms under control. However, ancient Asian technique of acupressure can also help in treating and controlling diabetes so that it does not interfere with your normal routine. Here are some pressure points you can try to relieve symptoms of diabetes and improve insulin use in the body.

Spleen point

Spleen Point is situated in lower leg. The Lower Leg Point is directly connected with the Spleen. Move towards the lower side of your leg to find Acupressure spleen pressure point. You can find the exact spot of Acupressure Spleen Point in behind the Shinbones. The Spleen Point is at above side of ankle bones.
Applying firm pressure on Spleen Point for at least 3 minutes a day will give you relief in Spleen related problems.
Acupressure Points for Diabetes control

Knees

Pressure points are located both on the front and the back of the knees. Massaging the area around 2 cm below the knee or pressing the point right behind the knee can help improve digestion and keep weight regulated. This point is also believed to control ageing.
 knee-diabetes-point

Thumb and index finger joint

The thumb and index finger joint is a popular acupressure point for the benefits it has. 5 minutes of pressing and massaging the point can improve digestion and therefore help in weight loss, extremely important to control diabetes. 
 http://www.acupressurepointsfor.com/files/wp-content/uploads/2014/09/point-1.png

Feet pressure points

Similar to the thumb and index finger joint, the joint between the biggest toe and the next is another pressure point. This point helps in the treatment of insomnia, diabetes and hypertension. Press and massage the point for 5 minutes every day for best results.
 feet-acupressure-point-toe

Hand pressure point

This point is located on your wrist, right below where you palm ends, towards your pinky finger. This point works towards reducing stress and controlling emotions. One cause of weight gain and diabetes is stress and this point can help in managing it better.
point 2

Near the calf of your leg
knee-acupressure-point
This point is basically a little below the back part of your knee and above the calf of your leg. This acupressure point is connected to the urinary bladder which helps clearing impurities in the body. Problems regarding excess urination and others are common with diabetic people and applying pressure on this point for about three to five minutes shall help reducing such problems.


Kidney Point (Inner Foot Point):
Best Acupressure Points for Diabetes
Kidney Point is situated in inner side of Foot. Find Acupressure Kidney Point exact between the Ankle bone and Achilles muscle. Find the Kidney Point spot and apply pressure for 3 minutes every day. Applying regular pressure on Kidney Point will help you to improve the functioning and develop production of insulin in body.

Stomach Point (Inner Lower Leg Point):
Image Source: quizlet.com

Stomach Point is also very effective. You can find Acupressure Stomach Point in the inner side of lower leg. The exact point of Stomach Point is about eight centimeters on upper side of outer malleolus. Malleolus is the bony protuberance on either side of the ankle, at the lower end of the fibula. Find the Stomach Point and apply pressure firmly on the point spot to get rid of unnecessary toxins from the body.

Urinary Point:
Diabetes Acupressure Points
Urinary Point is very important for Diabetes treatment. The person, who is suffering from Diabetes, must have urinary problem. Acupressure Urinary Point is helpful to decrease urinary related troubles. Urinary Point is located on backside of Knee cap. The exact place for Acupressure Urinary Point is behind the knee cap at center in leg. The picture of Urinary Point is presented below. Apply pressure on Urinary Point for 5 minutes on a regular basis to get benefits like relief in Additional Urination and other associated problems.

Big Toe Point:
Acupressure Points for Diabetes Relief
Big Toe Point is very useful pressure point for Diabetes. Acupressure Big Toe Point is situated on Big Toe of your Foot. Find the pressure point on Big Toe as shown in picture. Apply firm pressure on Big Toe (in both feet, one by one) every day. Applying proper pressure on Big Toe Point with your fingers will help you to cure / remove various symptoms of Diabetes.

Arthritis Point:
Acupresure Knee Point for Diabetes
Arthritis Point is situated below the Knee. The Arthritis Acupressure Point is exactly situated at 2 centimeters distance in below side from the Knee. Find the Arthritis (Below Knee) Point as shown in the picture below. Apply mild pressure on Arthritis Point for 5 minutes in daily routine to get relief in Arthritis, burning in stomach, indigestion problem and other problems.

THIS IS ONLY FOR INFORMATION, ALWAYS CONSULT YOU PHYSICIAN BEFORE HAVING ANY PARTICULAR FOOD/ MEDICATION/EXERCISE/OTHER REMEDIES.                                    PS- THOSE INTERESTED IN RECIPES ARE FREE TO  VIEW MY BLOG-                                                                                           https://gseasyrecipes.blogspot.com/                                                                                                                                                         FOR INFO ABOUT KNEE REPLACEMENT, YOU CAN VIEW MY BLOG-                                                  https:// kneereplacement-stickclub.blogspot.com/           

                                                                           FOR CROCHET DESIGNS                                                                                                                                                                                                  https://gscrochetdesigns.blogspot.com

Labels: , , , , , , , , , , , , ,

Friday, February 08, 2019

Doctors Wired a Prosthetic Hand Directly Into a Woman’s Nerves

In a world first, doctors in Sweden say they've wired a prosthetic hand directly into a woman’s nerves, allowing her to move its fingers with her mind and even feel tactile sensations.
The hand is an enormous step up from existing prostheses, which often rely on electrodes placed on the outside of the skin — and it could herald a future in which robotic devices interface seamlessly with our bodies.

Researchers created the prosthetic hand as part of DeTOP, an ambitious European research program on prosthetic limbs.

Surgeons anchored the hand to the woman’s forearm bones using titanium implants. They connected an array of 16 electrodes directly to her nerves and muscles, allowing her to control the hand with her mind — and, according to photos, use it to tie shoelaces and type on a laptop computer.

“The breakthrough of our technology consists on enabling patients to use implanted neuromuscular interfaces to control their prosthesis while perceiving sensations where it matters for them, in their daily life,” a researcher said in a press release.

Virtual Light

Electronics wired straight into a human nervous system allow for mind-bending new ways to interact with technology. A video released by the Swedish researchers even shows the woman using the implant to flex a virtual hand on a computer screen — before the actual physical hand was installed.
For decades, cyborg limbs like those depicted in “Star Wars” or “Neuromancer” seemed relegated to the realm of science fiction. New research shows that they’re already here — just not yet widely available.

THIS IS ONLY FOR INFORMATION, ALWAYS CONSULT YOU PHYSICIAN BEFORE HAVING ANY PARTICULAR FOOD/ MEDICATION/EXERCISE/OTHER REMEDIES.                                    PS- THOSE INTERESTED IN RECIPES ARE FREE TO  VIEW MY BLOG-                                                                                           https://gseasyrecipes.blogspot.com/       
                                                                                                                                                                      FOR INFO ABOUT KNEE REPLACEMENT, YOU CAN VIEW MY BLOG-                                                  https:// kneereplacement-stickclub.blogspot.com/           
                                                                           FOR CROCHET DESIGNS                                                                                                                                                                                                  https://gscrochetdesigns.blogspot.com

Labels: , , , , , , ,

Tuesday, October 09, 2018

Exercises for Rehabilitating and Strengthening the Hand

Many people suffer from an inability to move their hand and use it as they had in the past, often after a tendon injury, stroke, or other injuries, and sometimes just because of natural aging. People who suffer from this condition occasionally try to use their hands as before and fail, and as a result, lose hope. However, do not despair, because there are some exercises that you can start regularly, starting today, to strengthen and restore your hand, and they are all recommended by occupational therapists. Here are 9 exercises that are divided into 3 levels of difficulty, choose your set based on your hand’s strength level. In the end, you will also see a video that fully demonstrates how each exercise is performed as well as more level 1 exercises that are suitable for everyone.
hand exercises

Level 1 exercises for hand rehabilitation

If you have difficulty performing simple hand movements, these are the exercises you should start with. For them, you will only need a table, and your strong hand to help you work your weak hand until it can do the exercises on its own.

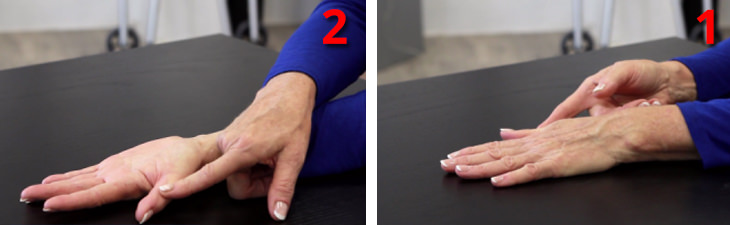
1. Palm up and down

hand exercises
  • Place your weaker palm on the table facing downward.
  • Use your stronger hand to flip your palm upward. Use only your stronger hand’s fingers when assisting.
  • Flip your palm back with your strong hand and repeat 10 times.                               

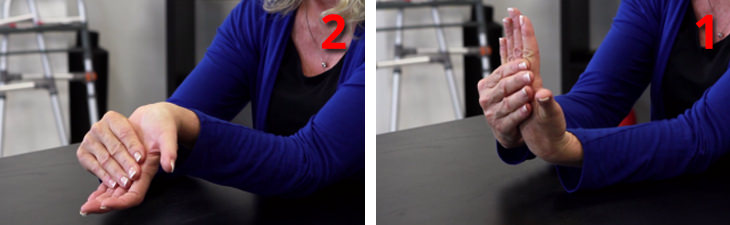
    2. Bend the wrist up and down

    hand exercises
    Place your elbow on the table and use your stronger hand to stretch the wrist up and down.
    Perform the exercise slowly 5 times.

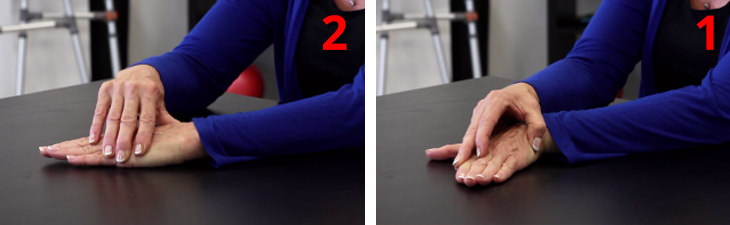
    3. Bend the wrist to the sides
    hand exercises
    • Place the weak palm on the table facing downward.
    • Use the stronger hand to move the weaker hand from side to side. Make sure the movement is done from the wrist.
    • Repeat the exercise slowly 5 times.

    Level 2 exercises for palm rehabilitation

    After you’ve achieved some control over your weaker hand, proceed to level 2. For these exercises, you’ll need a table, pen and a small bottle filled with water. Note that even at this level, it is still recommended to perform level 1 exercises as a warm-up

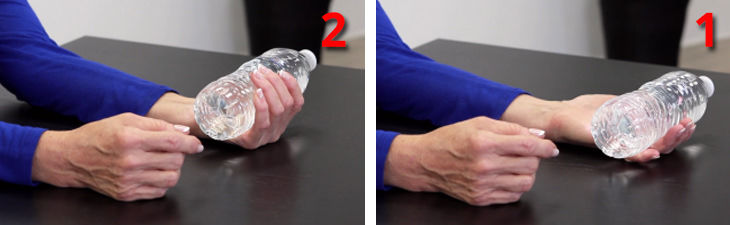
    1. Finger bending

    hand exercises
    • Place your weaker palm on the table, facing up.
    • Place a small bottle filled with water on your palm and keep your fingers relaxed.
    • Slowly bend your fingers to catch the bottle, then release.
    • Repeat the exercise 5 times.

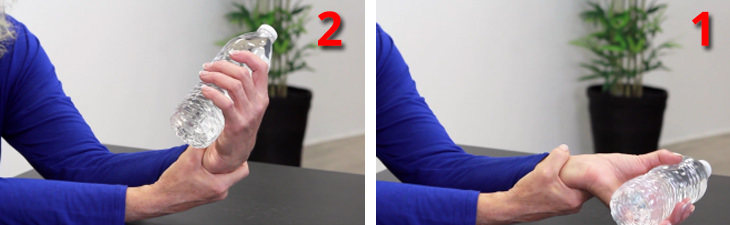
    2. Wrist curl

    hand exercises
    • Put your elbow on the table, hold a bottle in your weak hand, and hold the weaker hand’s arm with your stronger hand.
    • Bend the wrist upward and then release it slowly.
    • Repeat the exercise 10 times.

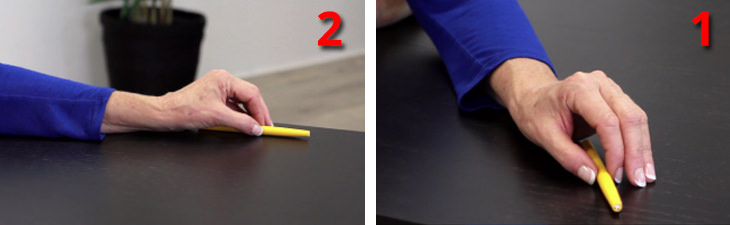
    3. Grip and release

    hand exercises
    • Place a pen on the table and hold it with your weak fingers.
    • Then, slide the pen on the table from one side to the other, and release it.
    • Make sure your fingers gently grip the pen and use as little force as possible to move it.
    • Repeat the exercise 5 times.

    Level 3 exercises for palm rehabilitation

    These exercises are a bit more complex, and if you can do them you can regain control of your hand. They may be a little challenging, but the results will be very good. For them, you will need a table, a pen, and 8 coins.

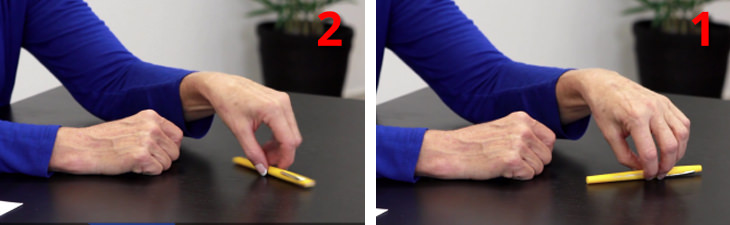
    1. Pen spin

    hand exercises
    • Place a pen on the table and use your thumb and index finger to spin it.
    • Try not to move your shoulder during the exercise, although you will be tempted to do so. You should use only your thumb and index finger.
    • If you can, try to slowly pick up the speed.
    • Spin the pen quickly for 15 seconds.

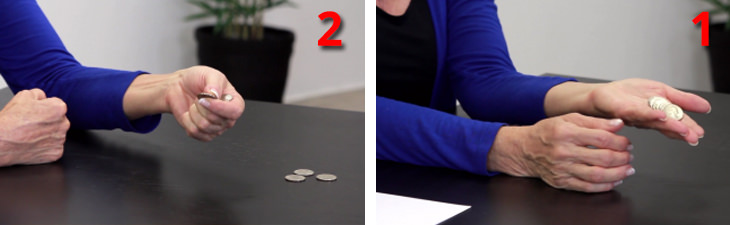
    2. Coin drop

    hand exercises
    • Start by placing eight coins in a row on your weaker hand’s palm.
    • Use your thumb to slide one coin so you can catch it with your index finger and thumb.
    • Place the coin on the table and continue to do so with the other coins.

    3. Finger curl

    hand exercises
  • Place the elbow of the weaker hand on the table, and bend it so that your palm is at shoulder height.
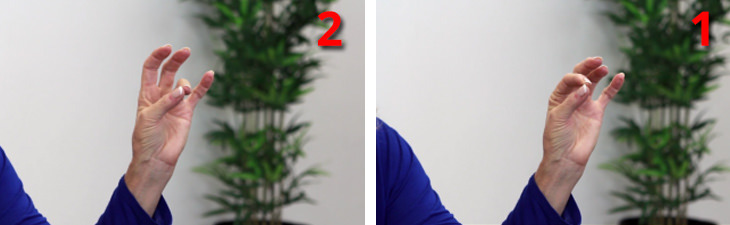
  • Make the OK sign by bringing your thumb and index finger together, press and release.
  • Repeat this with your middle, ring and pinkie finger, and do it 7 times in total with each hand.                                               

    THIS IS ONLY FOR INFORMATION, ALWAYS CONSULT YOU PHYSICIAN BEFORE HAVING ANY PARTICULAR FOOD/ MEDICATION/EXERCISE/OTHER REMEDIES.                                                                                                                                                                                                                                            PS- THOSE INTERESTED IN RECIPES ARE FREE TO  VIEW MY BLOG-                                                                                           https://gseasyrecipes.blogspot.com/   

      FOR INFO ABOUT KNEE REPLACEMENT, YOU CAN VIEW MY BLOG-                                                                                                                                https:// kneereplacement-stickclub.blogspot.com/                              

    FOR CROCHET DESIGNS                                                                                                                                                                                                                                 https://gscrochetdesigns.blogspot.com

Labels: , , , , , , , , , ,

Tuesday, April 03, 2018

8 Children’s Skin Rashes That You Should Be Familiar With

Children are in the developmental stages during their childhood, and there are certain systems that don’t function at the peak of their ability until they grow older. This causes children to be particularly susceptible to infections, and their immune system can react severely when exposed to different substances they have not yet come in contact with.
 
Sometimes the immune system doesn’t respond adequately, and the results can be seen on the child's skin in the form of rashes. In order for you to differentiate between different types of rashes and how to treat them, it is important that you become familiar with the following 8 rashes and whether you need to go to the doctor if they appear.

1. Contact Dermatitis

Symptoms
  • Small blisters with flaking in the irritated area (common areas are neck, waist, groin, and any place in the body that comes in direct contact with any substance)
  • In some cases, pustules are formed that store fluid and may be burdensome (in both cases the inflammation isn’t contagious, but is specific to the child and the area that is inflamed on their body)
Causes
As can be seen from its name, contact dermatitis is created after prolonged contact with a substance that causes skin irritations, such as a garment label, bracelets, creams, etc. In infant’s, contact dermatitis appears when they drool a lot, causing irritation of the chin and the appearance of blisters with dry skin.
Prevention and treatment
To prevent contact dermatitis, try to prevent contact between your child's skin and irritating items. Remove clothing labels, coat metal jewelry with a protective material, and apply face cream to your child’s chin so that there is no direct contact between their drool and their skin. If you are not aware of any allergies to this substance, you may apply 1% hydrocortisone, which doesn’t require a prescription or any other ointment recommended by their pediatrician after being checked.

2. Coxsackievirus/hand foot and mouth disease

Symptoms
  • High fever
  • Red and painful rash on the fingers and toes (not itchy)
  • Sores on tongue, throat and inner cheeks
  • In severe cases, complications can be caused by the virus due to viral meningitis, which is also manifested in headaches and neck stiffness
  • Decreased appetite
  • Difficulty in swallowing due to the formation of blisters
Causes
Coxsackievirus is caused by exposure to it by physical contact, sneezing, or exposure to fecal particles in public areas. Because this virus has several strains, a child can be infected several times, with children under the age of five at a particularly high risk of this. However, children over these ages and adults won’t exhibit symptoms. The spread of the Coxsackievirus is particularly high during hot days, so it is best to keep your hygiene especially during the spring and summer months.
Prevention and treatment
As with most viruses, there is no medication for this disease other than rest and plenty of fluids. In order to reduce the fever, you can give your child medicine and make sure they drink to avoid dehydration. Maintaining proper hygiene and washing hands after contact with people or substances is important to prevent this disease.

3. Eczema 

Symptoms

  • Patches of red, dry and itchy skin with small bumps that appear first on the face or scalp (these patches can spread to other areas like the elbows, arms, wrists, and legs)
  • Itching in areas that are inflamed on the skin
Causes
Doctors are unsure about the specific causes of eczema, but it is known to accelerate or appear when inherited, during seasonal allergies, external fever, or stress.
Prevention and treatment
Unfortunately, eczema can’t be prevented, but its symptoms can be treated along with the annoying itch that accompanies it. To do this, it is important to avoid contact with ingredients and items that cause sensitivity and breakouts of the inflamed areas. Most of these substances are perfumed soaps and creams, fragrances (especially those containing alcohol), mold, animal fur, flowers, dust, rough fabrics and certain foods (egg protein is the most common component that causes the phenomenon). Dry winter air can also cause an outbreak of eczema, so it is important to keep the skin hydrated by using special creams and washing with mild soap that doesn’t irritate or dry the skin. Doctors usually prescribe corticosteroids to treat eczema, and it is important to consult with them when you have an outbreak

4. Fifth disease

Symptoms
  • Low fever accompanied by symptoms of a cold
  • When the fever begins to pass after a few days, their cheeks become red (as if the child had been slapped).
  • After the redness in the face begins to pass, it spreads to other areas of the body such as the limbs
  • In older children, the disease sometimes comes with joint pain
Causes
Fifth disease is a viral disease caused by being infected with the B19 virus that is common at the end of winter and spring. Children aged 5-15 are particularly sensitive to this virus and are the ones who tend to develop the symptoms characteristic of the disease.
Prevention and treatment
You can prevent the Fifth disease by frequently washing your hands with soap and water or hand sanitizer when necessary. If the child is ill, the stage of the initial cold-like symptoms is contagious, and it is recommended that other children be kept away. When the cheek rash appears, the child moves to the non-contagious stage, but it is still advisable to be extra careful if there are other children around. Children who have contracted the fifth disease will usually not contract it again.

5. Impetigo

Symptoms

  • Red and painful bumps (initial phase)
  • Blisters with yellow-brown membrane (advanced stage)
  • Itching
Causes
The disease is caused by exposure to Staphylococcus or Streptococcus bacteria and is common in children aged 2-6. The bacteria usually penetrate through wounds or cuts and cause unpleasant symptoms, and the disease is most common in the hot summer months.

Prevention and treatment

Also in the case of impetigo, the best way to prevent it is to maintain good hygiene. If your child is injured, clean the wound as quickly as possible to prevent bacteria from entering the skin. When the disease breaks out, doctors prescribe antibiotic drugs depending on the severity of the condition, with creams that are meant for small infected areas, and liquid medicines or pills to treat more severe conditions.

6. Petechiae

Symptoms
  • A rash of tiny dots on the skin in red/purple/brown that appears on the buttocks, limbs and upper trunk
  • Pain in joints including swelling and tenderness in inflamed areas
  • Swelling in soft areas like testicles and palms
Causes
An explosion of tiny blood vessels under the skin that may occur after periods of a severe cough or similar conditions. In severe cases where the rash is found in large areas, it is caused by a blood clotting issue brought on by a viral infection (idiopathic thrombocytopenia purpura (ITP)) or by a bacterial infection of the meningococcus family which causes, among other things, meningitis.
Prevention and treatment
It is possible to prevent meningitis in children by giving them the Hib vaccine, but there is no way to prevent the other causes of Petechiae symptoms. The rash usually goes away by itself, but it is important to consult your doctor about ways to relieve the symptoms that cause it, such as a heavy cough, and also ask for a test to find out if there is a more serious problem hiding beneath the surface which requires treatment.

7. Psoriasis 

Symptoms

  • Protruding red spots on the skin
  • The merging of the dots into a patch on the skin, with a silvery gray top, that is thick and sheds skin (usually on the elbows and knees)
  • In severe cases: patches on the navel, scalp, genitals, and buttocks
  • Nails with faded grooves (sometimes the nails fall off as a result of the disease)
Causes
It is now known that heredity plays a major role in cases of psoriasis, and if one of the parents has the disease, there is a chance that their children will also get it. However, there is no information about the exact cause of this autoimmune disease that causes the production of skin cells at a faster rate than normal, resulting in the formation of scales.

Prevention and treatment

Half of the cases of psoriasis in children are caused by infection, mainly throat infections, so it is important to avoid dirty places or contact with sick children. Hygiene, as always, is very important, and it is recommended to wash your hands or use a hand sanitizer after coming in contact with strangers or other children. Regarding treatment, when it comes to cases of psoriasis caused by infection, doctors will often prescribe antibiotics. In other cases, they will prescribe corticosteroids to relieve the symptoms and irritation of the skin, but today there is no drug that completely eliminates the disease.

8. Roseola

Symptoms
  • High fever
  • Symptoms reminiscent of colds
  • Decreased appetite
  • Restlessness 
  • A pinkish-red rash that doesn’t itch, on the upper body that may spread to the face and limbs (occurs after fever goes down)
  • About 15 percent of children with roseola have a seizure from the high fever. The seizure lasts about 2 minutes and doesn’t endanger the child, but it is important to consult your doctor if this happens to your child
Causes
Roseola is caused by exposure to the virus that spreads through a cough. It is common in children between the ages of 6 months and 2 years and usually does not recur afterward. After exposure to the virus, it is incubated in the body for two weeks until symptoms appear.

Prevention and treatment

If you know that a child in your child's environment is sick with roseola, avoid contact between them and try to prevent the sharing of food or drink in these cases. Keep your children's hands clean and make sure they don’t put them in their mouth if they are exposed to the virus. Because roseola is caused by a virus, there is no antibiotic or medication for it, and doctors will recommend medicine to reduce the fever until the rash disappears.

 THIS IS ONLY FOR INFORMATION, ALWAYS CONSULT YOU PHYSICIAN BEFORE HAVING ANY PARTICULAR FOOD/ MEDICATION/EXERCISE/OTHER REMEDIES.                                                                                                                                                                                                      PS- THOSE INTERESTED IN RECIPES ARE FREE TO VIEW MY BLOG-                                                                                           https://gseasyrecipes.blogspot.com/   
FOR INFO ABOUT KNEE REPLACEMENT, YOU CAN VIEW MY BLOG-                                                           https:// kneereplacement-stickclub.blogspot.com/                              

FOR CROCHET DESIGNS                                                                                                                                                                                                                                         https://my crochet creations.blogspot.com/


Labels: , , , , , , , , , , , , , , , ,