Thursday, March 19, 2020

8 Pressure Points For Kidneys
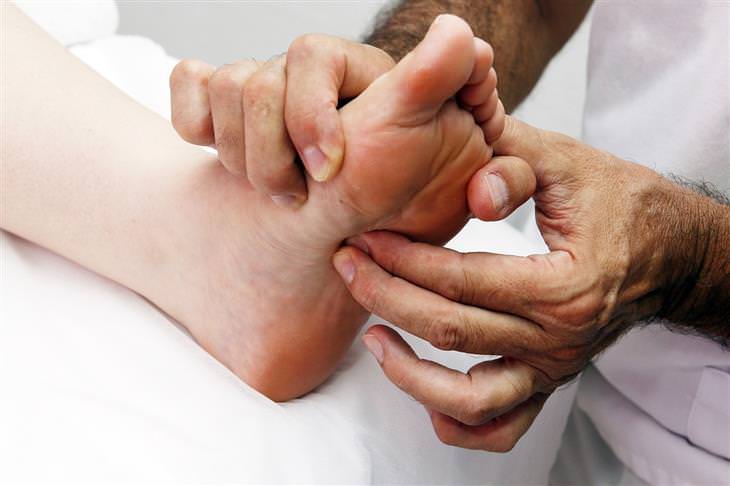
The kidneys are a vital part of the human body. Most people know that their main function is to remove waste products and excess fluid through urine, but they also produce and secrete a number of hormones. Therefore, when something is wrong with the kidneys, the problem will exhibit itself in more ways than just through the urine. Of course - if you feel there is a problem in even just one of the kidneys, it is extremely important to seek medical help. Until you do so, it’s handy to know that there are several ways to ease kidney-related pain by applying pressure on certain points in the body.

This list contains 8 anatomical points of pressure, which you can massage depending on the ailment you suffer from. It is recommended to repeat the exercise twice a day.
Please note, this is NOT to be done instead of a doctor’s appointment but only to ease symptoms in the meantime. Pregnant women should AVOID massaging pressure points altogether. 
 
How to Reduce Kidney Related Symptoms Quickly and Easily

To Treat Difficulty Passing Urine

Urinary retention can occur for a number of causes, such as nerve problems, certain medications, or a blockage resulting from benign prostatic hyperplasia in men. To ease the symptoms while waiting to receive medical treatment, you may massage these 2 pressure points:

1. LV8
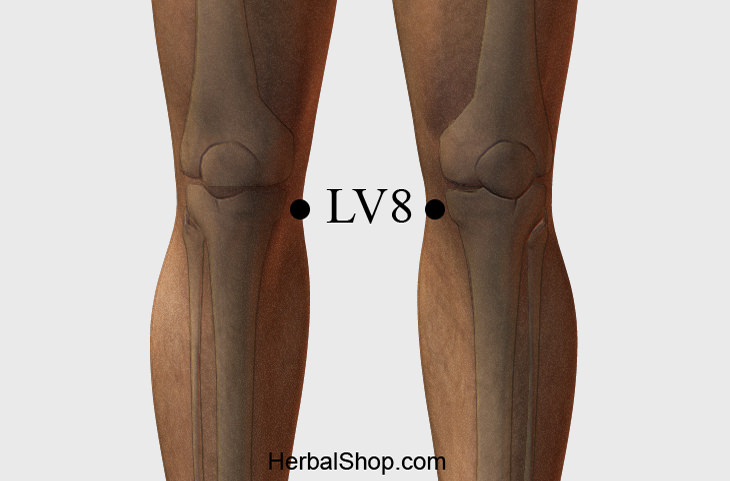
LV8

This pressure point is located on the inner part of your knee joint. Massaging it may also ease pain in the lower abdomen, excessive sweating, insomnia, depression, and skin conditions, such as psoriasis. 

2. UB39
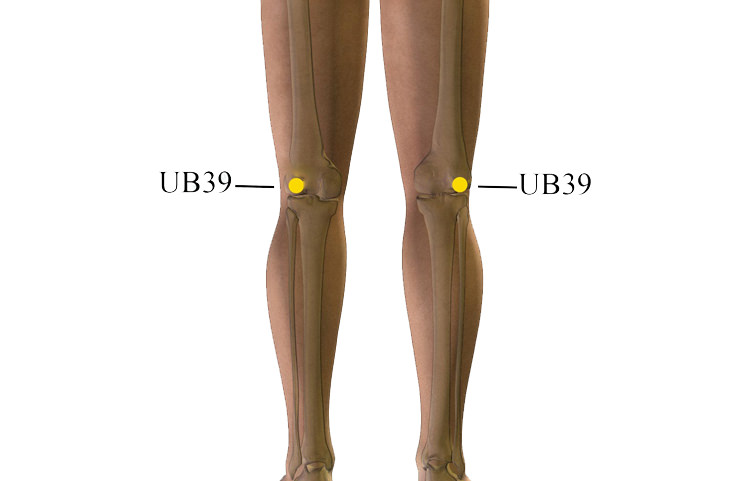
UB39
This pressure point is found on the outer frontal part of the knee. Massaging it not only reduces difficulty in passing urine but also reduces stiffness in the lower back and frequent muscle spasms in the legs and palms. 

To Treat Frequency in Passing Urine

If you have to excuse yourself between 4-10 times a day in order to visit the bathroom - that is completely normal. If it happens more frequently than that, however, it might be best to consult your GP. Frequent urination could point to a UTI, kidney stones, or ovarian cysts. Another likely culprit could be prescription drugs you take on a daily basis. While waiting to receive medical treatment, you may massage these 2 pressure points:

3. CV4
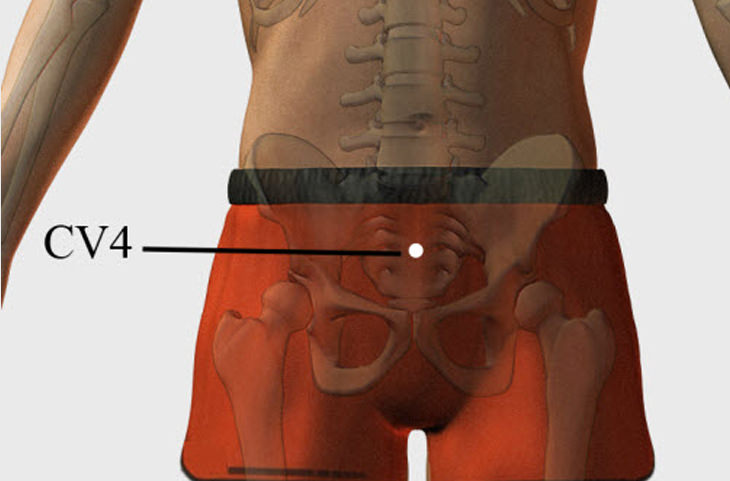
CV4 To Treat Frequency in Passing Urine
This point is located in the center of your pelvis, about 7 cm (3 inches) underneath your belly button. Massaging it may reduce the frequency of your body feeling the need to urinate, as well as help with irregular periods and diarrhea. 

4. K3
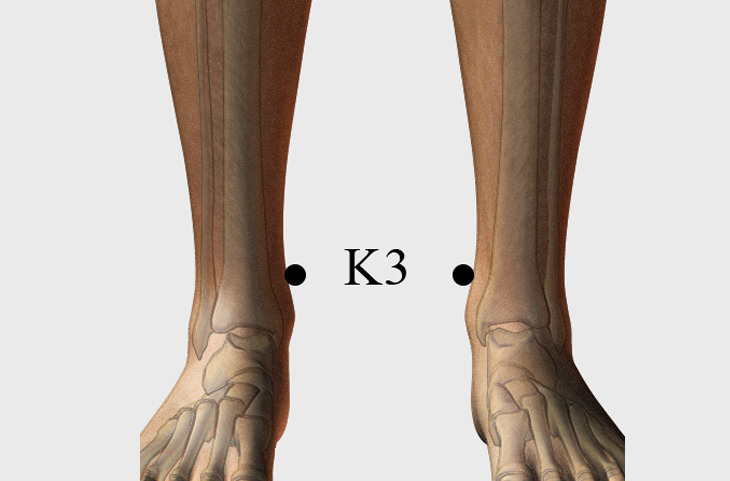
K3 To Treat Frequency in Passing Urine
This point can be found in the dent that’s right above the inner ankle bone. Massaging it can balance the bladder’s need to empty itself as well as ease toothaches, asthma attacks, prevent vomiting and even prevent frostbite.

To Treat Kidney Infections

Pyelonephritis is an inflammation of the kidneys caused by a bacterial infection (typically Escherichia coli). Symptoms include high fever, pain in passing urine, and high resting heart rate. If you suffer from these combined symptoms, it is strongly recommended to seek medical treatment. In the meantime, you may massage these 2 pressure points:

5. LU7
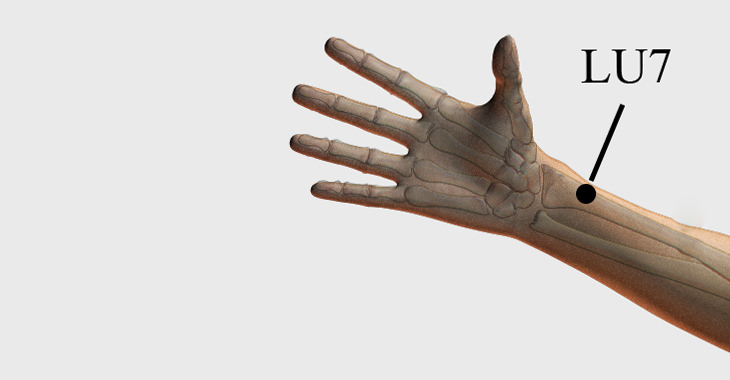
To Treat Kidney Infections: LU7
This point is underneath your wrist. You can measure the exact distance using your thumb. Massaging it may ease kidney inflammation symptoms, migraines, a sore throat and wrist pains.

6. SP10
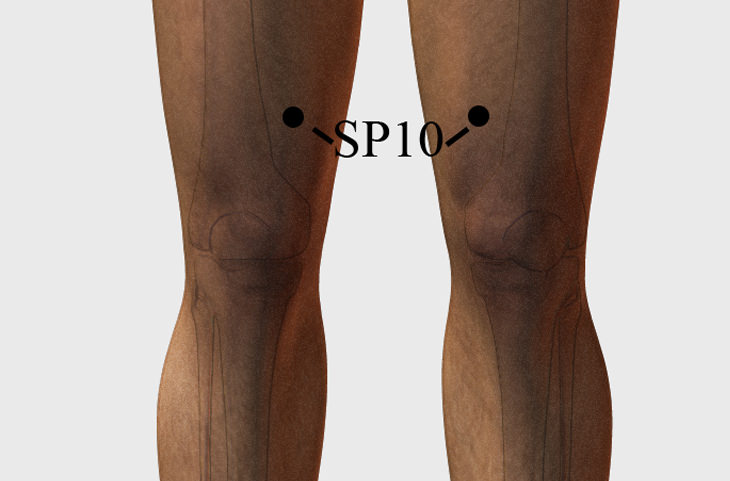
To Treat Kidney Infections: SP10
To find this point, bend your knees and place your palm on the inner part of your knee. You should feel a bump - the pressure point is located three horizontal fingers above the end of the bump, towards the inner thigh. Massaging it helps ease kidney inflammation symptoms, period pain, acne breakouts and it may prevent problems with the thyroid gland.

To Ease Kidney Failure

Kidney failure is a condition in which the kidneys function at less than 15% of normal, and the blood going through them is not filtered properly. The symptoms may include fatigue, loss of appetite and vomiting. Those suffering from complications of severe cases may also experience high blood pressure and high heart rates. Not all symptoms always appear at once, but if you notice any of them, seek medical help immediately. In the meantime, you can massage these 2 pressure points:

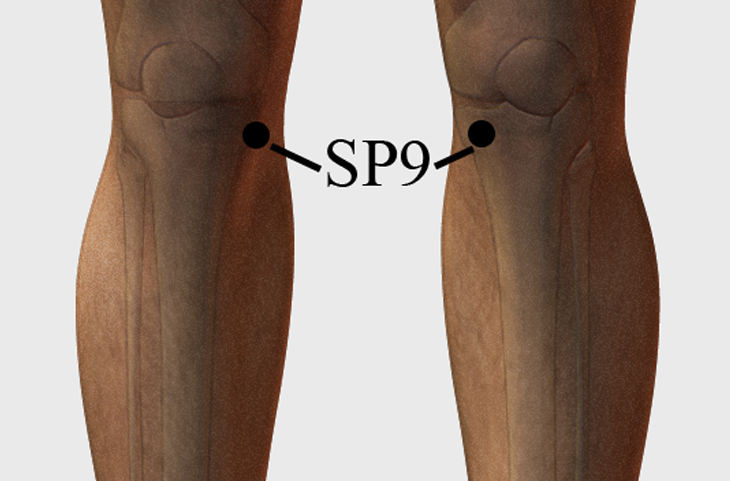
7. SP9

To Treat Kidney Failure SP9
This point is located on the inner part of your leg, right below the knee - you can bend the knee to help you find, it but massage it with your leg straight. Massaging SP9 may improve the kidney’s ability to filter and remove waste, and get rid of excess fluid. Another function of this pressure point is to improve libido.

8. LV5
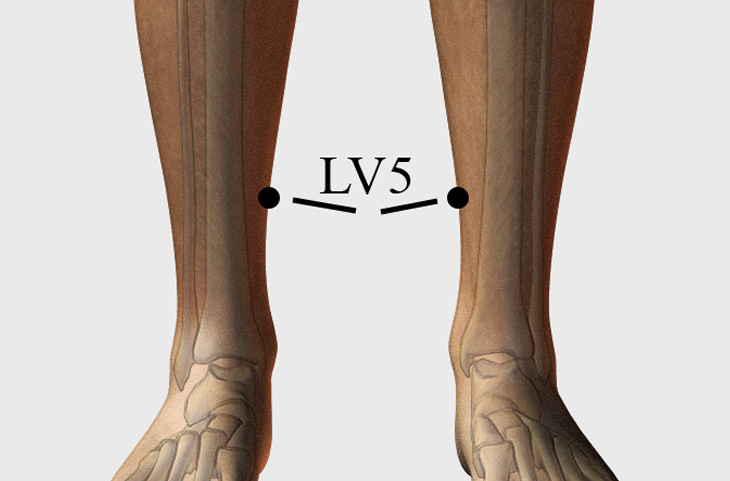
To Treat Kidney Failure LV5
To find this pressure point, place 7 horizontal fingers over the inner ankle bone (tibia). Other than improving the kidney's ability to filter blood, massaging it may also help with chronic fatigue, strengthen the immune system, and ease the side effects of chemotherapy for cancer patients. 
 
This is only for your information, kindly take the advice of your doctor for medicines, exercises and so on.     

https://gscrochetdesigns.blogspot.com. one can see my crochet creations  
https://gseasyrecipes.blogspot.com. feel free to view for easy, simple and healthy recipes    
https://kneereplacement-stickclub.blogspot.com. for info on knee replacement


Labels: , , , , , , , , , , , , , ,

Thursday, January 30, 2020

Pain-Relieving Stretches You Can Do Seated in a Chair

A sedentary lifestyle can leave our joints and muscles aching in need of a good stretch, but many people are limited in time and have other restrictions that make daily exercising a real struggle. No matter if you’re a busy bee toiling away at work all day, a hardworking student, or a senior limited in their range of motion, this seated stretch routine will bring relief from pain and tightness in the muscles and tendons and other musculoskeletal conditions.
All 7  of these beginner-friendly stretches can be done in a chair and are equally simple and effective at relieving pain and tightness in different areas of the body.

1. Neck Stretch

chair stretches Neck Stretch
Needless to say, you can simply tilt your head back and forth or rotate it in circles to loosen up a tight neck, but if you're looking for a deeper stretch, this neck exercise is just what you need. This particular stretch is also very safe, as by raising your arm over the head, you're actually making your upper back straighten up, and this can help prevent your neck from getting hurt.
Directions:
1. Sit up straight and raise your right arm overhead, resting your right palm over the left ear. Try to avoid your right elbow from going forward, as this can strain your neck.
2. Slowly and gently bend your head to the right while simultaneously pressing your head against the right hand. You will start feeling a stretch on the left side of the neck.
3. Hold for 2-3 minutes and then repeat on the other side. You can repeat the stretch as many times as you'd like.  

2. Heart Opener

chair stretches Heart Opener stretch

This is one of the most powerful stretches you can do for your upper body, as it activates your shoulders, arms, and chest muscles, and makes your upper spine straighten up right away, so it is truly a heart opener. This stretch is especially useful for those of you who work at the computer or read a lot, as it is essentially the opposite of hunching forward, so it will bring relief to a stiff neck and aching shoulders, and can even help you breathe easier, as it stretches the entire ribcage.
Directions:
1. Sit at the edge of your chair and take hold of the back of the chair, like the trainer does in the image above. It is important to pull down the shoulders and bring the shoulder blades as close together as possible to feel an effective stretch.
2. If you don't feel any effect right away, simply continue breathing and you will soon start feeling a pleasant stretch in your neck, shoulders, and chest. To deepen the stretch, you can also raise your hands further up on the back of the chair.
3. Hold this position for 3-5 minutes and repeat as many times a day as you'd like.

3. Forearm Shoulder Stretch

chair stretches elbow shoulder stretch
Here is another stretch that targets the shoulder muscles, but it's a lot gentler and more focused than the previous one. The exercise targets the back portion of the shoulder muscles, as well as the arms, making it perfect for both shoulder pain and tension in the neck.
Directions:
1. Extend your left arm in front of you at shoulder level, then use your right forearm to move the left arm closer to the chest until you start feeling a stretch in the left side of the neck and the left shoulder. Don't worry if your forearm doesn't reach the chest, the most important thing is to feel a stretch.
2. Hold for 2-3 minutes and then repeat on the other side.

4. Reach For the Sky

chair stretches sky stretch
This is one of the easiest stretches you can do, and it really energizes your upper body and activates the spine. Simply lock your fingers together and reach high into the sky with a straight spine. To really feel this posture, move from side to side, backward and forward - this will help you stretch the side muscles and arms.
A little trick here is to push the shoulders down while stretching the arms up, as this will ensure you're not straining your neck while doing this exercise. If you can manage to hold this position for a few minutes without lowering your hands for a few repetitions, the exercise can even be quite effective at activating the back and core muscles.

5. Wrist Pain Relief

chair stretches wrist stretch
Wrist pain is another one of those occupational hazards, no matter if you draw, write a lot, type a lot, or garden. Your wrists are among the most sensitive joints in your body, and constant strain and inflammation can really make them become painful.
The first exercise targets the inner side of your wrist: extend your arms at shoulder level, then press the right hand against the inner part of the left palm, and slowly increase the pressure until you feel a stretch in your hand and forearm (see image above). Hold for a few minutes, and then repeat on the other side.
To stretch the outer arm muscles in a second similar stretch, simply press the right hand against the top of the left hand and hold for a few minutes. Don't forget to repeat on both sides. 

6. Tricep Stretch

chair stretches Triceps Stretch
This exercise is designed to stretch the triceps, so it can help relieve shoulder pain and neck strain without any particular effort or tension put on the spine or neck.
Directions:
1. Reaching both arms overhead, bend the right arm and hold the right elbow with the left hand. In this position, your right hand should nearly or completely be touching the left shoulder blade.
2. Using the left hand, pull the right elbow gently down, which should produce a stretch in your right side and right tricep.
3. Hold for 3-5 minutes, then repeat on the opposite side.

7. Energizing the Spine

chair stretches

Strengthening the back and promoting spinal health while sitting on a chair is possible, all you have to do is to repeat this exercise on a daily basis. This exercise will energize the sides of your body as well, and it's great at improving your overall posture.
Directions:
1. Raise the right arm overhead while simultaneously holding the right thigh with your left hand. If this sounds confusing, just see the reference image above.
2. On an exhale, slowly and mindfully tilt your torso towards the left. Continue reaching your arm towards the right as well. Activate your abdominal muscles and pull your shoulders together to maintain a straight posture.
3. Hold this pose for 1-2 minutes, breathing deeply to make the stretch more effective. Then repeat on the other side. Try to do at least 3 reps on each side. 

This is only for your information, kindly take the advice of your doctor for medicines, exercises and so on.     
https://gscrochetdesigns.blogspot.com. one can see my crochet creations  
https://gseasyrecipes.blogspot.com. feel free to view for easy, simple and healthy recipes    
https://kneereplacement-stickclub.blogspot.com. for info on knee replacement


Labels: , , , , , , , ,

Monday, August 26, 2019

9 Exercises to Alleviate Joint Pains

One of the most common health issues in seniors is joint aches and pains. With every movement, you can feel the stress on your joints, but just like a rusty hinge, joints can be “lubricated” through a series of stretches and exercises.  This article will provide you with an array of information about joint pains and the exercises that help ease them.
joints
What are Joints?
Joints are where our bones connect. They provide physical support and provide our body with a range of motions. Any damage to the joints, incurred through force or infection, may hinder our ability to move, and cause pain. Joint pains are quite common; with about a third of the population suffering from joint aches and pains. The knees, shoulders, and thighs tend to be the most problematic areas. The older we get, the more likely it is that we’ll suffer from joint pains.
What are Joint Pains? Joint pains can be weak or strong, and can be acute - lasting from one to two weeks, or chronic – lasting for several months. Whether it’s a strong pain or a weak one, it lowers our quality of life and must be treated. Treatment can be done by taking medication, through alternative medicine, or by performing simple, daily exercises.
By exercising the muscles around the joints, you can strengthen them, thus improving your control over those joints. This will also help reduce joint-related pains.
Knee Pain
Knee pain is especially noticeable when going up a flight of stairs. With severe joint pains, even walking becomes a painful experience.
Pillow Squeeze
joints
This exercise will help you strengthen your inner thighs and provide more support for your knees.
• Lie on your back, with your knees bent.
• Put a pillow between your knees.
• Squeeze the pillow with both knees for 5 seconds and release.
• Perform two sets of ten repetitions.
• If the exercise is too difficult, start by doing it while sitting on a chair.
From Sitting to Standing
joints
This exercise will help you transition between sitting and standing, making it easier for you to straighten your knees.
• Place two pillows on a chair and sit on them. Maintain an upright posture with both feet flat on the floor.
• Use your leg muscles to slowly and smoothly stand up.
• Slowly sit back down.
• Pay attention that your knees do not move forward and pass your toe line.
• Try doing this with your hands crossed against your chest and when they’re hanging at your sides.
• If the exercise is too difficult, add a pillow or two, or use a chair with armrests to use as leverage.

Thigh Joint Pain
The largest joint in the human body, the thigh joint, supports most of our body weight and is a key component in maintaining one’s balance. Since these joints are critical for walking, any pain in the area can debilitate a person. Chronic pains in this region become more common with age.
Bridge Exercise
joints
The bridge is a simple exercise you can perform every morning, which loosens the thigh joint. This makes it easier to move your joints throughout the day.
• Lay down on the floor with your back flat and your legs bent. Your feet must be pressed against the floor.
• Lift your pelvis by pushing with your ankles. Keep your stomach muscles hard and your knees in line with your ankles. Your body should be in a straight line from your shoulders to your feet.
• Stay in this position for 3-5 seconds, and then lower your pelvis back to the floor slowly.
• Repeat ten times.
Classic Leg Lift
joints
If you have pain on one side, lay down on the opposite side. This can be done on the carpet or on a yoga mat.
• Raise the sore leg 6 inches (15cm) from the floor. Hold it in the air for 2-3 seconds
• Slowly lower your leg back down to the floor.
• Perform 10 repetitions. If possible, do the same for the other leg, but if you’re in too much pain, stop.

Shoulder Joint Pain
Another common joint pain is shoulder pain, which is most common in people who perform repetitive movements with their shoulders, or those who spend long hours at a desk, in front of a computer.
Shoulder Stretches
joints
joints
You will need a fitness elastic band for this exercise. This type of exercise is a great way to strengthen your shoulder muscles, as well as improve their elasticity and range of motion.
• Secure the band to an object at waist-height.
• Grasp the band and stand with your back to the securing object. Take a step forward so that the band is stretched a little.
• Keep your arm straight and lift it upwards until it is parallel to the floor. Pay attention not to lift your shoulder.
• Keep your arm in that position for a second, and then slowly lower it back to the starting position.
• Perform 15 repetitions.

It is recommended that you perform this exercise in different variations and in different directions, as shown in the images above.
Wrist Pain
Wrist pain can be caused by inflammation or repetitive actions such as typing on a computer, or even using kitchen utensils. These pains can appear as weakness in the palm, making it difficult to perform everyday tasks, like opening a jar.
Fist Stretch
joints
Do these exercises whenever your palm feels weak, sore, or stiff.
• Open your palm and stretch your fingers outwards.
• Close your fists and stay in this position for a few seconds.
• Straighten and stretch your fingers again.
• Perform several repetitions a few times a day.

Stretching Your Fingers
• Reach out with your right hand, palm facing down.
• Use your other hand to slowly pull the 5 fingers in that hand, back.
• Try and provide resistance with your other hand. Make sure to
stop if you reach a point where it hurts.
• Perform 10 repetitions for each hand.

Elbow Pain The elbow plays a vital role in the arm’s movement. Repetitive motions that can lead to pain in the elbow could be playing tennis, washing windows, or even working with a screwdriver. These stretches should be performed 3 times a day, assuming they don’t hurt, or add to existing pain.
Stretch and Straighten
joints
• Stand straight with your arms at the sides of your body.
• Bend your hands towards your chest, so that only the forearm moves.
• Perform 10-20 repetitions. Stop if it starts hurting.

Forearm Twist
• Keep your hands tight against your body.
• Bend your forearms and keep them at a 90-degree angle.
• Twist your wrists to face up, then down again.
• Perform 10-20 repetitions for each hand. Stop if it starts hurting.
 
 
THIS IS ONLY FOR INFORMATION, ALWAYS CONSULT YOU PHYSICIAN BEFORE HAVING ANY PARTICULAR FOOD/ MEDICATION/EXERCISE/OTHER REMEDIES.                                    PS- THOSE INTERESTED IN RECIPES ARE FREE TO  VIEW MY BLOG-                                                                                           https://gseasyrecipes.blogspot.com/                                                                                                                                                FOR INFO ABOUT KNEE REPLACEMENT, YOU CAN VIEW MY BLOG-                                                                       https:// kneereplacement-stickclub.blogspot.com/                                                                                                                     FOR CROCHET DESIGNS                                                                                                   
                                https://gscrochetdesigns.blogspot.com


Labels: , , , , , , , , , , , , , , , , ,