Friday, October 15, 2021

6 Exercises to Improve Hunchback

As the years go by, our bodies undergo many changes, both external and internal. One of the most prominent is the formation of a hunchback or kyphosis, which results from low physical activity, improper posture, and osteoporosis. The weakening of the muscles over the years leads to a worsening of the phenomenon that leads to pain and to a non-aesthetic hump that can often undermine our self-confidence and interfere with our normal functioning.
The following exercises will help you improve your worsening posture by strengthening the chest muscles, shoulders and back - all of which are important to support our upper body, and treatment and prevention of kyphosis caused by an inactive lifestyle. 
 
1. Shoulder stretch 
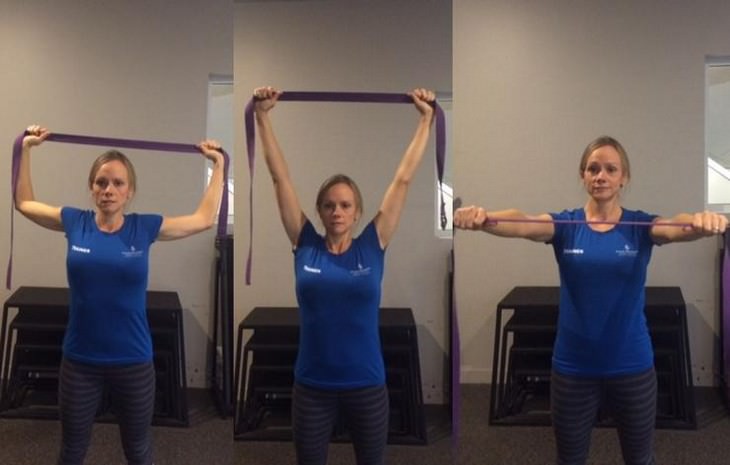
When we lean forward for long hours, our shoulders bend in the same direction because of the weakening of the chest muscles. The next exercise will help you release these clenched muscles and keep your shoulders in place. The instructions demonstrate the performance in a standing position, but you can also do it while sitting.
back exercises
How to do the exercise
Stand with your feet slightly apart at shoulder width, holding both sides of a yoga strap, jump rope or belt. 
 Raise your hands and stretch them forward with your palms facing down. 
Make sure your arms are spread a little wider than your shoulders, exhale and lift them up, palms facing forward. 
When inhaling, lower your hands to shoulder height behind your head. Repeat the exercise 3-5 times.
 
2. Shoulder blade stretch 
 When we spend most of our day with our shoulders slumped forward, this movement can become a habit and cause us to slump forward regularly. The purpose of the next exercise is to correct this problem by moving in a way that counteracts shoulder slumping. The instructions demonstrate the exercise in a standing position but it can be done while sitting as well.
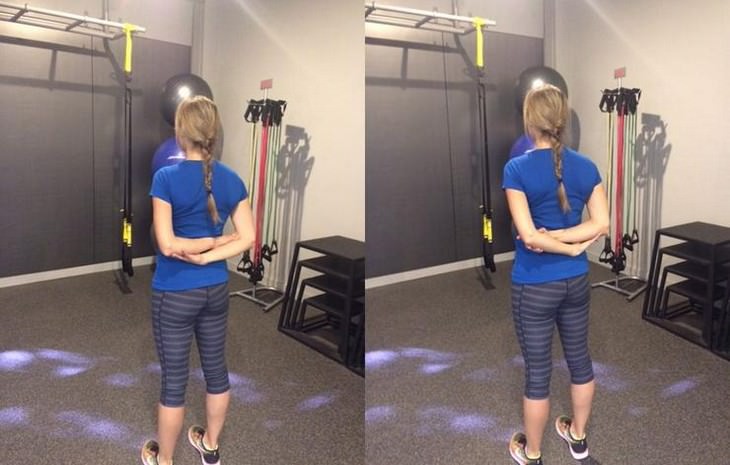
back exercises
How to do the exercise:  
Stand with your feet slightly apart at shoulder width. 
Pull your shoulder blades back and down toward your spine.
Bring your hands behind your back, then hold your right elbow with your left hand and your left elbow with your right hand (so your right hand is over your left hand). 
If you find it difficult to do this, hold your wrists or forearms instead of your elbows. 
Lift your chest and push your shoulder blades back and down toward your spine. 
Take 3-5 deep breaths and then alternate between the hands (so that the left hand is on top). 
Raise your chest again and pull the shoulder blades back and down toward your spine. 
Take 3-5 deep breaths and finish the exercise.

3. Shoulder blade squeeze  back exercises
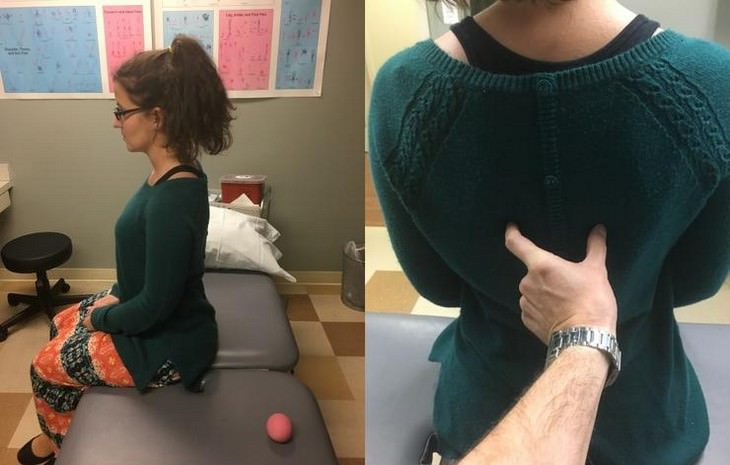
"This simple exercise will strengthen the scapular and shoulder blade muscles, preventing your shoulders from slumping forward and make you aware of your posture," said Jesse Lewis, a physiotherapist from the United States.

How to do the exercise: 
Sit with your back straight and press your shoulder blades together as much as possible, as if you were holding a pencil between them. 
When the shoulder blades are together, pull them back and down and press firmly. 
Stay in this position for 10 seconds and repeat 10 times. 
It is recommended to do the exercise 3-4 times throughout the day to see results quickly. 
 
4. Soft tissue chest massage 
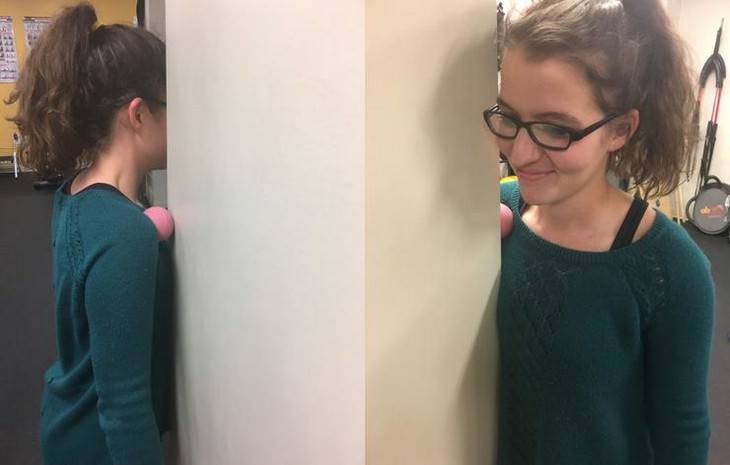
Lewis says that the next move releases the chest muscles that are strained because of the body's tendency to lean forward, what characterizes the hunchback state. Its performance is essential because when the chest muscles are stretched and tight, they pull the shoulders forward creating an unnatural and harmful body position. Their release will help both your posture and your hunchback, allowing you to look and feel better.
back exercises
How to do the exercise: 
Use a tennis ball and place it next to your chest muscles, inside the shoulder bone and under the collarbone. 

Gently lean against a corner of a wall with your chest resting on the ball and your face facing forward. 
 
Press the ball lightly against the wall and massage the area If you feel a sensitive spot, focus on it with the ball and massage it until you feel a release. 
 
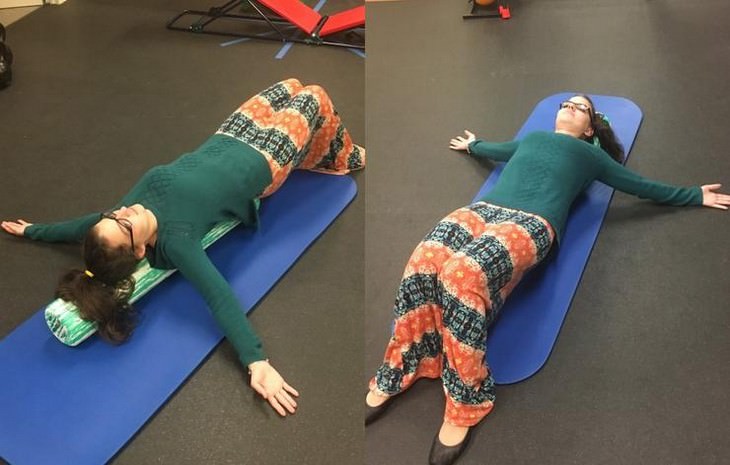
5. Laying down shoulder stretch 
It’s recommended to do this exercise in the morning or before bed. The move opens up the chest and releases and straightens the shoulders.
back exercises
How to do the exercise: 
Lie on a mattress or on the floor with your body stretched, your knees bent and your feet slightly apart. 
 
Stretch your arms to your sides to form the letter T. 
 
You can increase the stretch by placing a rolled towel or foam roll along your spine. 
 
Stay in this position for 30 seconds, lower your arms to your sides, hold for 10 seconds and repeat the entire exercise again and again for about 10 minutes.

6. Resistance “rowing” 
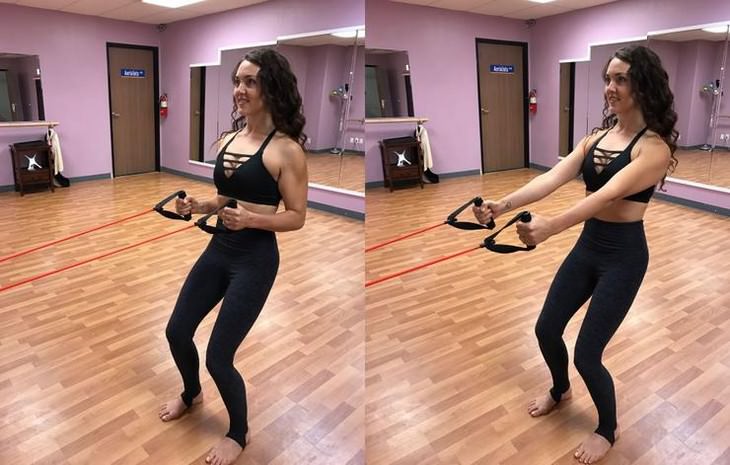
This is an excellent exercise for strengthening the upper back muscles, which helps straighten the shoulders back to their natural position and helps improve posture and prevents a hunchback from forming.
back exercises
How to do the exercise
Attach a resistance strap to a sturdy door handle or a heavy piece of furniture at the height of your waist. 
 
Grab the ends of the strap and step back with your feet parallel and hip distance apart. 
 
Bend your knees slightly while keeping your torso straight. Start the exercise by bending the elbows behind your waist, pressing the shoulder blades together. 
 
Slowly return to your starting position and repeat the entire exercise 10 more times. 
 
When the exercise becomes too easy, perform 2-3 sets with 10 repetitions each, and to increase resistance, move away from the handle or the furniture to which the strap is attached. 
 
Remember, a hunched backs can cause pain and problems in our daily functioning, but with a few simple exercises, it can be prevented and even improved in a short time!

This is only for your information, kindly take the advice of your doctor for medicines, exercises and so on.   

https://gscrochetdesigns.blogspot.com. one can see my crochet creations  
https://gseasyrecipes.blogspot.com. feel free to view for easy, simple and healthy recipes    
https://kneereplacement-stickclub.blogspot.com. for info on knee replacement

Labels: , , , , , ,

Thursday, January 30, 2020

Pain-Relieving Stretches You Can Do Seated in a Chair

A sedentary lifestyle can leave our joints and muscles aching in need of a good stretch, but many people are limited in time and have other restrictions that make daily exercising a real struggle. No matter if you’re a busy bee toiling away at work all day, a hardworking student, or a senior limited in their range of motion, this seated stretch routine will bring relief from pain and tightness in the muscles and tendons and other musculoskeletal conditions.
All 7  of these beginner-friendly stretches can be done in a chair and are equally simple and effective at relieving pain and tightness in different areas of the body.

1. Neck Stretch

chair stretches Neck Stretch
Needless to say, you can simply tilt your head back and forth or rotate it in circles to loosen up a tight neck, but if you're looking for a deeper stretch, this neck exercise is just what you need. This particular stretch is also very safe, as by raising your arm over the head, you're actually making your upper back straighten up, and this can help prevent your neck from getting hurt.
Directions:
1. Sit up straight and raise your right arm overhead, resting your right palm over the left ear. Try to avoid your right elbow from going forward, as this can strain your neck.
2. Slowly and gently bend your head to the right while simultaneously pressing your head against the right hand. You will start feeling a stretch on the left side of the neck.
3. Hold for 2-3 minutes and then repeat on the other side. You can repeat the stretch as many times as you'd like.  

2. Heart Opener

chair stretches Heart Opener stretch

This is one of the most powerful stretches you can do for your upper body, as it activates your shoulders, arms, and chest muscles, and makes your upper spine straighten up right away, so it is truly a heart opener. This stretch is especially useful for those of you who work at the computer or read a lot, as it is essentially the opposite of hunching forward, so it will bring relief to a stiff neck and aching shoulders, and can even help you breathe easier, as it stretches the entire ribcage.
Directions:
1. Sit at the edge of your chair and take hold of the back of the chair, like the trainer does in the image above. It is important to pull down the shoulders and bring the shoulder blades as close together as possible to feel an effective stretch.
2. If you don't feel any effect right away, simply continue breathing and you will soon start feeling a pleasant stretch in your neck, shoulders, and chest. To deepen the stretch, you can also raise your hands further up on the back of the chair.
3. Hold this position for 3-5 minutes and repeat as many times a day as you'd like.

3. Forearm Shoulder Stretch

chair stretches elbow shoulder stretch
Here is another stretch that targets the shoulder muscles, but it's a lot gentler and more focused than the previous one. The exercise targets the back portion of the shoulder muscles, as well as the arms, making it perfect for both shoulder pain and tension in the neck.
Directions:
1. Extend your left arm in front of you at shoulder level, then use your right forearm to move the left arm closer to the chest until you start feeling a stretch in the left side of the neck and the left shoulder. Don't worry if your forearm doesn't reach the chest, the most important thing is to feel a stretch.
2. Hold for 2-3 minutes and then repeat on the other side.

4. Reach For the Sky

chair stretches sky stretch
This is one of the easiest stretches you can do, and it really energizes your upper body and activates the spine. Simply lock your fingers together and reach high into the sky with a straight spine. To really feel this posture, move from side to side, backward and forward - this will help you stretch the side muscles and arms.
A little trick here is to push the shoulders down while stretching the arms up, as this will ensure you're not straining your neck while doing this exercise. If you can manage to hold this position for a few minutes without lowering your hands for a few repetitions, the exercise can even be quite effective at activating the back and core muscles.

5. Wrist Pain Relief

chair stretches wrist stretch
Wrist pain is another one of those occupational hazards, no matter if you draw, write a lot, type a lot, or garden. Your wrists are among the most sensitive joints in your body, and constant strain and inflammation can really make them become painful.
The first exercise targets the inner side of your wrist: extend your arms at shoulder level, then press the right hand against the inner part of the left palm, and slowly increase the pressure until you feel a stretch in your hand and forearm (see image above). Hold for a few minutes, and then repeat on the other side.
To stretch the outer arm muscles in a second similar stretch, simply press the right hand against the top of the left hand and hold for a few minutes. Don't forget to repeat on both sides. 

6. Tricep Stretch

chair stretches Triceps Stretch
This exercise is designed to stretch the triceps, so it can help relieve shoulder pain and neck strain without any particular effort or tension put on the spine or neck.
Directions:
1. Reaching both arms overhead, bend the right arm and hold the right elbow with the left hand. In this position, your right hand should nearly or completely be touching the left shoulder blade.
2. Using the left hand, pull the right elbow gently down, which should produce a stretch in your right side and right tricep.
3. Hold for 3-5 minutes, then repeat on the opposite side.

7. Energizing the Spine

chair stretches

Strengthening the back and promoting spinal health while sitting on a chair is possible, all you have to do is to repeat this exercise on a daily basis. This exercise will energize the sides of your body as well, and it's great at improving your overall posture.
Directions:
1. Raise the right arm overhead while simultaneously holding the right thigh with your left hand. If this sounds confusing, just see the reference image above.
2. On an exhale, slowly and mindfully tilt your torso towards the left. Continue reaching your arm towards the right as well. Activate your abdominal muscles and pull your shoulders together to maintain a straight posture.
3. Hold this pose for 1-2 minutes, breathing deeply to make the stretch more effective. Then repeat on the other side. Try to do at least 3 reps on each side. 

This is only for your information, kindly take the advice of your doctor for medicines, exercises and so on.     
https://gscrochetdesigns.blogspot.com. one can see my crochet creations  
https://gseasyrecipes.blogspot.com. feel free to view for easy, simple and healthy recipes    
https://kneereplacement-stickclub.blogspot.com. for info on knee replacement


Labels: , , , , , , , ,