Wednesday, January 20, 2021

4 Positions for Relieving Back Pain for Better Sleep

Those of us who suffer from chronic back pain, which is the most common and disturbing pain, know how difficult it is sometimes to fall asleep at night. When you don’t sleep well at night, the pain only gets worse, kind of like a snowball effect. In turn, it harms the normal routine of our lives and makes it difficult for us to relax all day long. If this is the case for you, you’ll be happy to hear that through the following 4 positions in this article, which you can easily implement on a bed or yoga mat, you can release and relieve that annoying back pain.

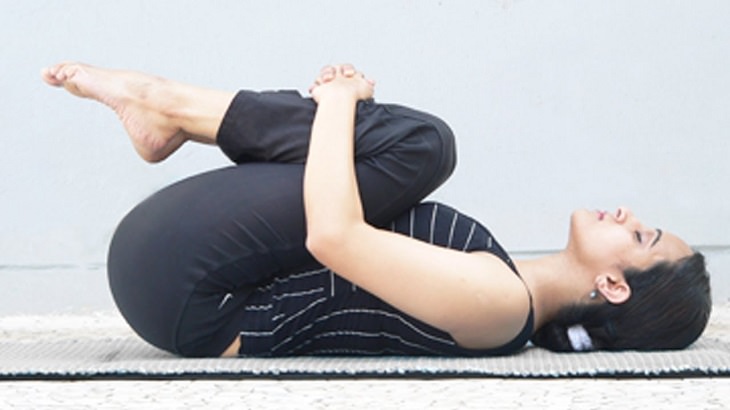
1. Wind-Relieving Pose 
The Wind-Relieving Pose, or as it is called in yoga: "Pavanamuktasana," is designed to release your spine, especially its lower part, within moments. In addition, this position allows the bowels to be accelerated and regulated, so we'd recommend trying it in the morning.
yoga poses
How to do it: 
Lie on your back, relax your muscles and bend your knees up. 
Take a deep breath of air, then hug your knees with both arms. 
Release the breath, continue to hug your knees keeping them close to your chest. 
Repeat the exercise several times: on each inhale move your legs away from your chest, and each time you exhale, bring them back. Be sure to take long breaths. 
Perform about 8 to 10 reps - about 1 minute of exercise.

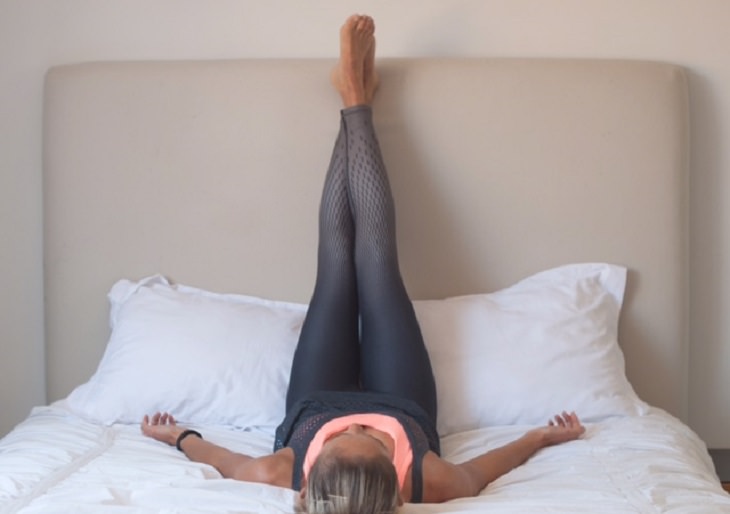
2. Legs Up the Wall Pose  
The next position is to release tension from the back and legs, relax the chest, and allow the lungs to fill with air and oxygen before going to bed.
yoga poses
How to do it: 
Place a folded pillow near the wall or on the edge of the bed. 
Lie on your back with your buttocks against the pillow. 
Press your buttocks toward the wall and then straighten your legs up and place them against the wall. Spread your arms to the sides, and try to stretch and widen your chest. 
Relax the rest of your body, and breathe calmly. 
Stay in this position for 1-2 minutes, then lower your legs off the wall. 
 
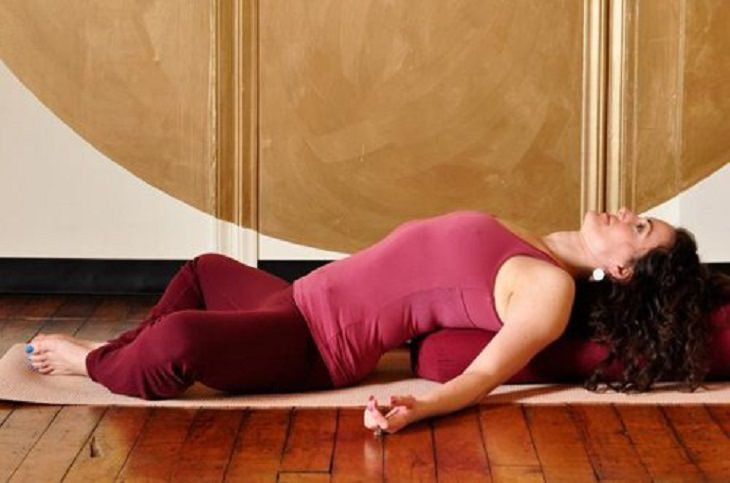
3. Reclining butterfly pose 
The Reclining butterfly pose will have a positive effect on your back and will allow you to release its most internal muscles, those located beneath the upper layers of the skin. There are two steps that are important to perform during this pose.
yoga poses
How to do it: 
Step 1: Lie on your back with two rolled towels underneath you, one under your waist and one under your neck. 
Bend your legs to each side (like a butterfly’s wings flapping) and remain as loose as possible. At the same time, move your head from side to side, without straining your neck and back. The head and leg movement can be done on the same side or opposite sides, whichever is easier for you. 
Try releasing and loosening your body as much as possible. Feel the waves of your movement penetrate your spine. Perform this step for one minute.

Step 2: Turn around and lie on your stomach with your arms spread out, feet resting on the bed or mattress, and a pillow or rolled towel under your forehead. 
Move your legs from side to side, and try to feel the vibrations pass through your entire relaxed body. Keep moving and perform this step for another minute. 
 
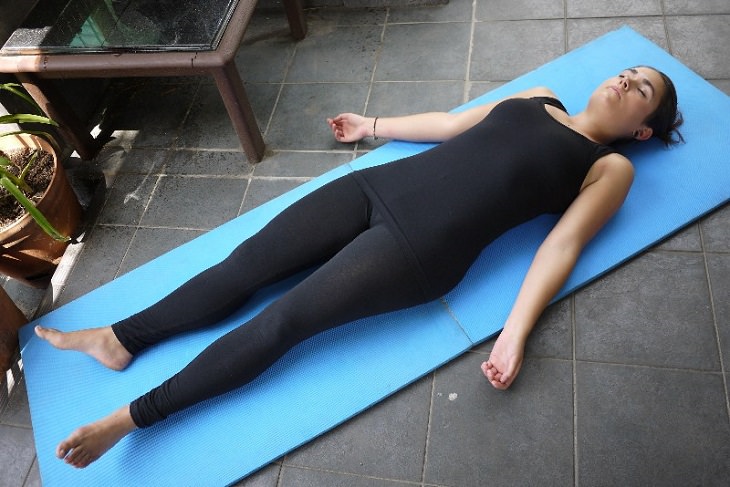
4. The Shavasana Pose 
The Shavasana Pose, whose literal meaning is "the corpse pose” is used by yogis to relax their bodies at the end of a strained workout. Doing it before bedtime will help you relax and fall asleep quickly and easily, in addition to relieving back pain.
yoga poses
How to do it: Lie on your back, gently spread your arms to your sides with your palms facing up. Place a rolled towel or a pillow under your head and neck. 
Slowly start relaxing your body from the bottom up: start with your toes and go up to your legs, hips, stomach, fingers, arms, and so on until you reach the top of your head. Relax each part on an inhalation and exhalation.
Do 20 cycles of breathing: breathe in and breathe out slowly. 
After 20 cycles, stop counting and breathe freely. Let your thoughts float and avoid concentrating on a specific thought. 
You’ll slowly feel your surroundings becoming blurred, and your whole body will be relaxed and loose. This is the best time to cover up and fall into a nice deep sleep.


This is only for your information, kindly take the advice of your doctor for medicines, exercises and so on.     

https://gscrochetdesigns.blogspot.com. one can see my crochet creations  
https://gseasyrecipes.blogspot.com. feel free to view for easy, simple and healthy recipes    
https://kneereplacement-stickclub.blogspot.com. for info on knee replacement


Labels: , , , , , ,

Sunday, April 19, 2020

Doing household chores cramping your muscles? 5 stretches to help you relieve sore muscles

The lockdown is probably making all of you do tasks which was seldom done by you before. Be it cooking, washing utensils, sweeping the house or dusting, all these tasks require us to utilise muscles which were not used on a regular basis. Using less used muscles on a regular basis makes them sore initially and might hurt for 3-4 days.
Here are a few stretches you can do in order to soothe sore muscles:

Side lunge

This pose will help in stretching your hip flexors and legs. Just stand firmly with your feet on the ground. Separate your feet and bend towards the left side. Keep going to the point you can maintain your balance and stop. Hold the position for a while and come back to the original position. This will help in giving your legs a good stretch and also ease their soreness.

Seated forward fold

Also known as Pascimottanasana, seated forward fold is another amazing stretch to ease muscle soreness. Just sit on the ground with your legs forward and bend. Try touching your toes and touch your forehead with the knees. Don’t force your body if it doesn’t allow stretching to that extent. Hold the position for 10 seconds and then relax. This will help in relaxing your arms, hamstrings, back and neck muscles. 

Butterfly pose

For this pose, just sit on the ground with your legs folded in a way that your soles touch each other. You should be able to form a triangle with your legs. Now slowly bend forward and let your head bend downwards as your go forward. Hold the position for 10 seconds and come back to the original position. Also known as groin stretch, this pose will help in soothing your legs, back and neck muscles. 

Cobra pose
An amazing stretch for your back as well as abs, cobra pose will help in relaxing your upper body. Just keep your palms on the ground and bend upwards. Your legs should be straight backwards, and spine should be blended. Look forward and keep your arms straight on the ground. Feel the stretch for 15-20 seconds and then relax. Cobra pose will soothe your arms, shoulders, chest, abs and back muscles.

Seated spinal twist

The best stretch to provide relief to your back is seated spinal twist. Just sit on the ground and bring your left foot to the inner thigh. Now keep the right foot on the outside of left thigh. Now, without moving your legs, twist to the right side using your back. This twist will help in relaxing the tensed muscles in the back and buttocks.
This is only for your information, kindly take the advice of your doctor for medicines, exercises and so on.     

https://gscrochetdesigns.blogspot.com. one can see my crochet creations  
https://gseasyrecipes.blogspot.com. feel free to view for easy, simple and healthy recipes    
https://kneereplacement-stickclub.blogspot.com. for info on knee replacement

Labels: , , , , , , , , , ,

Wednesday, November 20, 2019

6 easy yoga poses that will help to improve your flexibility


For most people, staying fit means building muscles and gaining body mass. The last thing we care about is increasing our flexibility. It is a general belief that flexibility is only for gymnasts, wrestlers and divers and if you are not associated with any of these sports, then you need not worry about how flexible you are. This is a common misconception among people. In reality, flexibility has a lot to do with how your muscles can move and it is crucial in carrying out day to day activity.

If your body is flexible, then you are less likely to get injured and you will remain healthy as you age. Here are 6 easy yoga poses that you can do to increase your flexibility. 


Seated Forward Bend (Paschimottanasana)

How to do it:
Step 1: Sit down on the ground with your legs stretched out in front of you and your hands resting by your side.
Step 2: Spread your hands out to the sides and then up above your head in a way that the tips of your fingers are pointing towards the ceiling.
Step 3: Take a deep breath and draw your spine up long.
Step 4: When you breathe out, bend forward to touch your toes with your hands.
Step 5: Your belly should be resting on your thighs and your nose should touch your knees. Stay in this position for 4-5 seconds and then go back from where you started.

Cat-Cow Pose (Marjaryasana-Bitilasana)

How to do it:
Step 1: Get on all your fours on an even surface. Your wrists should be under your shoulders and knees under your hips, while your toes should be tucked inside.
Step 2: Inhale and relax your belly so it moves towards the floor. Gently arch your back towards the ground, tilt your tailbone and try to look upward.
Step 3: Hold this position for 2-3 seconds. Now exhale and arch your spine towards the ceiling and tuck your chin into your chest.

Cobra Pose (Bhujangasana)

How to perform it:
Step 1: We have to start with the Makarasana position. Lie down on your stomach comfortably on the ground with your feet wide apart from each other and your hands folded in front of you. Rest your head on your hands and relax.
Step 2: Now join both your legs and extend your hands overhead. Rest your forehead on the ground and pull your hands back underneath your shoulders, keeping your elbows close to your body.
Step 3: Your elbows should be bent and palms should be resting by the side of your chest.
Step 4: Inhale and lift the upper half of your body. Your elbows should be in line with your body, legs stretched in such a way that you do not feel pressure on your waist.
Step 5: Stay in this position for 4-5 seconds and breathe in and breathe out. Then come back to the normal position.


this is only for your information, kindly take the advice of your doctor for medicines, exercises and so on.     
https://gscrochetdesigns.blogspot.com. one can see my crochet creations  
https://gseasyrecipes.blogspot.com. feel free to view for easy, simple and healthy recipes    
https://kneereplacement-stickclub.blogspot.com. for info on knee replacement


readmore

Bow Pose (Dhanurasana)

How to do it:
Step 1: Lie down on your stomach with your feet hip-width apart from each other and arms by your side.
Step 2: Now gently fold your knees and hold the ankles of both the legs with your hands.
Step 4: Inhale and lift your chest and legs off the ground. Pull your legs are much as you can, keeping your face straight.
Step 5: Hold the pose for a while and focus on your breathing. Your body should be tight like a bow.


Bridge Pose (Setu Bandha Sarvangasana)

How to do it:
Step 1: Lie down comfortably on your back with your feet hip-width apart and knees bent.
Step 2: Your arms should be resting on the sides of your body and your palms should be facing downwards.
Step 3: Take a deep breath, press your feet into the floor and gently lift your hips up rolling the spine off the floor.
Step 4: Press your arms and shoulders on the ground to lift your chest. Engage your legs and buttocks to lift your hips higher. Hold this position for 4-8 breaths.


Butterfly Pose (Baddha Konasana)

How to do it:
Step 1: Sit down on the ground with your back neutral and your knees bent.
Step 2: Move your knees to the outer side, so the soles of both your legs meet at the center. Hold the ankles of both the feet with your hands.
Step 3: Now engage your abs and slowly bend your body forward, towards your feet as far as you can. Hold the position for 30 seconds to 2 minutes.


Labels: , , , , , , ,