Type 2 diabetes affects 29.1 million people
in the United States, 8.1 million of whom may be unaware of their
condition. It occurs when the body doesn't use the hormone insulin
properly. As a result, when insulin is not doing its job, blood sugar
levels rise, causing health problems. However, lifestyle changes,
including regular exercise, can help manage diabetes.
How Yoga Can Help Manage Diabetes
Your exercise regime need not only be limited to biking or jogging.
Studies show that yoga can be just as beneficial. In fact, this ancient
practice has been found to help lower blood pressure and improve blood
glucose levels. Yoga is also recommended for stress management, as
stress elevates blood sugar, which can lead to further diabetes
complications. Furthermore, yoga invites us to center ourselves. This
act of centering calms us down, thus balancing our blood sugar levels.
Yoga also brings about mindfulness, which involves staying and living in
the moment. This is a helpful tool that can have lasting, fruitful
behavior changes, and is a must for managing diabetes.
In fact, in one study, researchers found that people that scored highly
at mindfulness were more likely to have healthy glucose levels than
people who had lower scores. But exactly how mindfulness plays a role on
glucose levels is not yet understood. In another study published in
March 2016, in the American Journal of Health Behavior, it was found
that mindful people are less likely to be obese. Furthermore, among 33
studies conducted on the topic, yoga was found to improve blood sugar
control, cholesterol profiles and weight. Yoga was also found to lower
blood pressure, enhance lung function, mood, sleep and quality of life.
To manage your diabetes, here are 10 yoga poses you can try:
10 Yoga Poses to Keep Your Diabetes Under Control
While some of these poses are suitable for beginners and can be
practiced in your own time at home, it is advised that others should be
practiced under the guidance of a qualified yoga instructor.
Deep breathing
Suitable for Beginners
Benefits: Deep breathing helps oxygenate the blood, improving
circulation. It helps calm the mind and gives the nerves some
much-needed rest.
Here's How:
1. Sit in a comfortable position. Keep your spine long and straight and
hands on your knees, palms facing up and your belly slightly tucked in.
Draw your shoulder blades slightly together and down your back,
simultaneously drawing your shoulders down and away from your ears. Keep
your chin parallel to the floor and your jaw relaxed. Close your eyes.
2. Connect with your natural breath, becoming aware of each inhale and
exhale for a couple of rounds. Then, breathe in deeply through your
nose. At the peak of your inhale, hold your breath for five counts and
slowly exhale through your nose, emptying the lungs completely. Repeat
the process for 10 rounds.
3. After the last round, rub your palms together until they are warm and
place them over your eyes. This process, known as palming, relaxes the
whole body and mind. Slowly open your eyes.
Child's Pose
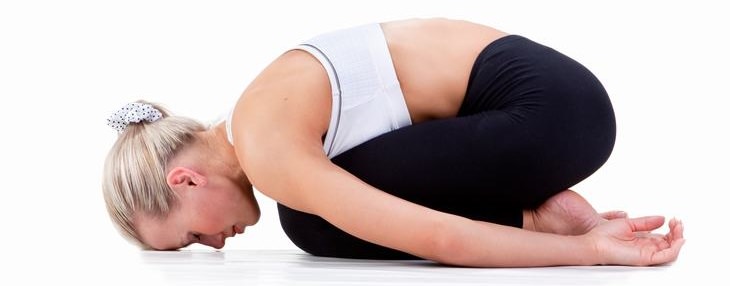
Suitable for: Beginners
Benefits: The Child's pose is a great stress reliever. It stretches the
hips, thighs and ankles and helps calm the mind, relieving stress and
fatigue. This pose will gently stretch the lower back muscles, relieving
any pain from long hours of sitting.
Modifications: For extra comfort, place a rolled up blanket at the back
of your knees. A cushion or folded blanket may be used to support your
forehead.
Here's How:
1. Come onto all fours in a cat pose and place blankets at the back of
your knees if needed. Release your buttocks towards your heels and
spread your thighs slightly apart.
2. Allow your torso to rest on your thighs and keep your arms extended
out in front of you, simultaneously elongating your spine.
3. If you have the flexibility, allow your forehead to rest on the
floor. Alternatively, you may place your forehead on a cushion or an
exercise block.
4. Once in the pose, draw your attention to your breath, breathing at a
normal pace.
5. Hold the pose for 5 to 10 breaths, or up to 3 minutes.
Contraindications: Do not practice this pose if you are pregnant, have a
knee injury or have diarrhea.
Hero Pose
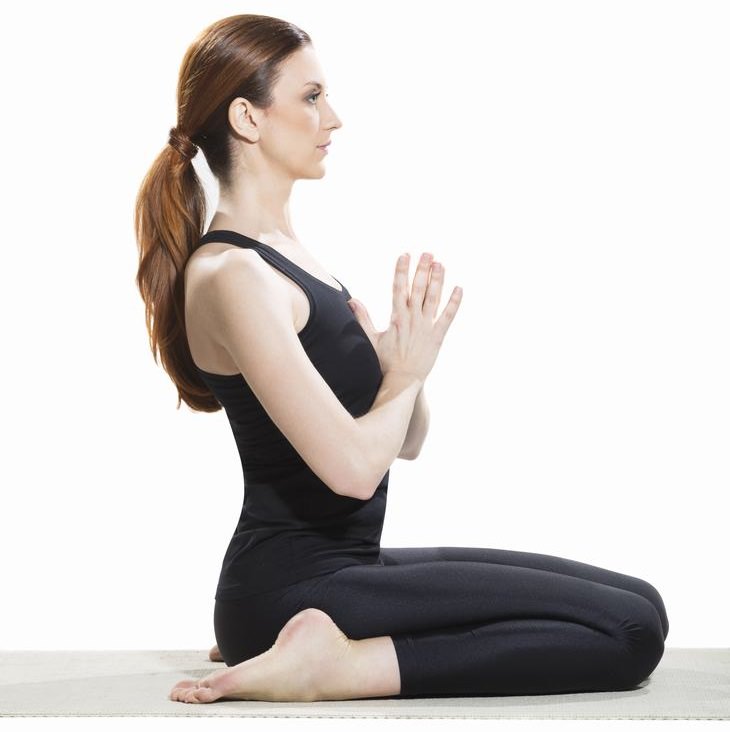
Suitable for: Beginners
Benefits: This simple pose relaxes the mind and improves digestion. It
also massages the kanda - a point located 12 inches above the base of
your spine, which is, according to the ancient practice of ayurveda,
said to be the point of convergence for over 72,000 nerves.
Modification: Pictured, is the modified version of the actual pose. You
may place a cushion or a folded blanket at the back of your knees.
Here's How:
1. Come onto all fours in cat pose. If practicing on a yoga mat, fold
the mat in two, providing extra support for the knees. Place a blanket
or cushion at the backs of your knees for extra support if desired.
2. Release your buttocks onto your heels. Keep your palms on your knees
facing downwards. Close your eyes and breathe deeply at a steady pace.
Hold for 5 to 10 breaths, or up to three minutes.
Bow Pose
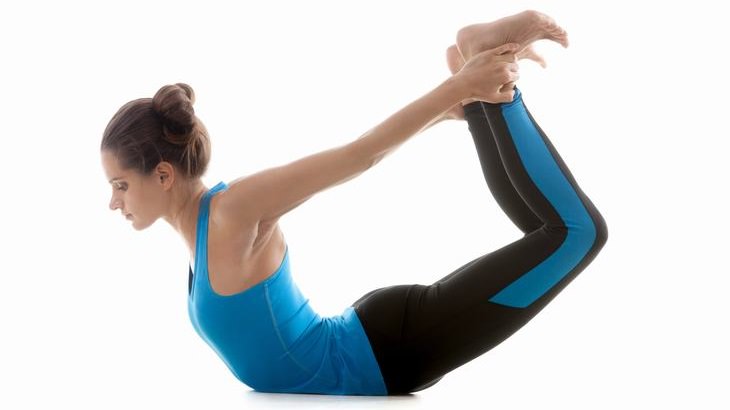
Suitable for: Beginners (modified version)
Benefits: A fantastic pose to strengthen the back and the spine. It
helps to stimulate the reproductive organs, beat stress and fatigue and
relieve menstrual pain and constipation.
Modifications: Lifting the thighs in this pose may be challenging. For
extra support, place a folded blanket under your pelvis and thighs. Use a
yoga belt (or other similar accessory) to grab a hold of your ankles if
needed.
Here's How:
1. Lie down on your stomach, with a blanket under your pelvis and thighs
if needed. Keep your feet hip-width apart and your arms by the side of
your body.
2. Fold your knees and lift your arms, reaching to wrap your hands
around the outside of your ankles. If needed, use a yoga belt or similar
accessory to help grab a hold of your ankles.
3. Take a deep breath in and lift your chest off the ground. You can
stop here. If you find the strength in your legs and glutes as well as
the flexibility in your lower back, pull your legs up and back.
4. Keep your eyes fixed at a point, looking straight ahead. Draw your
attention to your breath, taking long deep breaths, enabling you to
relax into the pose.
5. Hold for about 15 to 20 seconds. Exhale deeply, gently bringing your
legs and chest to the ground. Release your ankles and relax.
Contraindications: Do not practice this pose if you have high or low
blood pressure, a hernia, neck injury, pain in the lower back, headache,
migraine or recent abdominal surgery. This pose should also be avoided
if you are pregnant.
Shoulder Stand
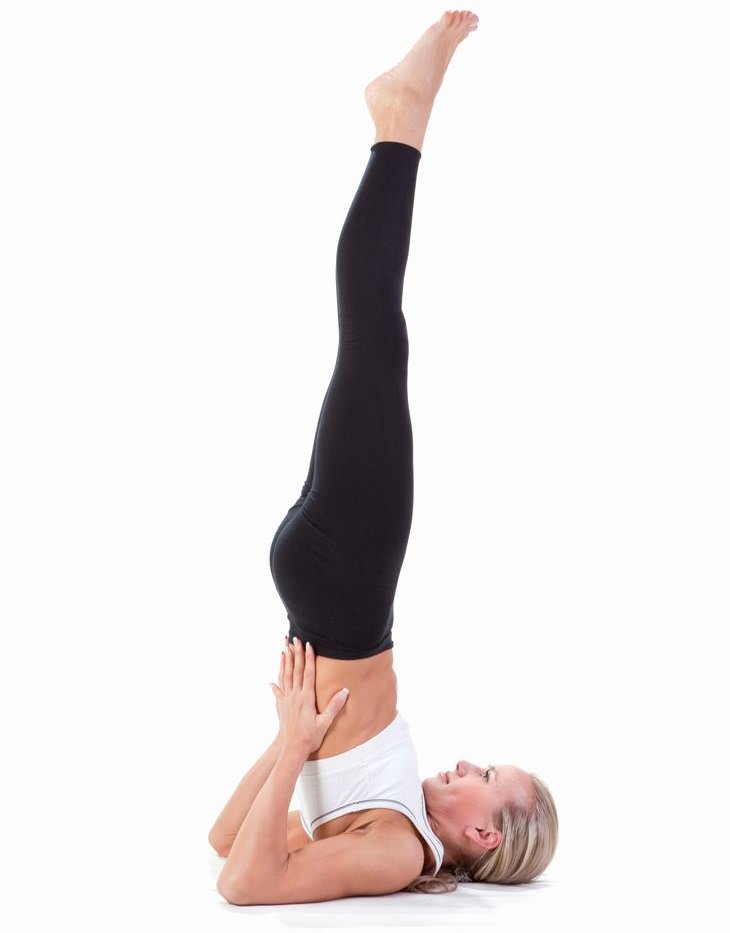
Suitable for: Intermediate
If you are new to this pose, practice only under the guidance of a
trained yoga instructor.
Benefits: A Shoulder stand is predominantly known to regulate the
thyroid glands, which are responsible for the proper functioning of the
entire body including the digestive, nervous and reproductive system.
They also regulate the metabolism and respiratory system. This pose is
also beneficial for the spine, supplying the blood with oxygen. It also
helps with nervous system disorders and improves overall health.
Modifications: Fold two or more blankets into rectangles, measuring
roughly one foot by two feet. Stack the blankets one on top of the
other. To keep your arms in place while in the pose, you can place a
sticky mat on top. Lie on the blankets with your shoulders supported and
parallel to one of the longer edges of the blanket. Keep your head on
the floor.
Here's How:
1. Lie down over the folded blankets (for correct alignment see
modifications), your legs extended outwards. Now, slowly raise your
legs, drawing them to your knees, then straight up, keeping your ankles,
knees and hips in alignment.
2. Use the strength in your core muscles to lift your pelvis off the
floor, directing your hips over your shoulders. Place your palms along
your back and hips for extra support. Keep your body extended, pointing
your toes to the ceiling.
3. The weight should be on your shoulders, not on your neck, and your
elbows should be parallel to one another and well-rested on the floor,
giving your back the support it needs.
4. Take long deep breaths and hold the pose for as long as you may need.
Then return to the lying position slowly, or proceed onto the next
pose.
Contraindications: Avoid this pose if you suffer from any neck or spinal
injuries, or have high blood pressure.
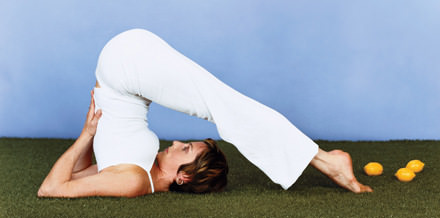
Plow Pose
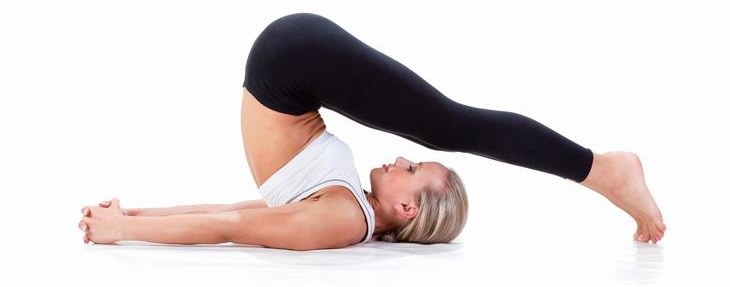
Suitable for: Intermediate
If you are new to this pose, practice only under the guidance of a
trained yoga instructor.
Benefits: The Plow pose improves posture, particularly among those who
sit for long hours. It stimulates the thyroid glands, parathyroid
glands, lungs and abdominal organs. It encourages blood to flow to the
head and the face. It improves digestion and balances hormones.
Modifications: Proceed from shoulder stand as described above, using two
folded blankets underneath your shoulders. If your feet do not touch
the floor, support them on a wall behind you or place them on a block.
Here's How:
1. From a shoulder stand, release your legs keeping them straight,
folding at the hips. Then, take your feet behind your head. Keep your
hands straight by your hips and flat on the floor, offering extra
support. While in the pose, breathe deeply and hold for about 15 to 20
seconds.
2. Come out of the pose slowly. Engaging your core muscles, lift your
legs up from the floor, wall or block slowly, taking your legs over your
hips, simultaneously releasing your hips down to the ground, using your
arms for extra support. Release your legs down to the ground, remove
the blankets and proceed to the next pose.
Bridge Pose
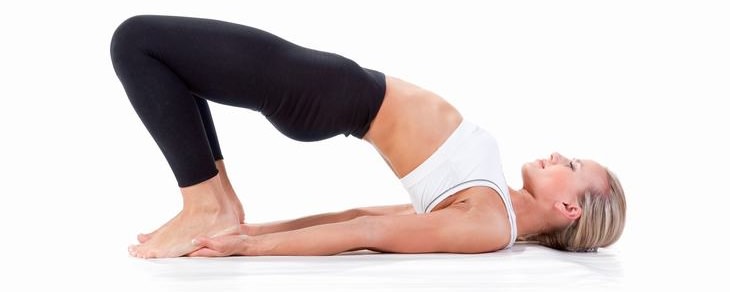
Suitable for: Beginners (modified version)
Benefits: The Bridge pose helps keep one's blood pressure under control.
It helps relax the mind and improves digestion. This pose helps relieve
the symptoms of menopause. It stretches the neck and the spine.
Modifications: Place a block in an upright position at the base of your
spine, supporting your weight in the pose.
Here's How:
1. Lie down on your back, tailbone down, your knees bent and your feet
flat on the floor, hip-width distance apart. Draw your heels as close to
your buttocks as you possibly can and keep your knees rotating
internally, directly over your ankles. Upon lifting your pelvis, there
may be a tendency to splay your knees out to the sides, internally
rotating the knees will help keep them in alignment. Keep your arms by
your hips, palms facing down. Take a couple of breaths here.
2. Exhale and lift your pelvis off the floor, using the strength in your
core muscles (belly and lower back) and your feet. Keep your arms by
your side, pushing your hands down into the ground for extra support.
Your neck and head should be flat on the floor. If you need extra
support, place a block in a vertical position at the base of your spine.
3. Breathe at a normal pace and hold the pose for 15 to 20 seconds.
Contraindications: Avoid the pose if you have a neck or back injury.
Seated Spinal Twist
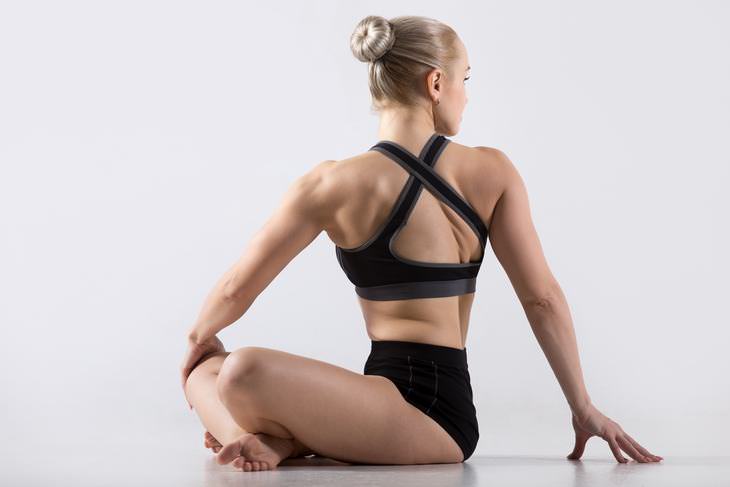
Suitable for: Beginners
Benefits: This pose increases the capacity of your lungs allowing them
to inhale and hold more oxygen. It also loosens up the spine and
relieves backaches and discomfort in the back.
Modifications: Sit up on a blanket and wrap your arm around your thigh,
as opposed to taking your arm to the outside of your knee.
Here's How:
1. Sit with your legs straight out in front of you. Keep your spine
long. Bend your left leg and place the heel of your left foot beside
your right hip. Alternatively, and if you find it easier, you can keep
your leg straight.
2. Now take your right leg over your left knee and place your left hand
around your right knee, simultaneously taking your right hand behind
you. Twist at the waist, shoulders and the neck, looking over your right
shoulder. Hold for a couple of long, deep breaths.
3. Slowly come out of the pose, releasing your right hand first, your
waist, your chest, and lastly your neck. Repeat on the other side.
Contraindications: Practice with caution if you have a back injury.
Forward Fold
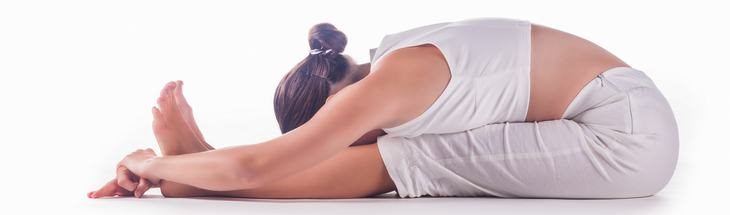
Suitable for: Beginners
Benefits: This pose encourages blood to flow to the face. It helps the
stomach function better and it strengthens your thigh muscles while
relaxing the back and the arms.
Modifications: Place a rolled up blanked under your knees for extra
support and comfort. Use a yoga belt or similar accessory if you do not
have the flexibility to reach your toes.
Here's How:
1. Sit with your legs stretched out in front of you. Keep your hands by
your hips, face down, and lengthen your spine. Take a deep inhale and as
you exhale, slowly lean the torso forward, from the pelvis, keeping
your spine straight. Continue to move your torso over your legs with
each exhale. Grabbing a hold of your big toes (or using the yoga belt).
2. Continue to bend forward with each exhale, taking, if you can, bend
your forehead to your knees. Allow your breath to help you relax into
the pose and hold for 15 to 20 seconds. Slowly return to the sitting
posture.
Contraindications: Be cautious if you suffer from back pain or have
problems with your spine.
Lying Down Twist
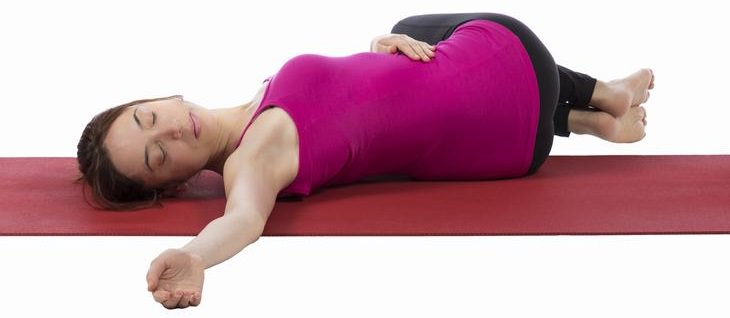
Suitable for: Beginners
Benefits: A great pose to stretch the spine and relax the back muscles.
It also promotes relaxation in the mind, releasing any stress or
tension.
Modifications: Rest your top knee on a firm pillow or place a folded
blanket between your legs.
Here's How:
1. Lie down on your back, with your arms stretched out horizontally,
keeping them in line with your shoulders. Bend your right knee, bringing
your foot close to your hip (the sole of your foot should be on the
ground).
2. Swing your right knee over to the left side, resting your knee on a
firm pillow or folded blanket if desired. Simultaneously, turn your head
to the right, looking at your right palm. Keep your shoulder blades on
the floor.
3. You should feel a stretch in your thighs, groin, arms, neck, stomach
and back. With each exhalation relax deeper into the pose, holding for a
couple of breaths.
4. Slowly come out of the pose by turning your head back to the center,
straightening the torso and then your right leg. Mirror the pose on the
other side.
Contraindications: Avoid the pose if you have any spinal injury.