Wednesday, April 26, 2023

7 Yoga Exercises That’ll Help You Treat Thyroid Dysfunction

As most of us already know, almost any physical or mental problem can be treated with methods other than artificial drugs, but did you know that you can handle thyroid-related problems with a few simple yoga stretches? As with all other parts of the body, proper functioning of the thyroid gland is closely related to the quality of the blood in it and its components, and various yoga positions can compress the thyroid gland and surrounding lymphatic tissue to extract the blood and lymph fluid stored in it and make room for healthier fluids. This together with a diet conducive to thyroid function, can greatly benefit the thyroid. So, what are you waiting for? Lay out your yoga mat and perform the following exercises to help your thyroid function properly.

How effective is yoga for thyroid function? 
In a study that examined the effectiveness of yoga exercises for the proper functioning of the thyroid gland, hormonal changes were found that could improve its activity within one month only with the help of yoga stretches. Participants were divided into two groups; One group performed yoga exercises that help the function of the thyroid gland and the other group performed physiotherapy exercises that help it function for the same amount of time and at the same frequency. Among those who performed yoga exercises, the most significant improvement in thyroid function was seen in the shortest time. The hormonal changes experienced by the first group didn’t appear in the second group, meaning the results show that yoga exercises are more effective and recommended for those with thyroid dysfunction.
 
How often should the exercises be performed? 
It is recommended to perform the following 7 exercises every other day, each stretch for 30 seconds to a minute. You’ll start seeing a positive change in your thyroid function after four weeks, but if you want to enjoy the most effective and healthy activity of the thyroid gland, it is recommended that you continue with these exercises for several months. If you are taking thyroid medication, it is recommended to take blood tests after 3 months, as you may need to reduce their dosage. However, continue to consume them as recommended by your doctor while doing these exercises. 
 
1. The Camel Pose (Ushtrasana)  
This position stretches the entire upper part of the body, and in addition to thyroid function, it also strengthens the core and spinal muscles, improving the flexibility of the thighs and shoulders. 


Kneel down and try to pull your tailbone toward your stomach without pushing your pelvis forward. 
 
Lean back, press your shoulder blades together and tilt your head back. 
 
Grab the body part between the calves and heels with your hands and make sure your chest doesn’t tilt up. 
 
Stay in this position for 30 seconds to a minute. 
 
Finally, place your hands slowly on your, take a breath and bring your head back down and your chest to its natural position by pushing your hips downward. 
 
Notes Make sure your neck doesn’t drop as this is what is allowing blood supply and oxygen to your head, preventing dizziness. This exercise may cause beginners to feel a bit odd and experience a tingling or nausea, but these are known phenomena that with constant training disappear.

2. The Cobra pose (Bhujangasana) 
This position strengthens the spine and stretches the chest, shoulders, and abdomen. It also tones the buttocks and helps reduce stress and fatigue. Ancient writings also indicate that it increases body temperature and helps prevent various diseases.

Lie on your stomach and place your hands on the floor. Push your chest upwards with your hands and stretch your neck so that you are looking up, but keep the floor below you within your sight. Stay in this position for 30 seconds to a minute. Finally, take a breath and slowly bring your chest back to the floor. Notes Be careful not to stretch your neck and lower back too much. To avoid this, keep your gaze towards the floor and concentrate on the movement between the shoulder blades. 
 
 
3. The bow pose (Dhanurasana) This position strengthens the muscles of the back and abdomen, stretches the chest, neck and shoulders, tones the leg muscles, and also helps to reduce menstrual cramps and headaches, stimulates the activity of the reproductive organs and helps alleviate various kidney problems.
Lie on your stomach and bend your knees. 
 
Hold your feet with your palms and use them to pull your chest upwards. 
 
Stay in this position for 30 seconds to a minute. 
 
Finally, take a breath, release your feet and return your chest slowly to the floor. 
 
Notes - Keep your head forward, but in this case, don’t stretch your neck too much. Look at the sky or the ceiling with your eyes only. 
 
4. The lion's pose (Simhasana) This position also helps to deal with stressful symptoms related to sinus problems, as well as balances blood pressure and heart rate. Sticking your tongue out during the exercise helps alleviate problems related to the vocal cords.

Crouch and balance your body with your toes and hands. 
 
Raise your knees and stay on your tiptoes only. 
 
Spread your knees apart to keep your balance. 
 
Place your hands on your knees, lower your head, stick your tongue out, and stretch it as far as you can toward your chest. 
 
Stay in this position for 30 seconds to a minute. 
 
Finally, take a breath and slowly bring your hands to the floor and then your knees. 
 
Notes- This may seem strange to you, but sticking your tongue out is a very important part of this exercise and therefore you shouldn’t skip it. 
 
5. The plow position (Halasana) This position helps reduce neck pressure, improves blood flow in the body and helps reduce blood pressure.

Lie on your back and keep your close to your sides on the floor. 
 
Bring your feet behind your head and keep your back straight at 90 degrees. 
 
Grab your toes with your hands. Stay in this position for 30 seconds to a minute. 
 
Finally, take a breath, release your feet and bring your legs back down. 
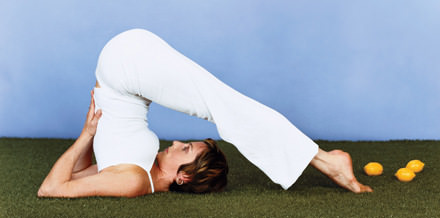
 yoga poses
Notes The plow position can create pressure on the spine among those who are not used to regularly doing yoga. In order to reduce your chances of getting injured, you can do an easier version of the position, where you support your back with your hands, and you can place an object to be used as a step where your feet should reach.

6. The angel pose (Konasana) This position helps reduce pressure on the lower back, hips, and pelvis, and strengthens and stretches the back.

Stand with your legs wide apart. 
 
Straighten your arms to your sides, grasp your right leg with your right hand and bring your left hand over your head until you're completely bent to the right. 
 
Keep your hands and back straight throughout the movement, and keep your hips in place. 
 
Stay in this position for 30 seconds to a minute. 
 
Take a breath, and from this position move your hands the same way in the other direction. 
 
Finally, take another breath and return your back to its natural position with your arms to your sides. 
 
Notes -How wide your legs are spread can affect the difficulty and comfort of the stretch. Find the width that suits you, where you feel the stretch, but it isn’t painful. 
 
7. The reclined thunderbolt pose (Supta Vajrasana) This position helps reduce leg pain and improves digestion. It is especially recommended for people who have to spend many hours during the day standing and athletes. You can also perform it as a post-running or walking stretch, and it is advisable to finish the exercises with it. 
 
Kneel down and sit with your buttocks on your heels. 
 
Support your body by placing your hands behind your back on the floor, and put your back behind you so that a straight line is formed between your knees and your head. 
 
Rest on your elbows on the floor and lift your back, all while maintaining a straight line between your knees and your head. 
 
Now support your body with the top of your head and place your hands on your thighs. 
 
Stay in this position for 30 seconds to a minute. 
 
 Finally, take a breath and use your hands to get your body back to the initial position slowly. 
 
Be careful not to make any sharp movements with your head and back and keep a straight line between your knees and your head. 
 
Notes It is recommended not to perform this exercise if you suffer from knee and joint problems.


This is only for your information, kindly take the advice of your doctor for medicines, exercises and so on.   

https://gscrochetdesigns.blogspot.com. one can see my crochet creations  
https://gseasyrecipes.blogspot.com. feel free to view for easy, simple and healthy recipes    
https://kneereplacement-stickclub.blogspot.com. for info on knee replacement
https://cancersupportindia.blogspot.com  for infor on cancer and health related topics
https://GSiyers home remedies.blogspot.com   is the latest addition to my blogs. I'm going to add posts there, do give me your valuable feed back on my blogs. Thanks a lot, take care, be healthy and be happy. 

Labels: , , , , , , ,

Friday, March 25, 2022

These Yoga Poses Will Normalize Your Appetite in 5 Minutes

Stress, hormones, and even intense exercise can all make you overeat, which can soon snowball into a full-blown bad habit. This harmful habit is destructive to your heart and digestive health, plus it negates all the hard work you put into your well-being and fitness.

To combat overeating and to regain control over your own appetite, try one or more of these yoga postures, designed specifically for said problem. Apart from normalizing your appetite, these poses have tons of other health benefits and will make you feel great. On top of that, doing these yoga asanas takes only a few minutes tops. 
 
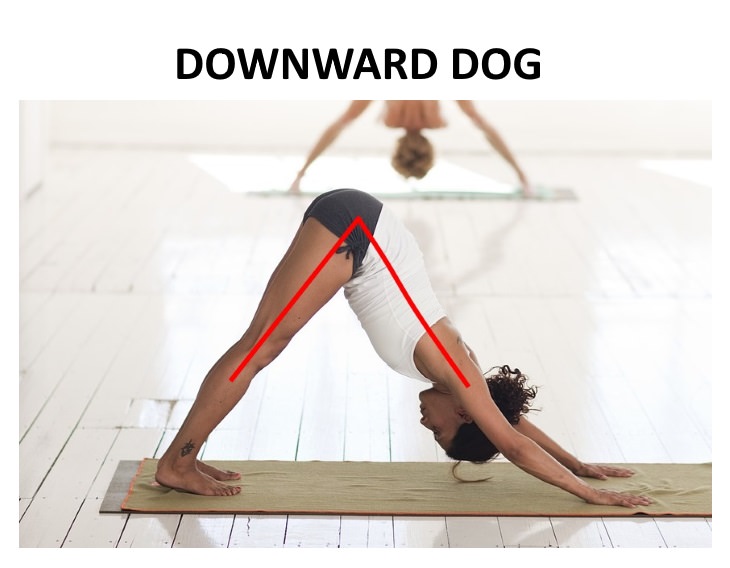
1. Downward Facing Dog
toga appetite control Downward facing dog
Downward-facing dog is one of the most famous yoga positions for a good reason, as it combines the benefits of a forward fold and engages the abdominal muscles at the same time. Apart from preventing you from overeating, it has the following health benefits: 
balances blood pressure 
engages the abdominal muscles 
relieves lower back pain 
promotes intestinal health 
 
This pose is an overall body and mind strengthener. 

How to do the pose: 
Step 1. Start from an all fours position. Your knees should be directly under your hips and hands should be at shoulder width. This alignment ensures your weight will be spread equally throughout your body once you’re in downward dog. 
 
Step 2. As you breathe in naturally, slowly lift your knees and elbows and straighten them, if possible, until your body looks like a downward letter "V". Situate yourself comfortably in the posture, breathe in slowly and mindfully, sucking your belly in and distributing the weight equally through your legs and shoulders. 
 
Hold this position for at least 10 cycles of breath, then slowly land back on your knees and elbows. 
 
Important note! A common mistake in downward dog is that people try to straighten their legs and not their lower back. The most important thing in this posture is a straight spine, so engage your belly and straighten the spine as much as you can... and the legs can stay bent. 
 
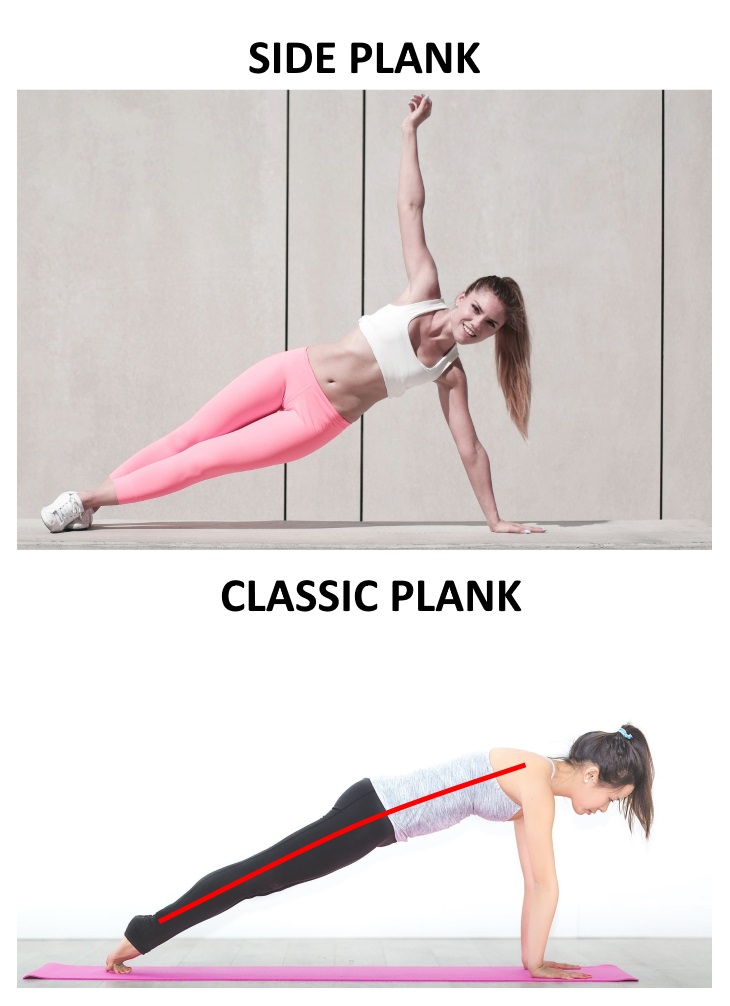
2. Plank Pose 
toga appetite control Plank and side plank
Another “celebrity” yoga pose, the plank is an essential component to most workout routines. Did you know that it can tame your naughty appetite, too? Apart from that, planks are excellent full-body strengtheners, as well as mood boosters and belly fat erasers. 
 
How to do the pose:  
Step 1. We recommend you start your plank from the downward facing dog position. The trick in this pose is to start when you’re exhaling and gradually moving your head and chest forward while simultaneously engaging your core and buttocks even more. Eventually, your body will form a sideways "L" position.

Step 2. Once you’re situated, make sure your spine and legs form a straight line. To do that, you have to engage your thighs and glutes quite a bit. Also, make sure to keep your neck relaxed. To do that, spread and pull your shoulders down. 
 
Hold this position as long as you can, start with around 5 breaths and then evolve until you can hold it for 2-3 minutes. 
 
When that becomes easy, you can move to a more difficult variation called the side plank (see picture above). To do it, just move your center of balance to one hand and lift the other. To maintain the balance, move the leg that’s closer to the floor a bit forward like the woman on the picture. 
 
Also, don’t forget to repeat it on the other side.

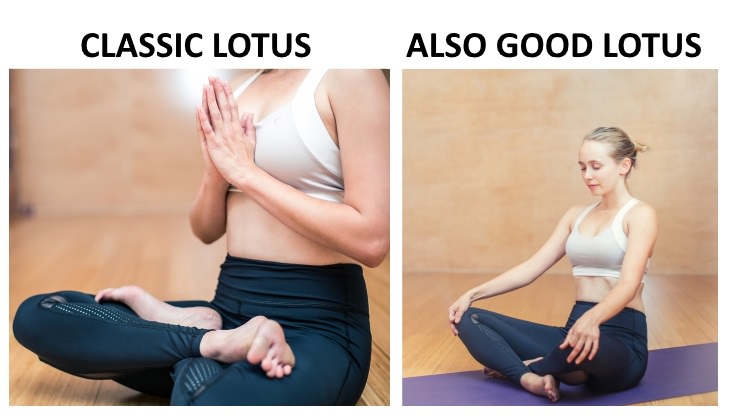
3. Lotus Pose  toga appetite control lotus
One of the most effective breathing and meditation poses is the famous lotus position. It has several benefits: it can help you focus and disconnect from the stresses of the world, concentrating on a deep breath. This calming effect is also reflected in your emotional state and appetite, calming and normalizing both.

How to do the pose: 
Step 1. Sit down on the floor with your legs bent at your knees and crisscrossed to form a comfortable seat. The goal here is for you to sit comfortably and to have a straight spine. 
 
Tip: if you did as instructed and still can’t straighten your back, grab a pillow (or two) to sit on. This will lift you up and make it easier to straighten your spine.  
 
Step 2. The standard lotus requires for you to fold your legs so that your feet stick out, like two lotus flowers. This posture can be hard on your knees, though, as it requires extreme outward knee rotation. That’s why many yoga teachers nowadays recommend spreading the knees with the feet folded below them like the picture on the right shows. 
 
You can hold this position for several minutes and simply focus on DEEP breathing.

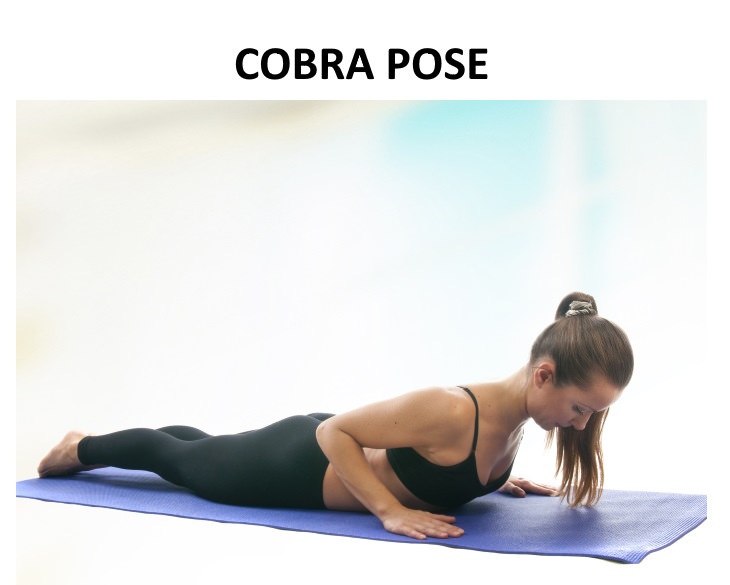
4. Cobra Pose 
toga appetite control cobra
 This wonderful pose activates the entire upper body and does wonders for your spine. It can relieve neck and back pain and is very beneficial to digestion, which is why it can normalize your urge to eat.

How to do the pose: 
Step 1. Lie down on your stomach, legs straight and arms bent in the elbows like a grasshopper. Your hands should be on the floor right next to your ribcage. Breathe in, relax your shoulders and pull out your neck. This position will ensure that you don’t hurt your neck. 
 
Step 2. On an inhale, engage your abdominals, your side body muscles and your back muscles as you slowly lift up your head, shoulders and upper torso as high up as you can. Don’t worry if your arms won’t be straight and remember that your torso should be doing all the work, and not your arms. 
 
Make sure to keep your shoulders relaxed and neck straight. 
 
Hold the position for 5 breaths or as long as you can until you return to your initial position. 
 
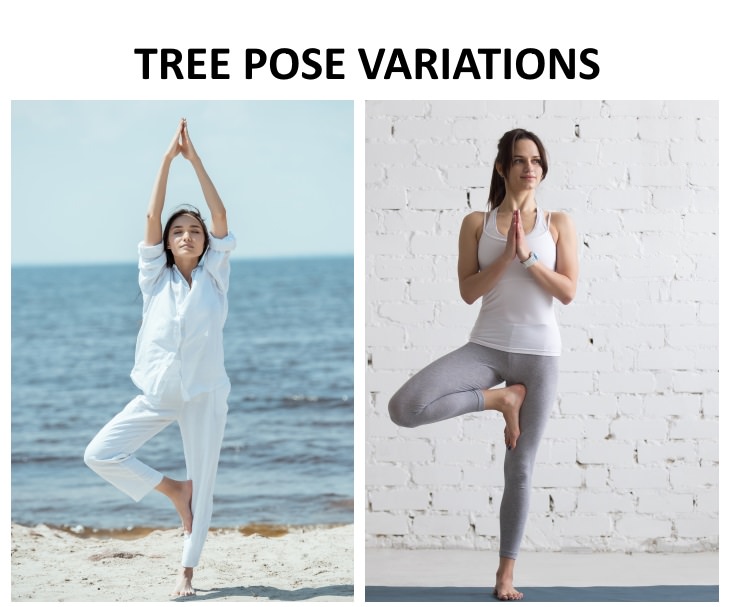
5. Tree Pose  toga appetite control tree pose variations
This balancing posture will calm your nerves and your digestive system. It is also beneficial for your posture and spine health.

How to do the pose: 
Step 1. Stand up straight with your arms on your sides. As you breathe in, raise one leg and put it on the other thigh. Can’t maintain the balance with your leg on your thigh? No worries, you can always keep it on your knee or slightly above the ankle. If you’re afraid of falling, practice this pose by the wall. 
 
Step 2. When it comes to your hands, you have many options: you can either keep them together in front of your torso or lift them overhead (try simply holding them up and then connecting them like on the left picture). If none of those work for you, just rest them on your sides. 
 
Hold as long as you’d like, slowly breathing and focusing on your breath and don’t forget to repeat on the other side.

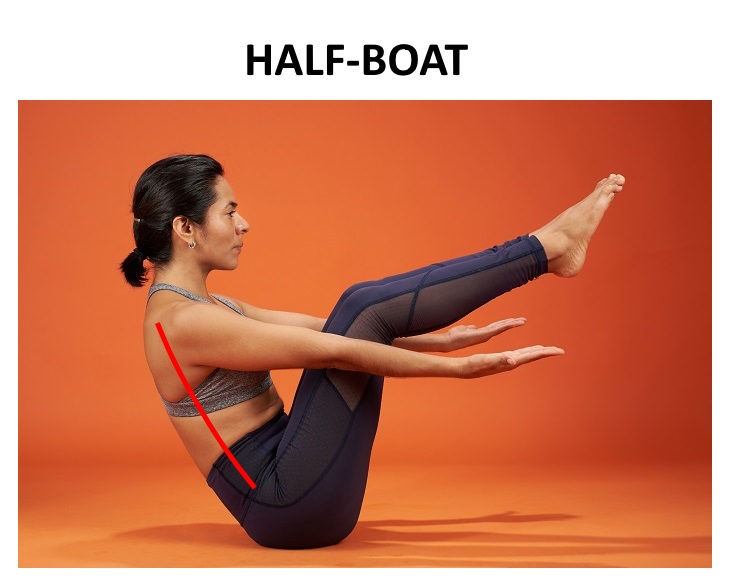
6. Half-Boat  toga appetite control half-boat
Boat positions come in different variations, and this specific one targets digestion. The side effects of doing this pose is a toned belly and thighs, and not only a happy digestive system. 
 
How to do the pose: 
Step 1. Sit up straight on the ground with your legs bent and parallel to each other. Engage your core and lift your arms, palms facing up until they’re parallel to the floor.

Step 2. When you’re ready, slowly lift your legs as high as you can by engaging your abdominal muscles. It is important to keep a straight lower back. No need to straighten your legs in this variation. 
 
Hold this position as long as you can, but don’t overdo it because it is a very intense core exercise. 
 
Tip: if you find that it is difficult for you to feel your core and maintain a sense of balance in the posture, try engaging your inner thighs or even holding a book between the legs to make you do so. 
 
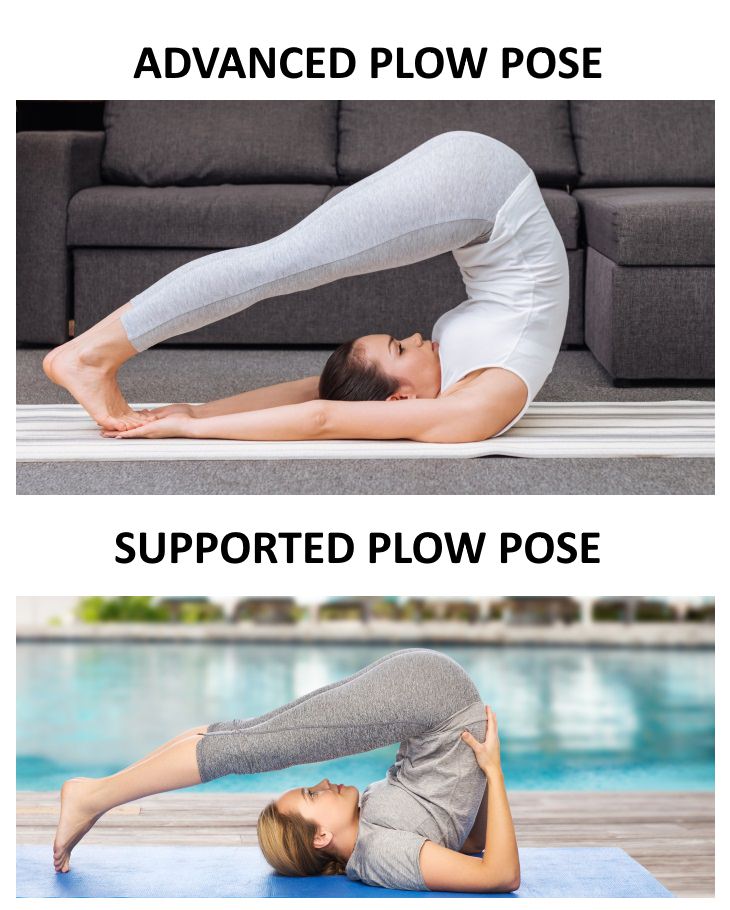
7. Plow Pose  
toga appetite control plow variations
Any inverted position is essential for digestive health. This position is particularly beneficial to your pancreas and liver. Many people also experience a sense of release in the lower back while doing this position, so it’s a real multitasker. 
 
We understand that this pose may look challenging, but it is much easier than it looks and we will give you a few variations of it, so find one suitable for you. 
 
Important note: Women on the first few days of their period and people who experience high blood pressure should avoid this posture.

How to do the pose: 
 
Step 1. Lie down on your back with your arms parallel to your body. Use your hands to support your lower back from the sides as you slowly lift your legs overhead. Knees can be bent or straight, feet can reach the floor or not. 
 
Step 2. If you’re a beginner, support your lower back with your arms like the woman on the lower picture. If you’re more confident, you can move your hands towards your feet and maybe even touch them (see upper picture). 
 
Wherever you are, relax and make 5-10 breaths in this position. 
 
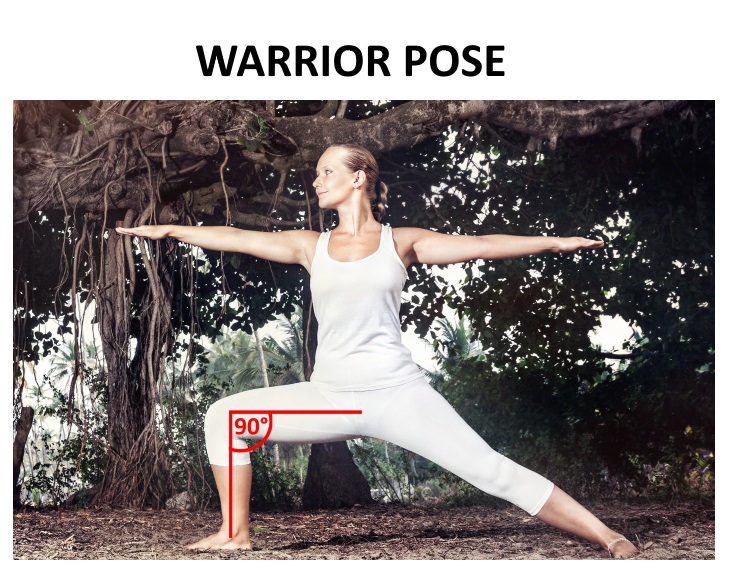
8. Warrior Pose  
 toga appetite control warrior
From the many warrior positions, this is the one that targets increased appetite, digestion, as well as balance and flexibility. Like all the warrior positions, it also aims to boost your mood and confidence

How to do the pose: 
 
Step 1. Stand up straight. Now take a big step back with one foot, placing the foot at a 45º angle. The step should be just big enough for your knee to create a 90º angle when bent. 
 
Step 2. Once your legs are situated, stretch your hands straight parallel to the earth like the woman on the picture. You can either look straight or in the direction of the bent knee in this posture. 
 
The goal of this posture is to stretch your side body as much as you can, so stretch your hands and back leg as wide as possible to the sides, just like a starfish. Hold the posture for 5-10 breaths and repeat it on both sides.

This is only for your information, kindly take the advice of your doctor for medicines, exercises and so on.   

https://gscrochetdesigns.blogspot.com. one can see my crochet creations  
https://gseasyrecipes.blogspot.com. feel free to view for easy, simple and healthy recipes    
https://kneereplacement-stickclub.blogspot.com. for info on knee replacement

Labels: , , , , , , , , , , ,