Friday, December 05, 2025

6 Ways to Stretch Your Gluteus Medius

The gluteus medius, which makes up the upper and side part of your buttocks, plays a crucial role in hip movement and overall lower body function. Stretching this muscle can help prevent injury and relieve pain in your lower back, knees, and hips. 

As one of your hip abductors - the muscles responsible for moving your leg away from your body - the gluteus medius benefits significantly from regular stretching. Proper stretching can help loosen tight hips, increase range of motion, and strengthen the hip area. 
 
Before You Begin: The Importance of Warming Up Before performing any static stretches, it's essential to warm up your muscles, especially if they feel tight. A stretching session can put considerable strain on your muscles, and without proper warm-up, the risk of injury increases. You'll also find it easier to go deeper into stretches when your muscles are warmed up. 
 
Warm-up suggestions: 
 Light cardio exercises such as walking, jogging, or jumping jacks 
Dynamic hip exercises to improve blood flow to the area 
When performing stretches, remember to relax your muscles and focus on your breathing. This helps relieve tension in your body and allows you to deepen the stretches safely. 
 
6 Stretches for the Gluteus Medius 
 
1. Pigeon Pose
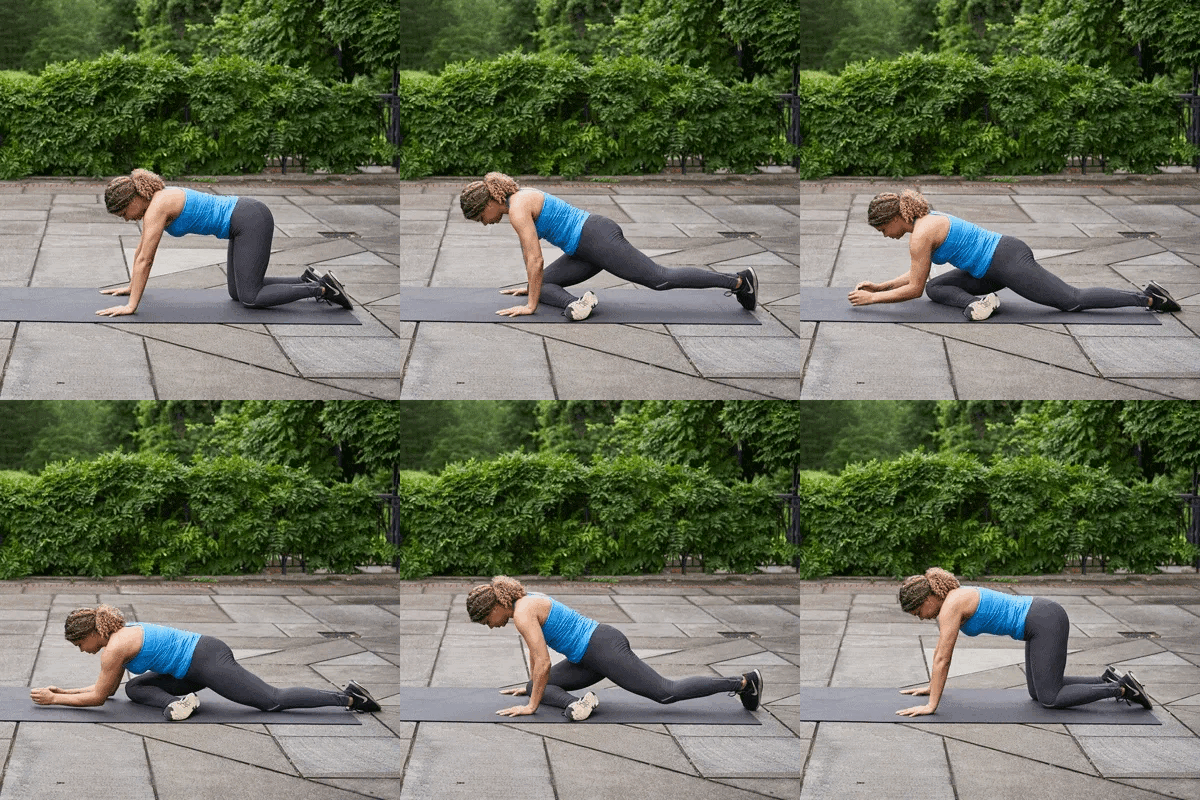


The Pigeon Pose is a popular yoga posture that engages the hip flexor muscles while stretching the gluteus medius.
 
How to do it: 
Kneel on the ground with your hands below your shoulders and hips below your knees 
 
Bring your right knee to a 90-degree position in front of your body, next to your right wrist 
 
Straighten your left leg toward the back of your body 
 
Slowly lean your torso forward toward your front leg and rest your forearms on the ground (or sit upright for a more comfortable variation) 
 
Hold for 30 seconds, then repeat on the other side Perform 3 sets on each side 
 
2. Seated Glute Stretch
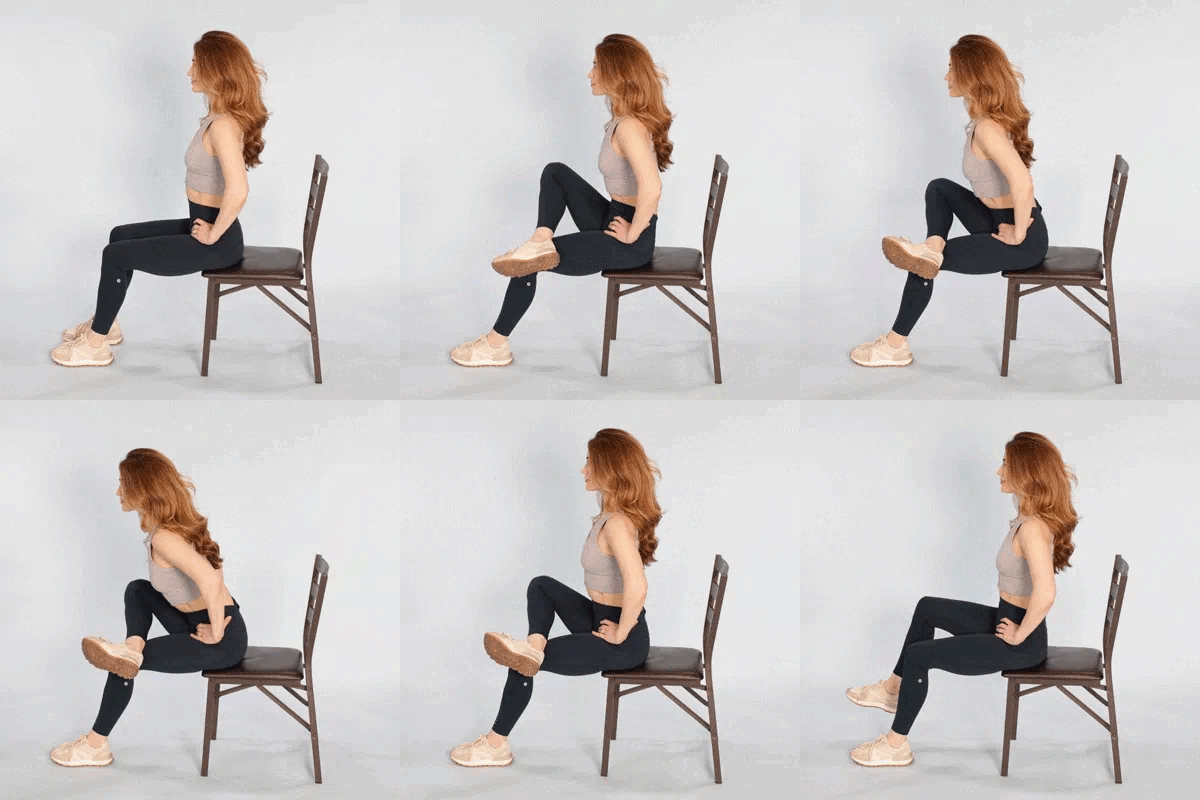


This versatile stretch has many variations, with the chair-seated version being most common as it allows you to adjust height and depth. 
 
How to do it: 
Sit upright with a neutral spine and hands on your hips 
 
Cross your right leg over your left, resting the ankle over the area between the knee and quad muscle 
 
Slowly lean your torso forward to a comfortable position (you should feel the stretch in your right glute) 
 
Hold for 3 to 5 seconds, then rise back up Release your leg and repeat on the other side Perform 8 to 10 reps on each side, 3 times daily 
 
3. Supine Glute Stretch
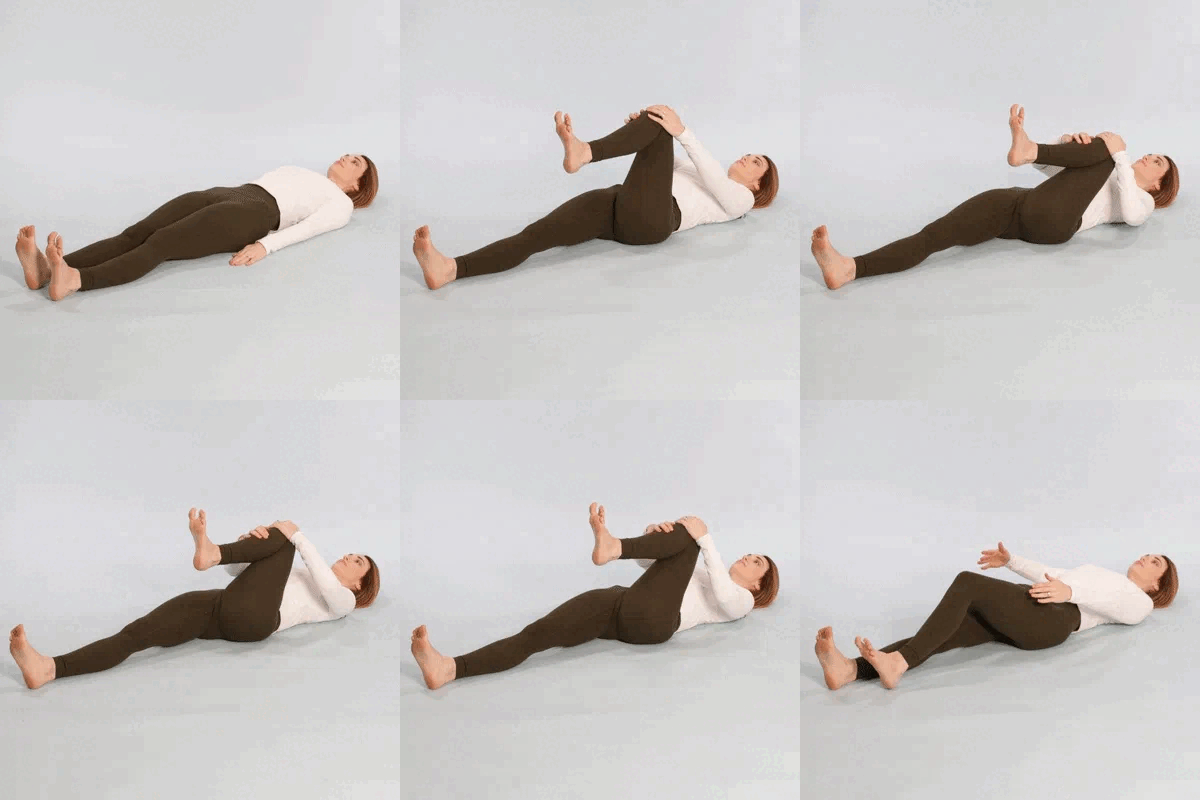

The supine (lying down) glute stretch is ideal for targeting the glute muscles and hip abductors. It's an excellent alternative if the Pigeon Pose causes knee discomfort or if you have very tight hips. 
 
How to do it: 
Lie on your back with arms by your side and legs straight 
 
Bring your left leg up toward your stomach and wrap your hands around the knee 
 
Pull the knee toward your chest, feeling a deep stretch in your left glute 
 
Rotate slightly right and left to deepen the stretch 
 
Release the knee and straighten your leg Perform 10 reps on each leg, 3 times daily 
 
 
4. Seated Spinal Twist
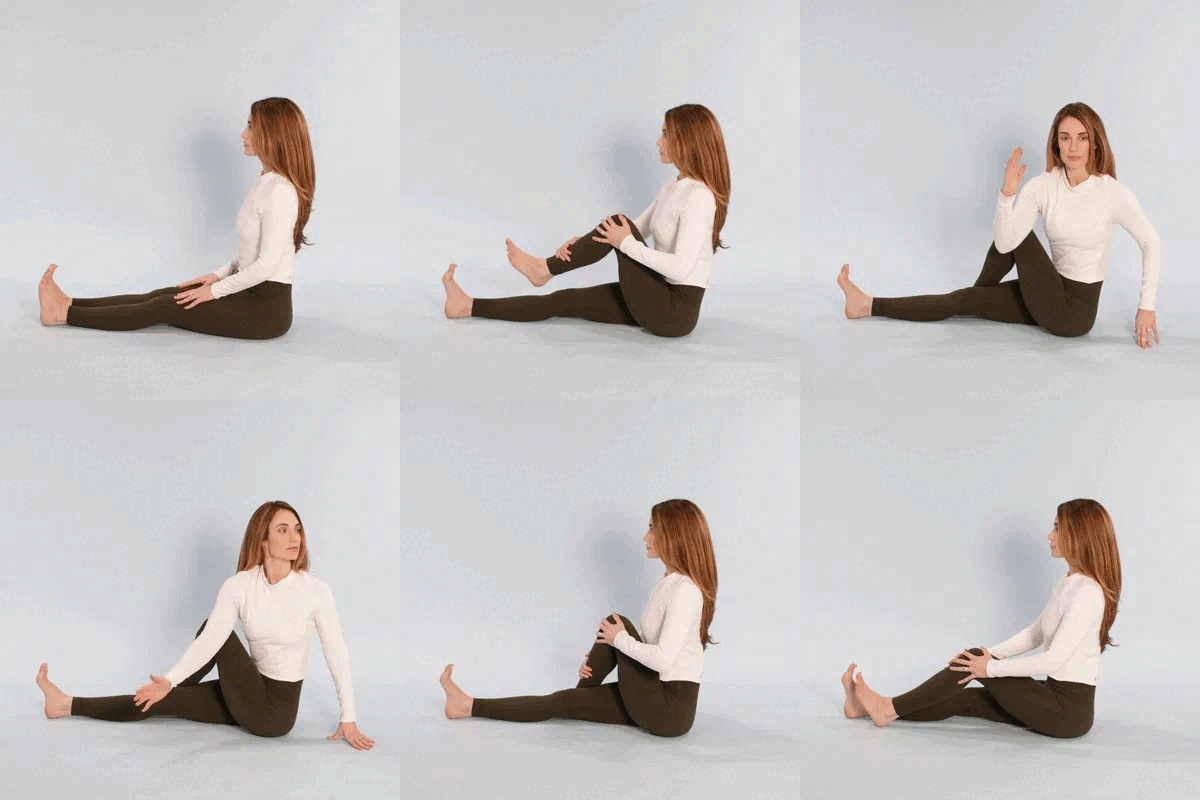
 

The seated spinal twist stretches the muscles in your glutes, hips, and back - all of which are interconnected. 
 
How to do it: 
 
Sit on the floor with legs outstretched 
 
Bend your left knee and bring it over the right leg, planting the foot beside the right knee 
 
Twist your upper body to the left, placing your right elbow on the left side of the bent knee 
 
Plant your left hand on the ground behind you and look in that direction 
 
Hold for 5 to 10 seconds, then slowly twist back to center and straighten your legs 
 
Perform 10 repetitions, then repeat on the other side 
 
Complete 3 sets on each side daily


5. Kneeling side bend
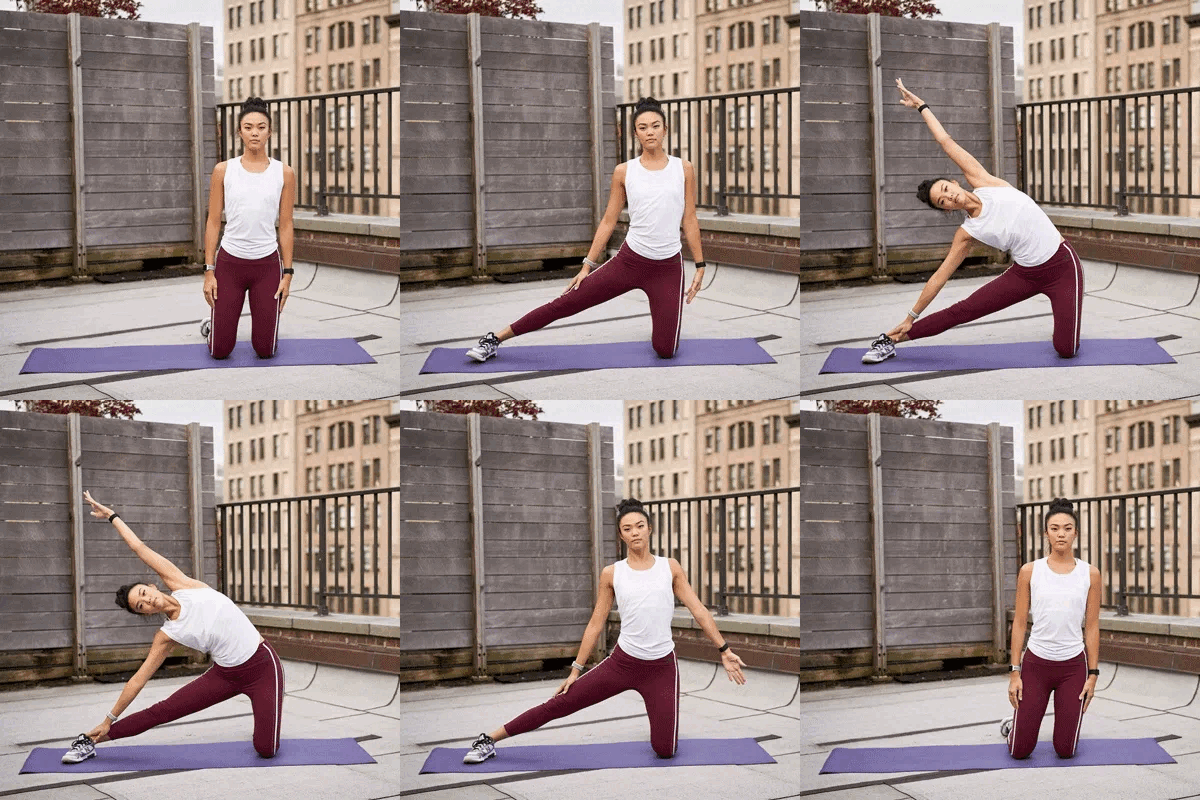


The kneeling side bend stretches the entire side of your upper body, from the gluteus medius up through the back, shoulders, and arms. 
 
How to do it: 
 
Kneel on both knees and extend your right leg straight out to the side 
 
Raise your left arm toward the ceiling, then bend over the outstretched leg 
 
Glide your right arm down the right leg for support and arch the left arm high, bringing it over to the right side (you should feel a deep stretch up the left side of your body) 
 
Hold for 5 to 10 seconds, then return to center 
 
Repeat 5 times on each side, 3 times daily 
 
 
6. Foam Rolling for Glutes
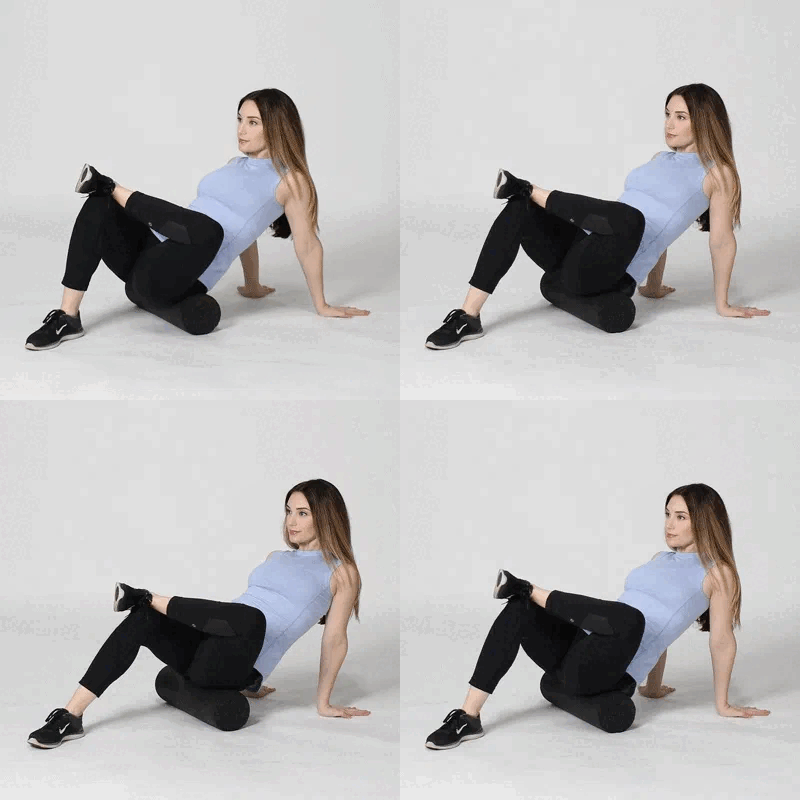
 

Foam rollers are exercise tools that can help loosen tight muscles. Use them before your stretching routine to warm up muscles, or afterward to support muscle recovery. 
 
How to do it: 
 
Sit on a foam roller with your hands planted behind you for support and knees bent at 90 degrees 
 
To target the left gluteus medius, raise your left leg and place the outside of the ankle on your right knee 
 
Rotate your lower body slightly to the side and upper part of your glute 
 
Roll back and forth 10 times, breathing through the movement 
 
Repeat on the other side Perform 3 sets on each side daily 
 
When to See a Doctor  
 
In most cases, tight hip abductors and glute muscles can be managed through exercises, stretches, and foam rolling. However, you should consider consulting a primary care doctor if you experience: 
 
Persistent glute and hip pain that affects your daily activities 
 
 Symptoms that may indicate an underlying health condition, such as arthritis 
 
A physical therapist can also help develop a stretching plan tailored to your individual needs and ensure you're performing exercises correctly.


The Bottom Line 
 
Your glutes are among the most important muscle groups in your body, involved in essential activities like walking and running. Regular stretching of the gluteus medius makes an excellent addition to any cooldown routine, helping to loosen tight hips, improve range of motion, and reduce chronic back pain. 
 
Important reminder: Don't stretch your body too hard or too fast. Doing so could lead to injury. Listen to your body, warm up properly, and progress gradually for the best results.


This is only for your information, kindly take the advice of your doctor for medicines, exercises and so on.   


Labels: , , , , , , , , ,

Saturday, February 15, 2025

Mobility Is the Key to Remaining Limber and Strong as You Age

 Everyone can benefit from improving their mobility so they can move more easily through each life stage. Mobility can promote healthy aging, joint function, strength and flexibility, making it easier to complete everyday tasks. It may even limit your risk of injury.

There are many reasons you'll want to add mobility to your workout routine so you remain your stronger and limber self as you age. We spoke with experts to break down what mobility exercises you should be doing, regardless of age.

Why is mobility important?

Being mobile and active is more than just exercise -- it allows you to move throughout your day and improves your quality of life. A lack of mobility can negatively affect your posture and balance, putting you at a higher risk of injuries, says a fitness and nutrition adviser.

According to the National Institute of Aging, maintaining your mobility is key to preventing disability and improving your chances of living independently as you get older. If you don't prioritize mobility, it can create "a loss of strength, cardiovascular endurance, flexibility and independence," says a physical therapist and clinic director.

Studies also suggest that along with a negative effect on performing activities of daily living -- which include bathing, eating, dressing, using the toilet and walking -- lower mobility can reduce your cognitive functioning. This can increase your likelihood of social isolation and developing depressive symptoms, especially as you age.

"During youth, our body tissue tends to be more supple and responds better to novel stressors, so we tend not to see the loss of mobility as quickly," says a program coordinator of exercise science at New York Institute of Technology. Focusing on mobility when you're young can help prevent these adverse effects and possibly increase your lifespan. 

Simply put: If you don't use it, you may lose it.

Benefits of mobility

Improving your mobility can have multiple benefits, including:

  • Better posture, balance and muscle function
  • Reduced fall risk
  • Stress relief
  • Increased range of motion and coordination
  • Injury prevention
  • Joint flexibility

The connection between mobility and exercise 

Harvard Health defines mobility as the ability to move through your day with purpose, using skills like balance, coordination, stamina, range of motion and strength. Exercise, on the other hand, is a physical activity that improves  your physical fitness, health and well-being. 

According to a 2018 study, exercise improved balance, cognitive function, endurance and mobility in people with cognitive impairment and dementia. Low-intensity exercises like walking, swimming, biking and yoga are safe for people who can't perform vigorous activities. When done regularly, low-impact activities can help you recover from injury and illness while improving your mood, energy levels and mobility. 

High-intensity exercises, such as hiking uphill, running, playing tennis or jumping rope, increase your heart rate and make it difficult to speak more than a few words without taking a breath. While both types of exercise can provide results, a 2012 meta-analysis focusing on older adults with impaired mobility, physical disability and/or multi-morbidity suggests that high-intensity exercise can improve physical function and mobility somewhat more effectively than low-intensity exercise. 

Overall, a 2015 article confirms that regular exercise and physical activity can promote healthy aging, slow the progression of mobility disability and improve motor performance. 

Mobility vs. flexibility

"Flexibility refers to the ability of a muscle to lengthen. Mobility refers to the active ability to control movement through a range of motion," says a kinesiology professor at the University of Nevada Las Vegas. 

One isn't more important than the other. Healthy movement requires both mobility and flexibility. If your muscles and joints aren't flexible, they can't move through the full range of motion, which can limit your ability to move freely, making everyday tasks like reaching, sitting or walking challenging or painful.

Personal trainer  likens it to a rusty door hinge. At first, the door sticks and creaks, but it works fine. But over time, it becomes harder to open until it won't work at all. "When one part of the body becomes stiff, we naturally compensate in other parts of the body, which can then lead to imbalance, causing larger issues like poor posture, sciatica and chronic pain," she says.

Flexibility isn't just about physical health; it also affects your cardiovascular health. According to a 2020 meta-analysis, stretching exercises can reduce arterial stiffness in older adults. Arterial stiffening increases your chances of developing cardiovascular disease later in life.

 How much mobility do you need?

Children and adolescents should get at least 1 hour of moderate-to-high exercise daily, while adults should strive for at least 150 minutes, or 2.5 hours, of moderate exercise per week, according to the experts. You should also complete muscle-strengthening activities at least twice per week.

The American College of Sports Medicine  recommends flexibility and stretching exercises two to three times weekly, though daily stretching is ideal. It advises stretching to the point of slight discomfort or when you feel tightness in your muscles and doing a range of exercises to target each muscle group. Each stretch should last for 10 to 30 seconds. Older adults should hold the stretch up to a minute for greater flexibility. 

Just a few more minutes per day of moderate to vigorous physical activity can significantly affect your life. One 2022 study shows that over 111,000 fewer preventable deaths occur yearly with 10 more minutes of physical activity per day. Increasing to 20 additional minutes is estimated to prevent over 209,000 deaths.

Getting a minimum of 150 minutes of moderate exercise per week can reduce your risk of developing metabolic syndrome, type 2 diabetes, heart disease and stroke, according to the Centers for Disease Control and Prevention. Stroke and heart disease are the leading causes of death in the US.

Ways to improve mobility

The best ways to improve your mobility depend on your current fitness level, health, age, ability and goals. For example, chair-based exercises can help improve cognitive and physical function in nursing home residents , according to a 2021 systematic review. Another 2011 study found that stroke survivors  may find that water-based exercises can improve their ability to perform ADLs. Aquatic exercises can also improve function, pain and quality of life for adults coping with musculoskeletal conditions. 

Mercer says that dynamic stretching (controlled movements that use your muscles to go through a full range of motion), yoga and Pilates are good ways to improve your mobility. Dynamic stretches are a great way to warm yourself up for a workout, as they put your muscles and joints through their full range of motion. 

While one 2016 study found that yoga and Pilates can improve dynamic and static balance and strength in older adults, another 2019 study found that Pilates is superior for individual health and functional movement. Pilates has also been found to significantly improve balance and postural control, which can reduce your fall risk.

Best exercises for mobility

The best exercises for mobility can look different for everyone, depending on your strength and ability level. Water exercises offer a low-impact way to improve your mobility if you have access to a pool. You can also find YouTube videos instructing you on how to do Pilates and yoga at home without equipment.

Here are some exercises our experts recommend for mobility that you can do at home:

Shoulder internal rotation

Seated spinal twist

Tabletop wrist extension 

Hip flexor lunge

Standing forward bend
 
Standing heel raises
 
Standing marches 

chair squats
 
Seated heel and toe raises
 

What aids can help with mobility? 

Aids such as walkers, canes, crutches, rollators and guide dogs can help people with limited mobility move about their lives. You can also use aids while exercising to keep you safe and prevent injury. 

"Tools such as resistance bands, foam rollers and massage balls help with stretching muscles and increasing range of motion," Mohr says. Rothstein suggests a soft mat, such as a yoga mat, for exercising on hard surfaces and a stretch strap when working with hard-to-reach body parts.

Registered nurse and personal trainer , believes a foam roller may be the single best tool to improve mobility. "They allow you to do almost everything, from myofascial release by rolling on them to thoracic mobility exercises, strengthening exercises like hamstring curls and even basic stretches, such as laying on the roller with your arms out for a good chest stretch," Repke says.

Repke also advises proper preparation to keep yourself safe while exercising. Take 10 minutes before your workout to warm up, doing light cardio or movements targeting the muscle groups you're about to work on. Then, continue your warmup with stretching and mobility exercises before moving into your workout routine. 

Don't forget "easily overlooked things such as shoe choice, comfortable clothing and easy access to exercise," Mercer says. Removing barriers can help you get into and maintain an exercise routine that will aid your mobility, flexibility and strength.

The bottom line

Mobility is essential to every life stage to ensure your body can move freely and with purpose throughout every range of motion. A lack of mobility can prevent you from performing everyday tasks like brushing your teeth, squatting to pick up laundry or your kid's toys, bathing, dressing and other ADLs. It can also alter your balance and diminish your stamina, strength, arterial health and quality of life, especially if it causes social isolation. 


Labels: , , , , , , , , , , ,

Saturday, October 22, 2022

10 Beginner Yoga Poses That Help Fight Diabetes

Type 2 diabetes affects 29.1 million people in the United States, 8.1 million of whom may be unaware of their condition. It occurs when the body doesn't use the hormone insulin properly. As a result, when insulin is not doing its job, blood sugar levels rise, causing health problems. However, lifestyle changes, including regular exercise, can help manage diabetes. 
 
How Yoga Can Help Manage Diabetes 
Your exercise regime need not only be limited to biking or jogging. Studies show that yoga can be just as beneficial. In fact, this ancient practice has been found to help lower blood pressure and improve blood glucose levels. Yoga is also recommended for stress management, as stress elevates blood sugar, which can lead to further diabetes complications. Furthermore, yoga invites us to center ourselves. This act of centering calms us down, thus balancing our blood sugar levels. Yoga also brings about mindfulness, which involves staying and living in the moment. This is a helpful tool that can have lasting, fruitful behavior changes, and is a must for managing diabetes. 
 
In fact, in one study, researchers found that people that scored highly at mindfulness were more likely to have healthy glucose levels than people who had lower scores. But exactly how mindfulness plays a role on glucose levels is not yet understood. In another study published in March 2016, in the American Journal of Health Behavior, it was found that mindful people are less likely to be obese. Furthermore, among 33 studies conducted on the topic, yoga was found to improve blood sugar control, cholesterol profiles and weight. Yoga was also found to lower blood pressure, enhance lung function, mood, sleep and quality of life. To manage your diabetes, here are 10 yoga poses you can try: 
 
10 Yoga Poses to Keep Your Diabetes Under Control 
While some of these poses are suitable for beginners and can be practiced in your own time at home, it is advised that others should be practiced under the guidance of a qualified yoga instructor. 
 
 Deep breathing 
 
Suitable for Beginners 
 
Benefits: Deep breathing helps oxygenate the blood, improving circulation. It helps calm the mind and gives the nerves some much-needed rest.  
 
Here's How: 
 
1. Sit in a comfortable position. Keep your spine long and straight and hands on your knees, palms facing up and your belly slightly tucked in. Draw your shoulder blades slightly together and down your back, simultaneously drawing your shoulders down and away from your ears. Keep your chin parallel to the floor and your jaw relaxed. Close your eyes. 
 
 2. Connect with your natural breath, becoming aware of each inhale and exhale for a couple of rounds. Then, breathe in deeply through your nose. At the peak of your inhale, hold your breath for five counts and slowly exhale through your nose, emptying the lungs completely. Repeat the process for 10 rounds. 
 
3. After the last round, rub your palms together until they are warm and place them over your eyes. This process, known as palming, relaxes the whole body and mind. Slowly open your eyes. 
 
Child's Pose
10 Beginner Yoga Poses That Help Fight Diabetes
Suitable for: Beginners 
 
Benefits: The Child's pose is a great stress reliever. It stretches the hips, thighs and ankles and helps calm the mind, relieving stress and fatigue. This pose will gently stretch the lower back muscles, relieving any pain from long hours of sitting. Modifications: For extra comfort, place a rolled up blanket at the back of your knees. A cushion or folded blanket may be used to support your forehead.  
 
Here's How: 
 
1. Come onto all fours in a cat pose and place blankets at the back of your knees if needed. Release your buttocks towards your heels and spread your thighs slightly apart. 
 
2. Allow your torso to rest on your thighs and keep your arms extended out in front of you, simultaneously elongating your spine. 
 
3. If you have the flexibility, allow your forehead to rest on the floor. Alternatively, you may place your forehead on a cushion or an exercise block. 
 
4. Once in the pose, draw your attention to your breath, breathing at a normal pace. 
 
5. Hold the pose for 5 to 10 breaths, or up to 3 minutes.  
 
Contraindications: Do not practice this pose if you are pregnant, have a knee injury or have diarrhea.  
 
Hero Pose
10 Beginner Yoga Poses That Help Fight Diabetes
Suitable for: Beginners 
 
Benefits: This simple pose relaxes the mind and improves digestion. It also massages the kanda - a point located 12 inches above the base of your spine, which is, according to the ancient practice of ayurveda, said to be the point of convergence for over 72,000 nerves.  
 
Modification: Pictured, is the modified version of the actual pose. You may place a cushion or a folded blanket at the back of your knees.  
 
Here's How: 
1. Come onto all fours in cat pose. If practicing on a yoga mat, fold the mat in two, providing extra support for the knees. Place a blanket or cushion at the backs of your knees for extra support if desired. 
 
2. Release your buttocks onto your heels. Keep your palms on your knees facing downwards. Close your eyes and breathe deeply at a steady pace. Hold for 5 to 10 breaths, or up to three minutes. 
 
Bow Pose
 10 Beginner Yoga Poses That Help Fight Diabetes
Suitable for: Beginners (modified version) 
 
Benefits: A fantastic pose to strengthen the back and the spine. It helps to stimulate the reproductive organs, beat stress and fatigue and relieve menstrual pain and constipation. 
 
Modifications: Lifting the thighs in this pose may be challenging. For extra support, place a folded blanket under your pelvis and thighs. Use a yoga belt (or other similar accessory) to grab a hold of your ankles if needed.  
 
Here's How: 
 
1. Lie down on your stomach, with a blanket under your pelvis and thighs if needed. Keep your feet hip-width apart and your arms by the side of your body. 
 
2. Fold your knees and lift your arms, reaching to wrap your hands around the outside of your ankles. If needed, use a yoga belt or similar accessory to help grab a hold of your ankles. 
 
3. Take a deep breath in and lift your chest off the ground. You can stop here. If you find the strength in your legs and glutes as well as the flexibility in your lower back, pull your legs up and back. 
 
4. Keep your eyes fixed at a point, looking straight ahead. Draw your attention to your breath, taking long deep breaths, enabling you to relax into the pose. 
 
 5. Hold for about 15 to 20 seconds. Exhale deeply, gently bringing your legs and chest to the ground. Release your ankles and relax.  
 
Contraindications: Do not practice this pose if you have high or low blood pressure, a hernia, neck injury, pain in the lower back, headache, migraine or recent abdominal surgery. This pose should also be avoided if you are pregnant. 
 
Shoulder Stand 
10 Beginner Yoga Poses That Help Fight Diabetes
Suitable for: Intermediate If you are new to this pose, practice only under the guidance of a trained yoga instructor. 
 
 Benefits: A Shoulder stand is predominantly known to regulate the thyroid glands, which are responsible for the proper functioning of the entire body including the digestive, nervous and reproductive system. They also regulate the metabolism and respiratory system. This pose is also beneficial for the spine, supplying the blood with oxygen. It also helps with nervous system disorders and improves overall health.  
 
Modifications: Fold two or more blankets into rectangles, measuring roughly one foot by two feet. Stack the blankets one on top of the other. To keep your arms in place while in the pose, you can place a sticky mat on top. Lie on the blankets with your shoulders supported and parallel to one of the longer edges of the blanket. Keep your head on the floor. 
 
Here's How: 
 
 1. Lie down over the folded blankets (for correct alignment see modifications), your legs extended outwards. Now, slowly raise your legs, drawing them to your knees, then straight up, keeping your ankles, knees and hips in alignment. 
 
2. Use the strength in your core muscles to lift your pelvis off the floor, directing your hips over your shoulders. Place your palms along your back and hips for extra support. Keep your body extended, pointing your toes to the ceiling. 
 
3. The weight should be on your shoulders, not on your neck, and your elbows should be parallel to one another and well-rested on the floor, giving your back the support it needs. 
 
4. Take long deep breaths and hold the pose for as long as you may need. Then return to the lying position slowly, or proceed onto the next pose. 
 
Contraindications: Avoid this pose if you suffer from any neck or spinal injuries, or have high blood pressure. 
 
Plow Pose 
10 Beginner Yoga Poses That Help Fight Diabetes
Suitable for: Intermediate If you are new to this pose, practice only under the guidance of a trained yoga instructor.  
 
Benefits: The Plow pose improves posture, particularly among those who sit for long hours. It stimulates the thyroid glands, parathyroid glands, lungs and abdominal organs. It encourages blood to flow to the head and the face. It improves digestion and balances hormones. 
 
Modifications: Proceed from shoulder stand as described above, using two folded blankets underneath your shoulders. If your feet do not touch the floor, support them on a wall behind you or place them on a block. 
 
Here's How:  
1. From a shoulder stand, release your legs keeping them straight, folding at the hips. Then, take your feet behind your head. Keep your hands straight by your hips and flat on the floor, offering extra support. While in the pose, breathe deeply and hold for about 15 to 20 seconds. 
 
2. Come out of the pose slowly. Engaging your core muscles, lift your legs up from the floor, wall or block slowly, taking your legs over your hips, simultaneously releasing your hips down to the ground, using your arms for extra support. Release your legs down to the ground, remove the blankets and proceed to the next pose. 
 
Bridge Pose
10 Beginner Yoga Poses That Help Fight Diabetes
Suitable for: Beginners (modified version)  
 
Benefits: The Bridge pose helps keep one's blood pressure under control. It helps relax the mind and improves digestion. This pose helps relieve the symptoms of menopause. It stretches the neck and the spine.  
 
Modifications: Place a block in an upright position at the base of your spine, supporting your weight in the pose.  
 
Here's How:  
 
1. Lie down on your back, tailbone down, your knees bent and your feet flat on the floor, hip-width distance apart. Draw your heels as close to your buttocks as you possibly can and keep your knees rotating internally, directly over your ankles. Upon lifting your pelvis, there may be a tendency to splay your knees out to the sides, internally rotating the knees will help keep them in alignment. Keep your arms by your hips, palms facing down. Take a couple of breaths here. 
 
2. Exhale and lift your pelvis off the floor, using the strength in your core muscles (belly and lower back) and your feet. Keep your arms by your side, pushing your hands down into the ground for extra support. Your neck and head should be flat on the floor. If you need extra support, place a block in a vertical position at the base of your spine. 3. Breathe at a normal pace and hold the pose for 15 to 20 seconds. 
 
 Contraindications: Avoid the pose if you have a neck or back injury. 
 
Seated Spinal Twist 
 10 Beginner Yoga Poses That Help Fight Diabetes
Suitable for: Beginners 
 
Benefits: This pose increases the capacity of your lungs allowing them to inhale and hold more oxygen. It also loosens up the spine and relieves backaches and discomfort in the back. Modifications: Sit up on a blanket and wrap your arm around your thigh, as opposed to taking your arm to the outside of your knee.  
 
Here's How: 
1. Sit with your legs straight out in front of you. Keep your spine long. Bend your left leg and place the heel of your left foot beside your right hip. Alternatively, and if you find it easier, you can keep your leg straight. 
 
2. Now take your right leg over your left knee and place your left hand around your right knee, simultaneously taking your right hand behind you. Twist at the waist, shoulders and the neck, looking over your right shoulder. Hold for a couple of long, deep breaths. 
 
3. Slowly come out of the pose, releasing your right hand first, your waist, your chest, and lastly your neck. Repeat on the other side.  
 
Contraindications: Practice with caution if you have a back injury.  
 
Forward Fold
10 Beginner Yoga Poses That Help Fight Diabetes
Suitable for: Beginners 
Benefits: This pose encourages blood to flow to the face. It helps the stomach function better and it strengthens your thigh muscles while relaxing the back and the arms.  
 
Modifications: Place a rolled up blanked under your knees for extra support and comfort. Use a yoga belt or similar accessory if you do not have the flexibility to reach your toes.  
 
Here's How: 
1. Sit with your legs stretched out in front of you. Keep your hands by your hips, face down, and lengthen your spine. Take a deep inhale and as you exhale, slowly lean the torso forward, from the pelvis, keeping your spine straight. Continue to move your torso over your legs with each exhale. Grabbing a hold of your big toes (or using the yoga belt). 
 
2. Continue to bend forward with each exhale, taking, if you can, bend your forehead to your knees. Allow your breath to help you relax into the pose and hold for 15 to 20 seconds. Slowly return to the sitting posture.  
 
Contraindications: Be cautious if you suffer from back pain or have problems with your spine.  
 
Lying Down Twist
10 Beginner Yoga Poses That Help Fight Diabetes
Suitable for: Beginners 
Benefits: A great pose to stretch the spine and relax the back muscles. It also promotes relaxation in the mind, releasing any stress or tension. Modifications: Rest your top knee on a firm pillow or place a folded blanket between your legs. 
 
Here's How: 
1. Lie down on your back, with your arms stretched out horizontally, keeping them in line with your shoulders. Bend your right knee, bringing your foot close to your hip (the sole of your foot should be on the ground). 
 
2. Swing your right knee over to the left side, resting your knee on a firm pillow or folded blanket if desired. Simultaneously, turn your head to the right, looking at your right palm. Keep your shoulder blades on the floor. 
 
3. You should feel a stretch in your thighs, groin, arms, neck, stomach and back. With each exhalation relax deeper into the pose, holding for a couple of breaths. 4. Slowly come out of the pose by turning your head back to the center, straightening the torso and then your right leg. Mirror the pose on the other side. 
 
 Contraindications: Avoid the pose if you have any spinal injury.

This is only for your information, kindly take the advice of your doctor for medicines, exercises and so on.   

https://gscrochetdesigns.blogspot.com. one can see my crochet creations  
https://gseasyrecipes.blogspot.com. feel free to view for easy, simple and healthy recipes    
https://kneereplacement-stickclub.blogspot.com. for info on knee replacement

https://GSiyers home remedies.blogspot.com     will be latest addition to my blogs. I'm going to add posts there, do give me your valuable feed back on my blogs. Thanks a lot, take care, be healthy and be happy.

Labels: , , , , , , , , , , ,