Friday, December 05, 2025

6 Ways to Stretch Your Gluteus Medius

The gluteus medius, which makes up the upper and side part of your buttocks, plays a crucial role in hip movement and overall lower body function. Stretching this muscle can help prevent injury and relieve pain in your lower back, knees, and hips. 

As one of your hip abductors - the muscles responsible for moving your leg away from your body - the gluteus medius benefits significantly from regular stretching. Proper stretching can help loosen tight hips, increase range of motion, and strengthen the hip area. 
 
Before You Begin: The Importance of Warming Up Before performing any static stretches, it's essential to warm up your muscles, especially if they feel tight. A stretching session can put considerable strain on your muscles, and without proper warm-up, the risk of injury increases. You'll also find it easier to go deeper into stretches when your muscles are warmed up. 
 
Warm-up suggestions: 
 Light cardio exercises such as walking, jogging, or jumping jacks 
Dynamic hip exercises to improve blood flow to the area 
When performing stretches, remember to relax your muscles and focus on your breathing. This helps relieve tension in your body and allows you to deepen the stretches safely. 
 
6 Stretches for the Gluteus Medius 
 
1. Pigeon Pose
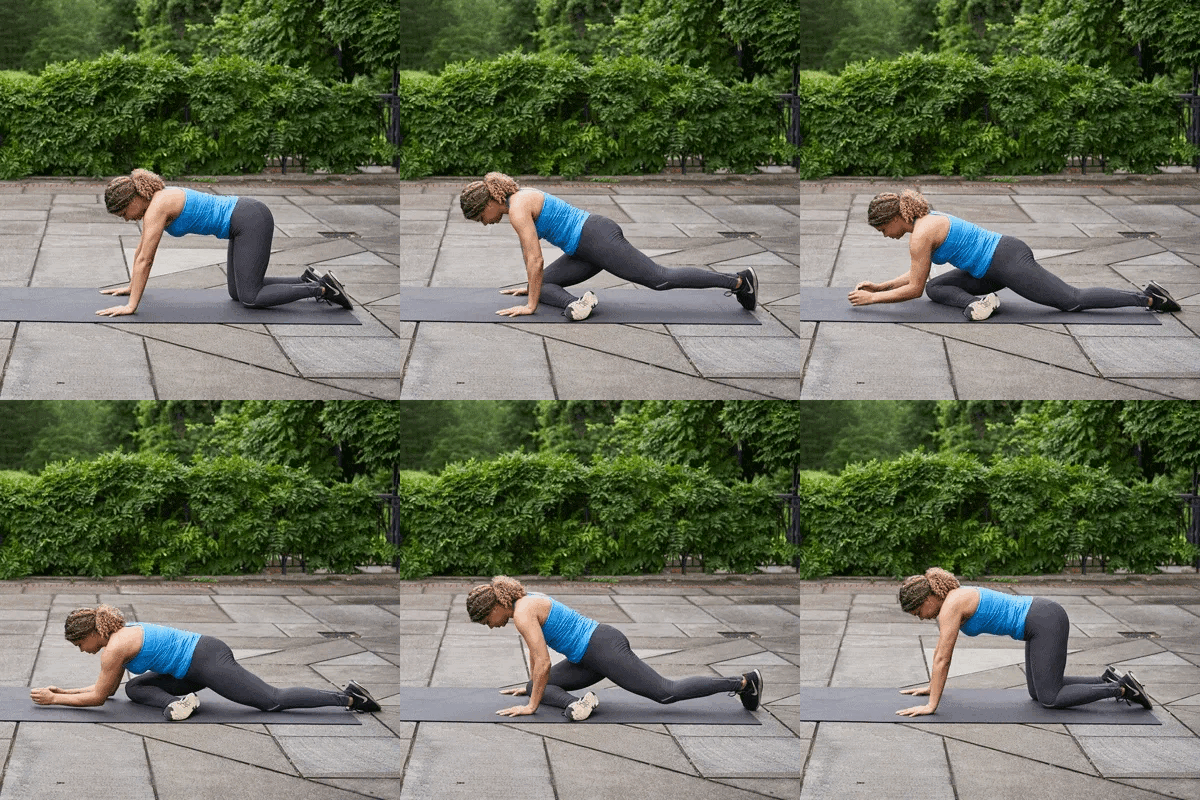


The Pigeon Pose is a popular yoga posture that engages the hip flexor muscles while stretching the gluteus medius.
 
How to do it: 
Kneel on the ground with your hands below your shoulders and hips below your knees 
 
Bring your right knee to a 90-degree position in front of your body, next to your right wrist 
 
Straighten your left leg toward the back of your body 
 
Slowly lean your torso forward toward your front leg and rest your forearms on the ground (or sit upright for a more comfortable variation) 
 
Hold for 30 seconds, then repeat on the other side Perform 3 sets on each side 
 
2. Seated Glute Stretch
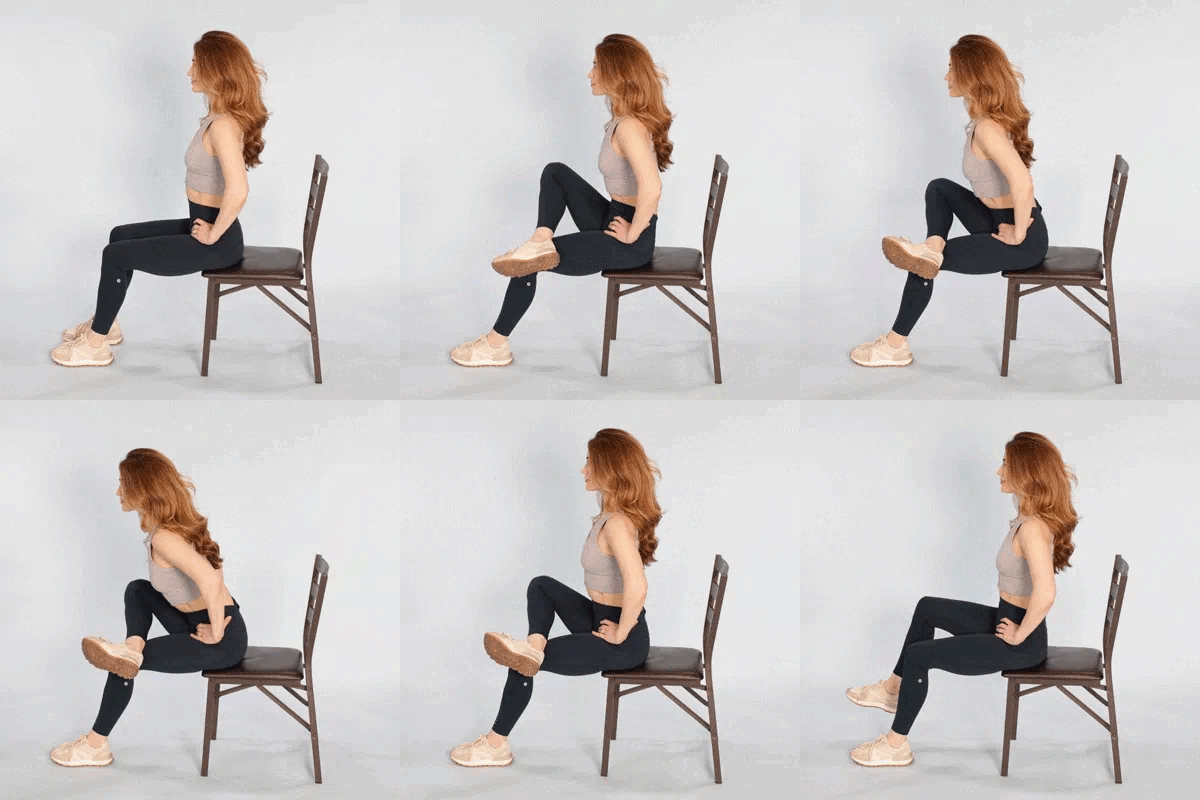


This versatile stretch has many variations, with the chair-seated version being most common as it allows you to adjust height and depth. 
 
How to do it: 
Sit upright with a neutral spine and hands on your hips 
 
Cross your right leg over your left, resting the ankle over the area between the knee and quad muscle 
 
Slowly lean your torso forward to a comfortable position (you should feel the stretch in your right glute) 
 
Hold for 3 to 5 seconds, then rise back up Release your leg and repeat on the other side Perform 8 to 10 reps on each side, 3 times daily 
 
3. Supine Glute Stretch
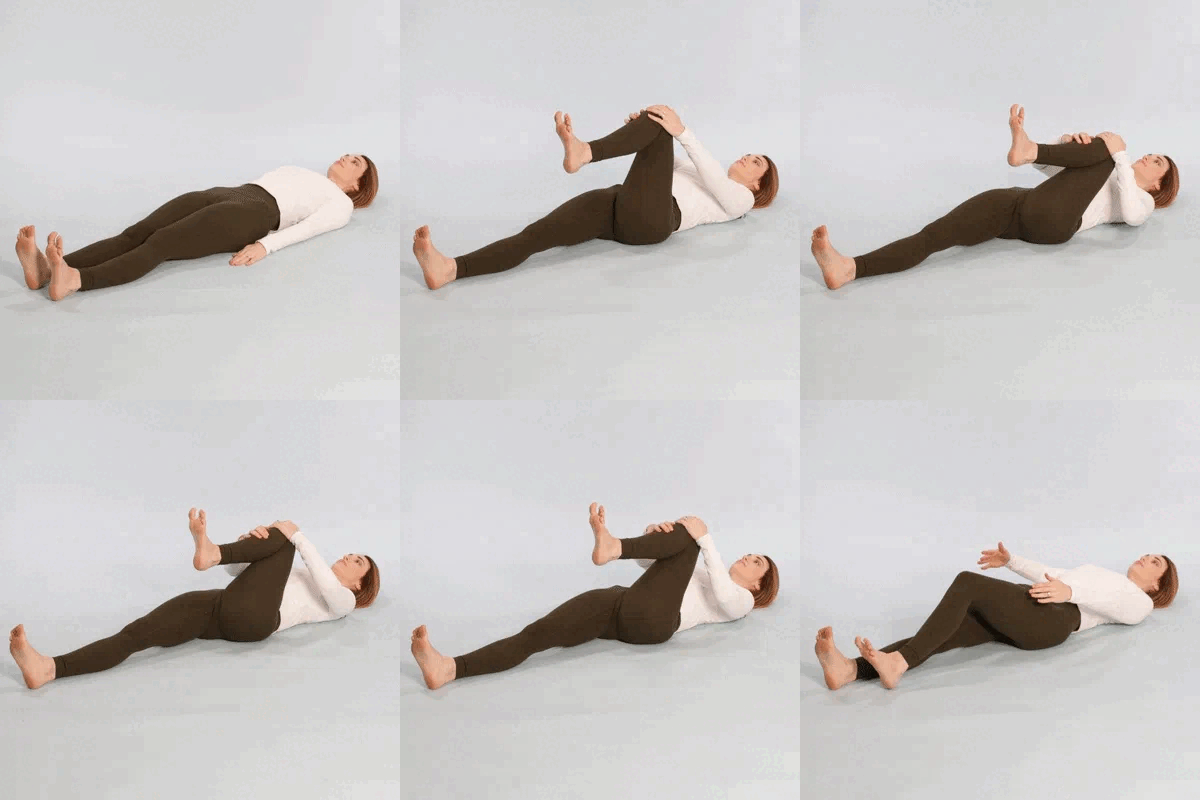

The supine (lying down) glute stretch is ideal for targeting the glute muscles and hip abductors. It's an excellent alternative if the Pigeon Pose causes knee discomfort or if you have very tight hips. 
 
How to do it: 
Lie on your back with arms by your side and legs straight 
 
Bring your left leg up toward your stomach and wrap your hands around the knee 
 
Pull the knee toward your chest, feeling a deep stretch in your left glute 
 
Rotate slightly right and left to deepen the stretch 
 
Release the knee and straighten your leg Perform 10 reps on each leg, 3 times daily 
 
 
4. Seated Spinal Twist
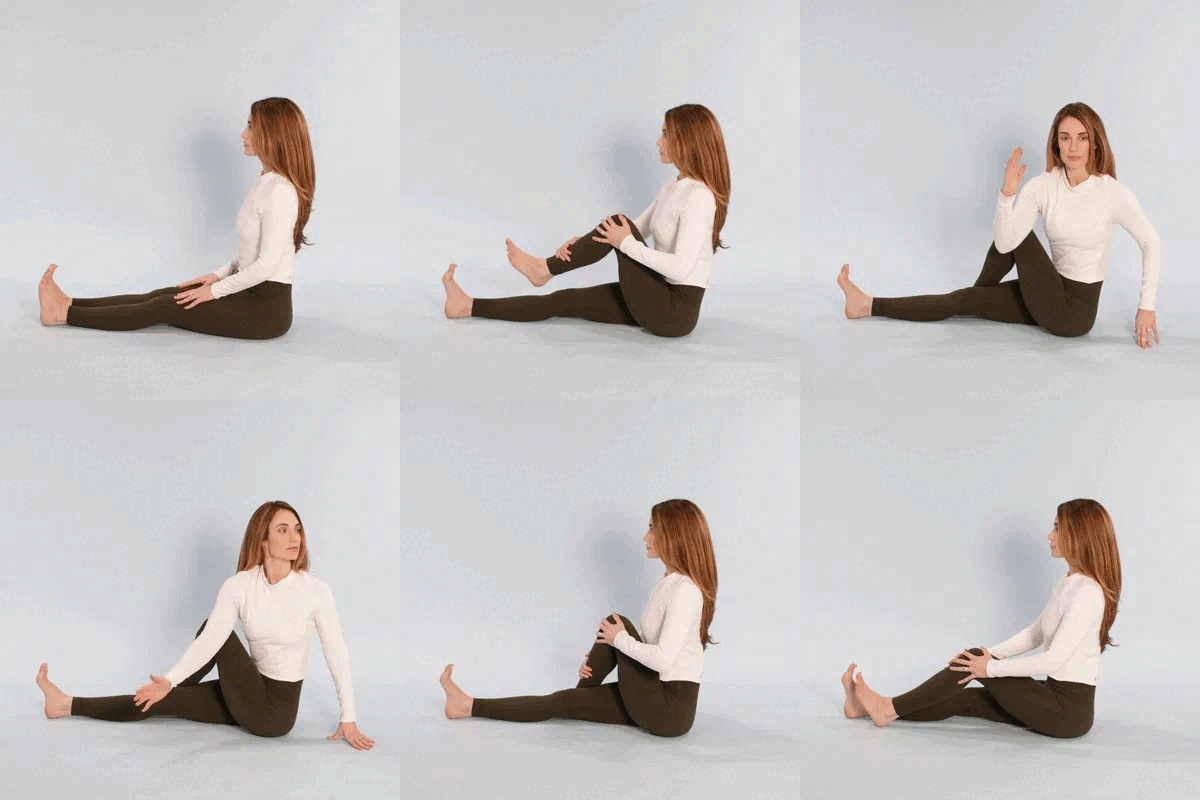
 

The seated spinal twist stretches the muscles in your glutes, hips, and back - all of which are interconnected. 
 
How to do it: 
 
Sit on the floor with legs outstretched 
 
Bend your left knee and bring it over the right leg, planting the foot beside the right knee 
 
Twist your upper body to the left, placing your right elbow on the left side of the bent knee 
 
Plant your left hand on the ground behind you and look in that direction 
 
Hold for 5 to 10 seconds, then slowly twist back to center and straighten your legs 
 
Perform 10 repetitions, then repeat on the other side 
 
Complete 3 sets on each side daily


5. Kneeling side bend
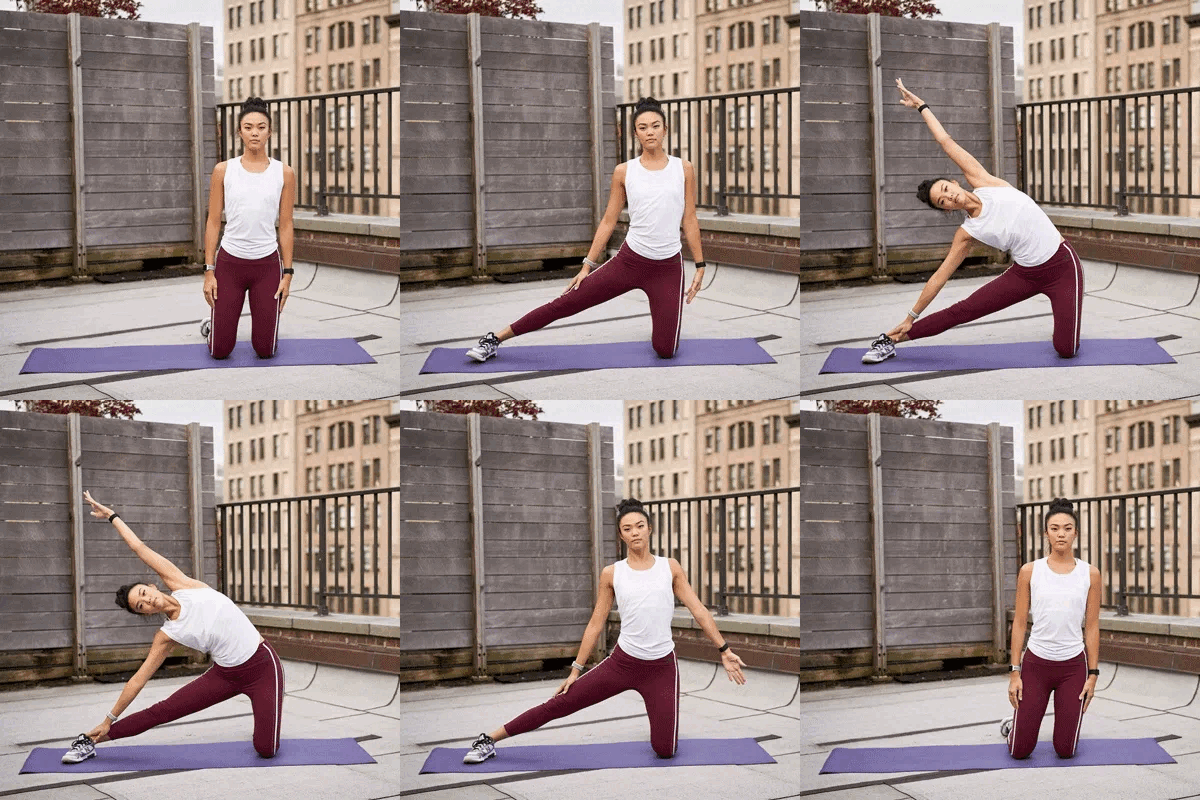


The kneeling side bend stretches the entire side of your upper body, from the gluteus medius up through the back, shoulders, and arms. 
 
How to do it: 
 
Kneel on both knees and extend your right leg straight out to the side 
 
Raise your left arm toward the ceiling, then bend over the outstretched leg 
 
Glide your right arm down the right leg for support and arch the left arm high, bringing it over to the right side (you should feel a deep stretch up the left side of your body) 
 
Hold for 5 to 10 seconds, then return to center 
 
Repeat 5 times on each side, 3 times daily 
 
 
6. Foam Rolling for Glutes
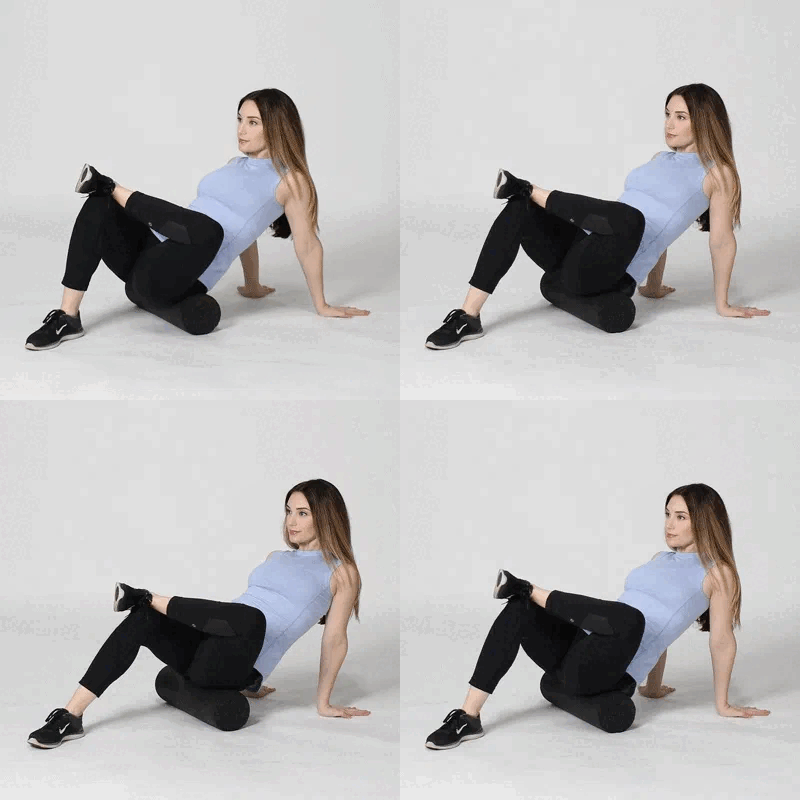
 

Foam rollers are exercise tools that can help loosen tight muscles. Use them before your stretching routine to warm up muscles, or afterward to support muscle recovery. 
 
How to do it: 
 
Sit on a foam roller with your hands planted behind you for support and knees bent at 90 degrees 
 
To target the left gluteus medius, raise your left leg and place the outside of the ankle on your right knee 
 
Rotate your lower body slightly to the side and upper part of your glute 
 
Roll back and forth 10 times, breathing through the movement 
 
Repeat on the other side Perform 3 sets on each side daily 
 
When to See a Doctor  
 
In most cases, tight hip abductors and glute muscles can be managed through exercises, stretches, and foam rolling. However, you should consider consulting a primary care doctor if you experience: 
 
Persistent glute and hip pain that affects your daily activities 
 
 Symptoms that may indicate an underlying health condition, such as arthritis 
 
A physical therapist can also help develop a stretching plan tailored to your individual needs and ensure you're performing exercises correctly.


The Bottom Line 
 
Your glutes are among the most important muscle groups in your body, involved in essential activities like walking and running. Regular stretching of the gluteus medius makes an excellent addition to any cooldown routine, helping to loosen tight hips, improve range of motion, and reduce chronic back pain. 
 
Important reminder: Don't stretch your body too hard or too fast. Doing so could lead to injury. Listen to your body, warm up properly, and progress gradually for the best results.


This is only for your information, kindly take the advice of your doctor for medicines, exercises and so on.   


Labels: , , , , , , , , ,

Sunday, December 19, 2021

Massage Your Body Using Tennis Balls to Relieve Body Pain

 While nothing beats a massage, I absolutely love using tennis balls to ease nagging aches and pains. They get into those tight areas almost as well as a pair of human hands, reaching into the deepest layers of muscle and connective tissue, enabling your muscles to fully contract and stretch. This series of mini self-massage techniques, from yoga teacher Jill Miller's new book, The Roll Model, will help relieve soreness, pain and increase circulation. So grab a pair of tennis balls and get started.

1. Soothe Achy FeetTennis Ball - Relieve - Pain
Using a ball for self-massage loosens up stiffness in your sole's muscles, joints and connective tissues. 
 
Here's How:  
• Rest your hand on a wall or chair for support. Place the ball under the arch of your foot, keeping your heel on the floor and allow your body weight to sink in. 
 
• Roll your foot from side to side, enabling the ball to cross your arch. Continue with this movement for one or two minutes. 
 
• Then roll the ball along the length of your foot, moving it from your heel to your toe. Continue with this movement for one or two minutes. Then repeat both movements (across and along) using the other foot.

2. Soothe Achy Knees
Tennis Ball - Relieve - Pain
Using a ball gently pulls the lower leg bones, kneecap, and thigh away from one another, providing an internal stretch within the knee. 
 
 Here's How: 
• Sit on a chair, placing the ball behind your bent knee (as close to the side of the knee as possible). 
 
• Contract the muscles against the ball, squashing the ball for a count of 10, relaxing your muscles for a count of 10. Repeat eight to 10 times, then repeat on the other knee.  
 
3. Soothe Tight Thighs
Tennis Ball - Relieve - Pain
This movement will help soothe tight knees and hips at once. 
 
Here's How:
 â€¢ Sit on the ground and place two balls on the outside of your thigh, keeping the balls nestled into the side of your thigh. Slowly bend and straighten your knee 20 times. 
• Then move your thigh from side to side, allowing the ball to move across the side of your thigh. Perform the movement for a total of two minutes. Then repeat on the other side.
 
4. Soothe Sore Hips
Tennis Ball - Relieve - Pain
Large and small muscles, connected to the side of the hips are targeted in this simple move, including the gluteus maximus, the medius, and the piriformis. These muscles generally become tight from sitting too much, wearing high-heeled shoes or being overused in exercise. 
 
Here's How: 
• Lie on the ground and place one ball on the side of your hip, leaning into the ball. 
• Then make slow circles with the hip and leg as it rests on the ball, circling 12 times in each direction. Repeat on the other side.  
 
5. Soothe a Cramped Back
Tennis Ball - Relieve - Pain
A fantastic way to massage and relieve tension in the back and core muscles. 
 
• Place two balls at the arch of your spine, between your bottom and your ribs, lying down on top of them. Maintain deep breathing, shifting your pelvis from side to side, allowing the balls to cross your entire lower back. To keep the balls from moving out, place them in a stocking or sock. 
 
• In the areas where you feel most stiff, move the balls more slowly, lifting the pressure at the spine, so that you do not feel the balls pinched against your bones. Repeat for a total of five minutes. 
 
6. Soothe Bad Posture 
Tennis Ball - Relieve - Pain
This move not only combats bad posture, it relieves upper back tension and helps revive your breath.  
 
Here's How: 
• Lie down and place two balls side by side on either side of your upper back. Then interlace your hands behind your head, lifting your head off the floor, bringing your chin toward your chest. Keep your bottom lifted off the floor and take three deep breaths into your ribs. 
 
• With a steady breath, roll the balls like a rolling pin up and down your upper back for three to four minutes.  
 
7. Soothe a Tight Chest
Tennis Ball - Relieve - PainThis move will help release tension in the over-worked chest muscles that frequently tighten due to holding cell phones, typing on computers, cooking or carrying kids. It also helps restore breathing and relaxes the nervous system.  
 
Here's How: 
• Lean against a doorway or wall corner and place a ball just below your collarbone. Breathe into the pressure of the ball, maintaining this exercise for one minute. 
• Then shift from side to side, allowing the ball to scroll along the upper chest. Breathe into the ball for one to two minutes. 
• If possible, move your arm and your neck while you shift from side to side, adding extra shoulder mobility into the mix. Continue for another minute, then repeat on the other side.  
 
8. Soothe Tense Shoulders
Tennis Ball - Relieve - Pain
Soothe the rotator cuff muscles that tend to tighten due to overuse, poor posture and repetitive motion.  
 
Here's How:  
• Lie on the floor and place a ball behind your shoulder blade. Move your shoulder in every direction for three minutes on each side. 
 
9. Soothe Tired Hands 
 Tennis Ball - Relieve - Pain
Our hands are often overworked from day-to-day activities. This move helps to relieve extra tight flexor muscles of the hand.  
 
Here's How: 
• Sit on the floor or stand at a table. Place your hand on top of a ball and your other hand on top to apply more pressure. Squash the ball, leaning your body weight into it, holding the ball steady for one minute while breathing deeply. 
• Move the ball from side to side and then up and down, creating an asterisk shape as you roll it across the palm. Repeat this motion for two to three minutes, then repeat with the other hand.  
 
10. Soothe a Stiff Neck
Tennis Ball - Relieve - Pain
The suboccipital and erector muscles, responsible for keeping your head staring at your computer screen all day, may get stiff and tight. This move helps to relax these muscles and is especially useful before sleep.  
 
Here's How: 
• Place two balls side by side under the base of your skull. You may put the balls in a stocking or sock for extra support. Breathe while you rest for one minute. 
 
• Gently nod your head 'yes', allowing the ball to nestle into the back of your neck. Hold for 1 minute. Then pivot your head from side to side, as if saying 'no'. Continue for one minute. 
 
• Pivot your head to one side, remaining there and nodding several times. Pivot your head in the opposite direction, nodding again. Alternate back and forth for one to two minutes.


This is only for your information, kindly take the advice of your doctor for medicines, exercises and so on.   

https://gscrochetdesigns.blogspot.com. one can see my crochet creations  
https://gseasyrecipes.blogspot.com. feel free to view for easy, simple and healthy recipes    
https://kneereplacement-stickclub.blogspot.com. for info on knee replacement


Labels: , , , , , , , , ,