Monday, March 31, 2025

Feel Bloated? Try the Following 6 Simple Stretches.

Bloating can attack anyone at any moment for a variety of reasons, including consuming foods that are not good for our bodies and drinking too little fluids during the day. No matter what caused the bloating, once it attacks you probably find it difficult to think of anything other than relief, but you'll be happy to discover that this can be achieved with 10-15 minutes of simple yoga stretching. The stretches below cause movements in the abdominal area that increase blood flow to your internal organs, and if you do them slowly, a few hours after a meal, they will relieve you of the annoying feeling of bloating. 
 
1. Wind Relieving Pose 
 exercises
 
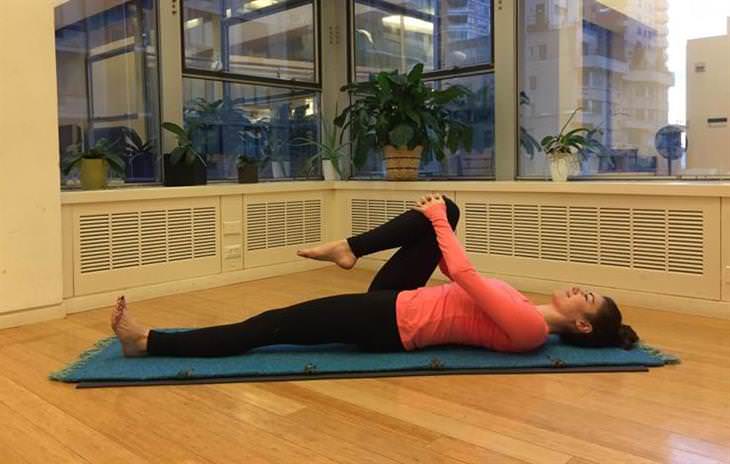
In Yoga, this stretch is called "Apanasana," which literally means “Wind Relieving Pose” in Sanskrit, a name that doesn’t need to be explained further..
 
Lie on a mattress, grab your right knee with your hands, and bring it close to your chest. 
 
Straighten your left foot so that it is parallel to the floor. 
 
Bring the left thigh as close to the floor as possible to stretch the abdomen. 
 
Stay in this position for 10 seconds, then change legs.


2. Supine Twist 
 exercises
 
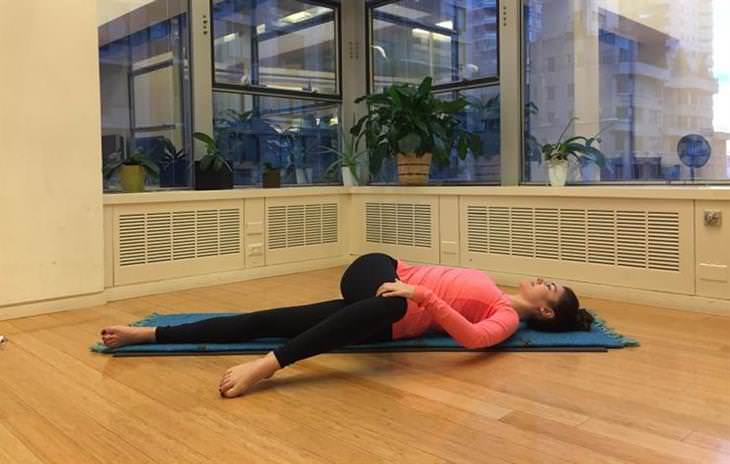
If you want to help the digestive processes in your body, twisting will speed up the flow of blood to the organs in your stomach.

Start with a knee-to-chest position, as you did with the previous stretch, but this time try to curl your body from the pelvis and abdomen to the opposite side of the leg you are holding - in the case of your right leg, turn to the left. 
 
Place your left hand on your right knee and help it stretch the pelvic area as much as possible. At the same time, straighten your right hand beside it and keep it at shoulder level. 
 
Turn your eyes toward your right hand. If your neck is sensitive to this movement, you can leave it straight and stare at the ceiling. 
 
Stay in this position for 10 breaths, return the right knee to your chest, as in the position of knees to the chest of the previous exercise, and straighten it slowly. Repeat the stretch with your left leg. 
 
3. Navasana  
 exercises
 
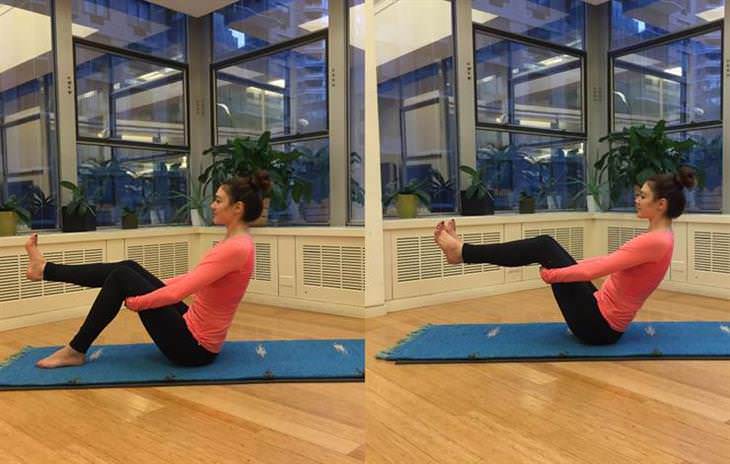
After you've curved and twisted your body while lying down, move on to the navasana position which will also help free you from the discomfort of bloating. exercises


Sit on a mat and grab the bottom of your thighs with your hands. 
 
Lift your right calf in the air so that it is parallel to the floor. 
 
Try holding your belly button to your spine, resisting the urge to round up your upper back. 
 
Expand your shoulder blades and shoulders and now lift your left leg into the air. 
 
Move your knees back and forth - toward and away from the chest, 10 times in total.


4. Twisting Child’s Pose
 exercises
 
Bending the body forward helps calm not only the body but also the soul, which is why worshipers from many different religions do this - try the next stretch to help calm the stomach pain from which you suffer while bloated.

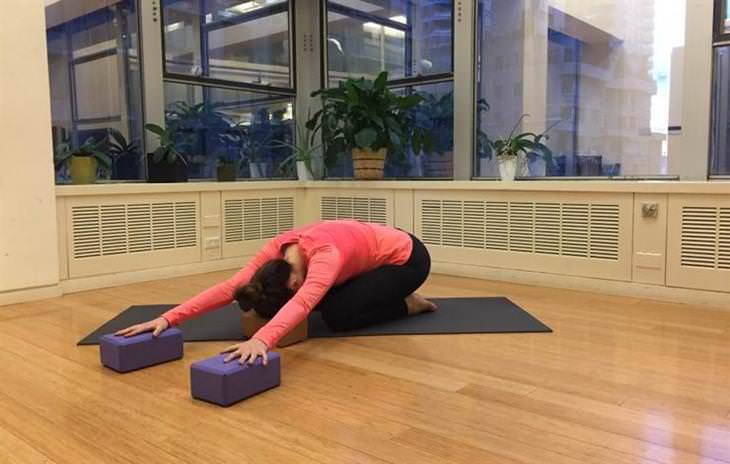
Bring your hands slowly back to your left knee without lifting your head. If your right thigh rises, put more weight on it. After 10-15 breaths, bring the hands back to the center to the right knee and wait for another 10-15 breaths. Then switch sides and take another 10-15 breaths. 
 
Sit with your buttocks on your feet and lean forward while stretching your back as far as possible. Try to reach the boxes with your hands, so you feel a stretch in your hips. 
 
Take 3 boxes (same size as in the picture) or any object you own of the same size, and place 2 in front of you shoulder distance apart and one closer to you so that you can lay your head on it when bent over, as shown in the picture. 
 
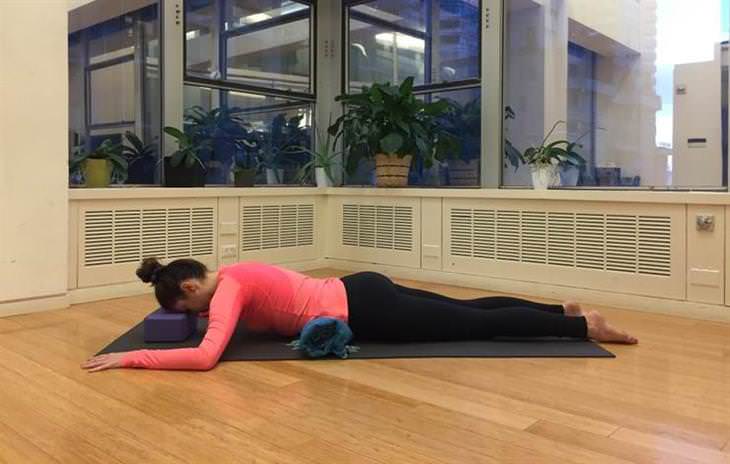
5. Burrito Pose 
exercises
The name of this stretch will help you remember that you should use a towel rolled up like a burrito. The towel should be 10-12 cm in diameter, you can use a pillow instead.

Lie with your navel directly on top of the rolled towel and keep your body straight. 
 
Make sure the towel isn’t crushing your ribs. 
 
Place your head on a box like the one you used in the previous exercise or on a pillow, and try to flatten your body as much as possible on the floor. Stay that way for 1-2 minutes.


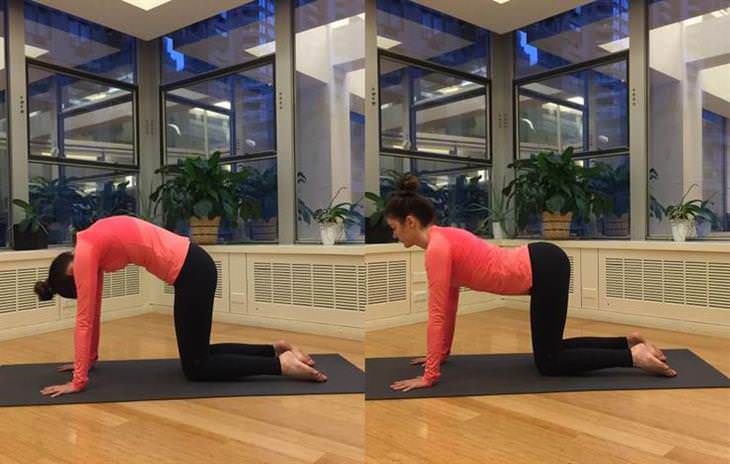
6. Cow/Cat   
exercises
 This movement is well known and is effective for a variety of purposes, including calming abdominal swelling. It helps to finish the tummy stretch after the set of poses you've done.

Start by standing on all fours with your hands in line with your shoulders and your knees in line with your hips. 
 
Exhale air and push the sternum outward so that it forms a concave shape with the back. Then inhale and form an arched shape with your back - continue alternating movements with your breathing. The movements must reach the upper back. 
 
Do this for 15 breaths.


This is only for your information, kindly take the advice of your doctor for medicines, exercises and so on.   

Labels: , , , , ,

Thursday, February 06, 2025

Feel Bloated? Try the Following 6 Simple Stretches.

 Bloating can attack anyone at any moment for a variety of reasons, including consuming foods that are not good for our bodies and drinking too little fluids during the day. No matter what caused the bloating, once it attacks you probably find it difficult to think of anything other than relief, but you'll be happy to discover that this can be achieved with 10-15 minutes of simple yoga stretching. The stretches below cause movements in the abdominal area that increase blood flow to your internal organs, and if you do them slowly, a few hours after a meal, they will relieve you of the annoying feeling of bloating. 

1. Wind Relieving Pose 

exercises In Yoga, this stretch is called "Apanasana," which literally means “Wind Relieving Pose” in Sanskrit, a name that doesn’t need to be explained further...


Lie on a mattress, grab your right knee with your hands, and bring it close to your chest. 
Straighten your left foot so that it is parallel to the floor. 
Bring the left thigh as close to the floor as possible to stretch the abdomen. 
Stay in this position for 10 seconds, then change legs.

2. Supine Twist 
exercises
If you want to help the digestive processes in your body, twisting will speed up the flow of blood to the organs in your stomach.

Start with a knee-to-chest position, as you did with the previous stretch, but this time try to curl your body from the pelvis and abdomen to the opposite side of the leg you are holding - in the case of your right leg, turn to the left. 
 
Place your left hand on your right knee and help it stretch the pelvic area as much as possible. At the same time, straighten your right hand beside it and keep it at shoulder level. 
 
Turn your eyes toward your right hand. If your neck is sensitive to this movement, you can leave it straight and stare at the ceiling. 
 
Stay in this position for 10 breaths, return the right knee to your chest, as in the position of knees to the chest of the previous exercise, and straighten it slowly. Repeat the stretch with your left leg.


3. Navasana 
exercises
After you've curved and twisted your body while lying down, move on to the navasana position which will also help free you from the discomfort of bloating.

Sit on a mat and grab the bottom of your thighs with your hands. 
 
Lift your right calf in the air so that it is parallel to the floor. 
 
Try holding your belly button to your spine, resisting the urge to round up your upper back. 
 
Expand your shoulder blades and shoulders and now lift your left leg into the air. 
 
Move your knees back and forth - toward and away from the chest, 10 times in total.


4. Twisting Child’s Pose 
exercises
Bending the body forward helps calm not only the body but also the soul, which is why worshipers from many different religions do this - try the next stretch to help calm the stomach pain from which you suffer while bloated.

Bring your hands slowly back to your left knee without lifting your head. If your right thigh rises, put more weight on it. After 10-15 breaths, bring the hands back to the center to the right knee and wait for another 10-15 breaths. Then switch sides and take another 10-15 breaths. 
 
Sit with your buttocks on your feet and lean forward while stretching your back as far as possible. Try to reach the boxes with your hands, so you feel a stretch in your hips. 
 
Take 3 boxes (same size as in the picture) or any object you own of the same size, and place 2 in front of you shoulder distance apart and one closer to you so that you can lay your head on it when bent over, as shown in the picture. 
 
5. Burrito Pose  
exercises
The name of this stretch will help you remember that you should use a towel rolled up like a burrito. The towel should be 10-12 cm in diameter, you can use a pillow instead.

Lie with your navel directly on top of the rolled towel and keep your body straight. 
 
Make sure the towel isn’t crushing your ribs. Place your head on a box like the one you used in the previous exercise or on a pillow, and try to flatten your body as much as possible on the floor
 
Stay that way for 1-2 minutes. 
 
6. Cow/Cat 
 exercises
This movement is well known and is effective for a variety of purposes, including calming abdominal swelling. It helps to finish the tummy stretch after the set of poses you've done.

Start by standing on all fours with your hands in line with your shoulders and your knees in line with your hips. 
 
Exhale air and push the sternum outward so that it forms a concave shape with the back. Then inhale and form an arched shape with your back - continue alternating movements with your breathing. The movements must reach the upper back. 
 
Do this for 15 breaths.


This is only for your information, kindly take the advice of your doctor for medicines, exercises and so on.   

https://gscrochetdesigns.blogspot.com. one can see my crochet creations  
https://gseasyrecipes.blogspot.com. feel free to view for easy, simple and healthy recipes    
https://kneereplacement-stickclub.blogspot.com. for info on knee replacement
https://GSiyers home remedies.blogspot.com   is the latest addition to my blogs. I'm going to add posts there, do give me your valuable feed back on my blogs. Thanks a lot, take care, be healthy and be happy.

Labels: , , , , , ,

Monday, September 06, 2021

4 Positions for Relieving Back Pain for Better Sleep

Those of us who suffer from chronic back pain, which is the most common and disturbing pain, know how difficult it is sometimes to fall asleep at night. When you don’t sleep well at night, the pain only gets worse, kind of like a snowball effect. In turn, it harms the normal routine of our lives and makes it difficult for us to relax all day long. If this is the case for you, you’ll be happy to hear that through the following 4 positions in this article, which you can easily implement on a bed or yoga mat, you can release and relieve that annoying back pain. 
 
1. Wind-Relieving Pose  yoga poses
The Wind-Relieving Pose, or as it is called in yoga: "Pavanamuktasana," is designed to release your spine, especially its lower part, within moments. In addition, this position allows the bowels to be accelerated and regulated, so we'd recommend trying it in the morning.

How to do it:  
Lie on your back, relax your muscles and bend your knees up. 
 
Take a deep breath of air, then hug your knees with both arms. 
 
Release the breath, continue to hug your knees keeping them close to your chest. 
 
Repeat the exercise several times: on each inhale move your legs away from your chest, and each time you exhale, bring them back. Be sure to take long breaths. 
 
Perform about 8 to 10 reps - about 1 minute of exercise.

2. Legs Up the Wall Pose 
yoga poses
The next position is to release tension from the back and legs, relax the chest, and allow the lungs to fill with air and oxygen before going to bed.

How to do it:  
Place a folded pillow near the wall or on the edge of the bed. 
 
Lie on your back with your buttocks against the pillow. 
 
Press your buttocks toward the wall and then straighten your legs up and place them against the wall. 
 
Spread your arms to the sides, and try to stretch and widen your chest.Relax the rest of your body, and breathe calmly. 
 
Stay in this position for 1-2 minutes, then lower your legs off the wall. 
 
3. Reclining butterfly pose  
yoga poses
The Reclining butterfly pose will have a positive effect on your back and will allow you to release its most internal muscles, those located beneath the upper layers of the skin. There are two steps that are important to perform during this pose.

How to do it: 
Step 1: 
Lie on your back with two rolled towels underneath you, one under your waist and one under your neck. 
 
Bend your legs to each side (like a butterfly’s wings flapping) and remain as loose as possible. At the same time, move your head from side to side, without straining your neck and back.The head and leg movement can be done on the same side or opposite sides, whichever is easier for you. 
 
Try releasing and loosening your body as much as possible. Feel the waves of your movement penetrate your spine. Perform this step for one minute.  
 
Step 2: 
Turn around and lie on your stomach with your arms spread out, feet resting on the bed or mattress, and a pillow or rolled towel under your forehead. 
 
Move your legs from side to side, and try to feel the vibrations pass through your entire relaxed body. 
 
Keep moving and perform this step for another minute. 
 
 4. The Shavasana Pose   yoga poses
The Shavasana Pose, whose literal meaning is "the corpse pose” is used by yogis to relax their bodies at the end of a strained workout. Doing it before bedtime will help you relax and fall asleep quickly and easily, in addition to relieving back pain.
How to do it:  
Lie on your back, gently spread your arms to your sides with your palms facing up. Place a rolled towel or a pillow under your head and neck. 
 
Slowly start relaxing your body from the bottom up: start with your toes and go up to your legs, hips, stomach, fingers, arms, and so on until you reach the top of your head. Relax each part on an inhalation and exhalation. 
 
Do 20 cycles of breathing: breathe in and breathe out slowly. 
 
After 20 cycles, stop counting and breathe freely. Let your thoughts float and avoid concentrating on a specific thought. 
 
You’ll slowly feel your surroundings becoming blurred, and your whole body will be relaxed and loose. This is the best time to cover up and fall into a nice deep sleep.

This is only for your information, kindly take the advice of your doctor for medicines, exercises and so on.   

https://gscrochetdesigns.blogspot.com. one can see my crochet creations  
https://gseasyrecipes.blogspot.com. feel free to view for easy, simple and healthy recipes    
https://kneereplacement-stickclub.blogspot.com. for info on knee replacement


Labels: , , , , , , , ,

Wednesday, January 20, 2021

4 Positions for Relieving Back Pain for Better Sleep

Those of us who suffer from chronic back pain, which is the most common and disturbing pain, know how difficult it is sometimes to fall asleep at night. When you don’t sleep well at night, the pain only gets worse, kind of like a snowball effect. In turn, it harms the normal routine of our lives and makes it difficult for us to relax all day long. If this is the case for you, you’ll be happy to hear that through the following 4 positions in this article, which you can easily implement on a bed or yoga mat, you can release and relieve that annoying back pain.

1. Wind-Relieving Pose 
The Wind-Relieving Pose, or as it is called in yoga: "Pavanamuktasana," is designed to release your spine, especially its lower part, within moments. In addition, this position allows the bowels to be accelerated and regulated, so we'd recommend trying it in the morning.
yoga poses
How to do it: 
Lie on your back, relax your muscles and bend your knees up. 
Take a deep breath of air, then hug your knees with both arms. 
Release the breath, continue to hug your knees keeping them close to your chest. 
Repeat the exercise several times: on each inhale move your legs away from your chest, and each time you exhale, bring them back. Be sure to take long breaths. 
Perform about 8 to 10 reps - about 1 minute of exercise.

2. Legs Up the Wall Pose  
The next position is to release tension from the back and legs, relax the chest, and allow the lungs to fill with air and oxygen before going to bed.
yoga poses
How to do it: 
Place a folded pillow near the wall or on the edge of the bed. 
Lie on your back with your buttocks against the pillow. 
Press your buttocks toward the wall and then straighten your legs up and place them against the wall. Spread your arms to the sides, and try to stretch and widen your chest. 
Relax the rest of your body, and breathe calmly. 
Stay in this position for 1-2 minutes, then lower your legs off the wall. 
 
3. Reclining butterfly pose 
The Reclining butterfly pose will have a positive effect on your back and will allow you to release its most internal muscles, those located beneath the upper layers of the skin. There are two steps that are important to perform during this pose.
yoga poses
How to do it: 
Step 1: Lie on your back with two rolled towels underneath you, one under your waist and one under your neck. 
Bend your legs to each side (like a butterfly’s wings flapping) and remain as loose as possible. At the same time, move your head from side to side, without straining your neck and back. The head and leg movement can be done on the same side or opposite sides, whichever is easier for you. 
Try releasing and loosening your body as much as possible. Feel the waves of your movement penetrate your spine. Perform this step for one minute.

Step 2: Turn around and lie on your stomach with your arms spread out, feet resting on the bed or mattress, and a pillow or rolled towel under your forehead. 
Move your legs from side to side, and try to feel the vibrations pass through your entire relaxed body. Keep moving and perform this step for another minute. 
 
4. The Shavasana Pose 
The Shavasana Pose, whose literal meaning is "the corpse pose” is used by yogis to relax their bodies at the end of a strained workout. Doing it before bedtime will help you relax and fall asleep quickly and easily, in addition to relieving back pain.
yoga poses
How to do it: Lie on your back, gently spread your arms to your sides with your palms facing up. Place a rolled towel or a pillow under your head and neck. 
Slowly start relaxing your body from the bottom up: start with your toes and go up to your legs, hips, stomach, fingers, arms, and so on until you reach the top of your head. Relax each part on an inhalation and exhalation.
Do 20 cycles of breathing: breathe in and breathe out slowly. 
After 20 cycles, stop counting and breathe freely. Let your thoughts float and avoid concentrating on a specific thought. 
You’ll slowly feel your surroundings becoming blurred, and your whole body will be relaxed and loose. This is the best time to cover up and fall into a nice deep sleep.


This is only for your information, kindly take the advice of your doctor for medicines, exercises and so on.     

https://gscrochetdesigns.blogspot.com. one can see my crochet creations  
https://gseasyrecipes.blogspot.com. feel free to view for easy, simple and healthy recipes    
https://kneereplacement-stickclub.blogspot.com. for info on knee replacement


Labels: , , , , , ,