Thursday, May 07, 2026

Massage These 4 Pressure Points to Clear Your Blocked Nose

 Nobody likes having a blocked, stuffy nose, and I’m definitely down for the count on this particular ailment. I can’t stand not being able to sleep or breathe properly, and all I can think of is how to get rid of it. 

While most of us would think of turning to over-the-counter nasal sprays or drugs, the stark reality is that these are chemical solutions, which have side effects and can be addictive, resulting in you continuing to take them when you don’t need to.
stuffed-nose

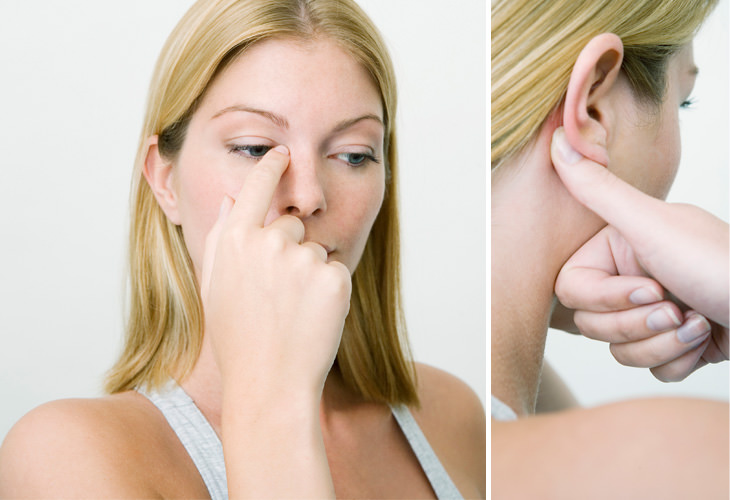
Consider an alternative approach that’s easy to master, is less invasive and more effective. It is based on acupressure principles, and all you need to do is apply gentle pressure to four points of the face to help you clear your nose:

General Guidelines 

 1. Use your fingertips to apply gentle pressure. 

2. Use rotational movements. In fact, it’s a pushing-releasing rotation that’s needed. 

3. You should not feel any pain. 

4. Repeat the cycle three times.

stuffed-nose
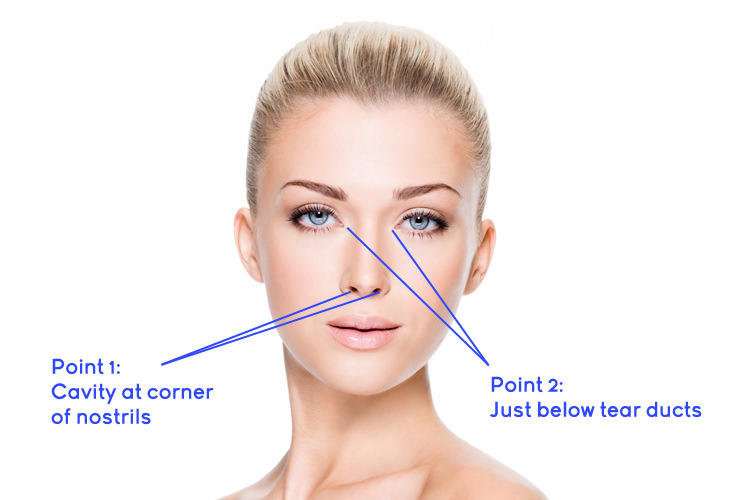
Pressure Point 1 – Cavity at the corner of the nostrils 

Instructions  

1. Gently push your nostrils together using a rotating movement. As you do this, you should almost be opening and closing them.

2. Repeat the movement 10 times over Tip: Refrain from pushing on the nose cartilage. Your attention should be focused on the bottom part of the nostrils. 

Pressure Point 2 – Just below the tear ducts 

Instructions 

1. Perform a gentle rotation at this point 10 times over. 

2. Do not lift your fingers while performing the rotation – simply move the skin so you feel the corner of your eyes as you push.

stuffed-nose

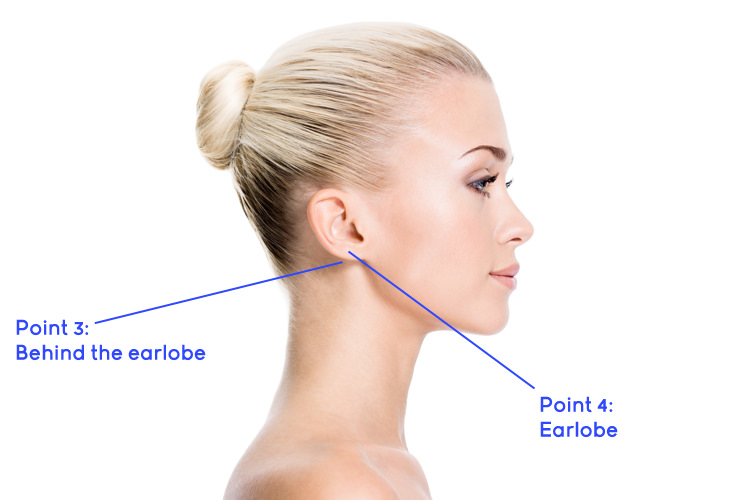
Pressure Point 3 - Behind the earlobe 

Instructions  

1. Find the pressure point correctly. It’s located behind your ear, in the cavity just below the cartilage. 

2. Push and release the point 10 times. Do not apply pressure to the cartilage. 

Tip: This needs to be a subtle movement. 


Pressure Point 4 – Earlobe 

Instructions  

1. Gently massage the earlobe 10 times. 

What’s next?

Go through all of the above pressure points three times over, and you should feel immediate symptom relief. Should you require more relief, repeat the entire process after 10 minutes. 

Note that you can use this simple, safe technique anywhere, and at any time. In addition to it being free, it’s also empowering to know that there are simple ways of being able to heal yourself. Be sure to share this knowledge with someone dear to you should it work for you.

This is only for your information, kindly take the advice of your doctor for medicines, exercises and so on.   


Labels: , , , , , , ,

Thursday, June 24, 2021

Is aspirin really effective on acne and scars?

Is aspirin really effective on acne and scars

Aspirin, which is acetylsalicylic acid (ASA) is a widely used medicine commonly used to relieve pain, fever or inflammation. Since it’s also helpful in preventing blood clots and strokes, aspirin is also used in the heart attack treatment. But apart from these therapeutic uses, people now have begun to use it for acne and scar treatment. This drug essentially consists of acetylsalicylic acid which is closely related to the anti-acne element salicylic acid. However salicylic acid has an amazing drying effect on the sebaceous secretions and the dead skin particles which aids in preventing and clearing the acne and its scars, many people claim the similar effect of aspirin on acne.

For acne treatment

The inflammatory acne exhibits symptoms like red, pussy, swollen blisters while the non inflammatory acne shows minor pimples, blackheads or white heads.

A study proved that aspirin was found competent in reducing allergic skin reactions, inflammation and pain due to it. Being a type of nonsteroidal anti-inflammatory drug, aspirin was found to be effective only on the inflammatory acne while it showed no extraordinary results for non-inflammatory acne. Hence people with such acne need to find other treatment which cleanses the blocked pores.

​Side Effects

Since there is no great effect of this drug on the acne problem, rather an unprescribed use can lead to severe health complications. Hence one should opt for other acne forbidding options like retinoids, salicylic acid or benzoyl peroxide after consulting a dermatologist. Here are some reasons which proves the detrimental side of aspirin.

  • Aspirin can at times effectively lead to overdrying of the skin leading to increased amount of breakouts with redness and a lot of irritation.
  • This drug can make your facial skin even more sensitive towards the UV rays of the sun.
  • Intake of aspirin by breastfeeding or a pregnant woman can cause severe problems to the baby.
  • A person who’s allergic to nonsteroidal drugs can potentially harm himself by such a use of aspirin.
  • Asthamatic and people with rhinitis can face severe health problems.

 Other techniques to manage acne

Other techniques to manage acne

  • Never ever try popping or unnecessary touching your acne.
  • Try using a non alcoholic, paraben free and gentle cleanser on the skin.
  • An excessive sweat and sebaceous secretions can lead to acne hence it is recommended to wash your fash at least twice a day.
  • Oil or dandruff on the hair can prominently cause pimples, hence one should try washing their hair very often in a week.
  • Don’t over scrub or abrasively wipe your face.
  • Always use a high spf sunscreen before going out or getting exposed to sun rays.

This is only for your information, kindly take the advice of your doctor for medicines, exercises and so on.   

https://gscrochetdesigns.blogspot.com. one can see my crochet creations  
https://gseasyrecipes.blogspot.com. feel free to view for easy, simple and healthy recipes    
https://kneereplacement-stickclub.blogspot.com. for info on knee replacement


Labels: , , , , , , , , ,

Wednesday, March 24, 2021

Relieve Your Stress With This Easy 5 Minute Meditation

Meditation is used by people across the world for its wonderful benefits for the mind, body, and soul. However, many of us never give it a go because we think it involves complex learning, special skills and even a level of meaning that we don't really understand. In reality, the only equipment you need in order to meditate is yourself, and you do not need any special training. Here is a five minute, stress-relieving meditation that anybody can perform easily.

How It Works  
Meditation comes in many different forms, but this guide covers a practice that is designed to allow you to re-connect with yourself emotionally and mentally. Meditative practices like this are specifically intended to promote relaxation, calm and stress relief, and provide you with peace of mind. You only need five minutes to run through the entire process, so it's possible to perform the routine in the middle of a hectic day when you are feeling worn down, anxious or overworked. 
 
Meditation can help you shake off your woes and continue with your day in a much better frame of mind. 
 
Step 1 - Set a Timer
meditation
You will not relax properly if you are constantly thinking about the time that has elapsed since you started the process, so use a timer. You can set the timer on your phone, computer or wristwatch to ensure you can concentrate on the meditation. If you are an iPhone user, you can download the Healing Music app and use that as a timer instead. 
 
Ideally, you will set the timer for five minutes, but if you are pushed for time, you can set it for a shorter period.
meditation  
 Step 2- sit in a comfortable position
If you think of meditation, you probably think of people sitting cross-legged on the floor. While that is an effective position in which to meditate, it is not a necessity. When picking a sitting position, it is best to simply ensure that you are comfortable. An awkward position will distract you. 
 
You should sit or lie down, rather than stand to replenish your energy supplies, but you can use a chair if you like. Just try to keep your feet in contact with the ground. 
 
Step 3 - Close Your Eyes and Focus on Breathing
meditation

Start your timer, and then close your eyes. Gently focus your attention on your breathing. Don't try to change your breathing pattern or do anything unusual, sustain a normal breathing pattern. Focus on how your breath feels right now, and if you can find a way to breathe naturally but deeply it will help.


Step 4 - Hold Your Attention
Your mind is the biggest barrier to successful meditation, but remember that you are trying to clear it. Thoughts will drift into your head, but as they do so, gently acknowledge them but let them drift away. Continue to focus on your breathing patterns as the thoughts try to dominate your mind. Focusing your brain on your breath will ensure that your mind stays in the present.
 
Concentrate on each inhale and exhale until your timer sounds the end of your meditation.


This is only for your information, kindly take the advice of your doctor for medicines, exercises and so on.     

https://gscrochetdesigns.blogspot.com. one can see my crochet creations  
https://gseasyrecipes.blogspot.com. feel free to view for easy, simple and healthy recipes    
https://kneereplacement-stickclub.blogspot.com. for info on knee replacement


Labels: , , , , ,