Thursday, March 20, 2025

Yoga Exercises to Relieve Muscle Tension

The more our muscles exert themselves during the day, the more our body craves rest - but beyond a night's sleep, there’s another way, full of benefits, to allow our body to receive its dose of calm, and that’s through performing yoga exercises. The following 8 yoga poses you’re about to discover might seem familiar at first, but in fact, each one is presented here in a unique version designed to relieve tired, tense, and sore muscles. So, if you regularly engage in sports, perform strenuous physical activity, or simply feel your muscles are exhausted, we recommend disconnecting from your surroundings for the next few minutes and recharging with renewed energy through the following poses.

Exercise 1: Squat for Ankle Strengthening (Ankle Strength Squat)
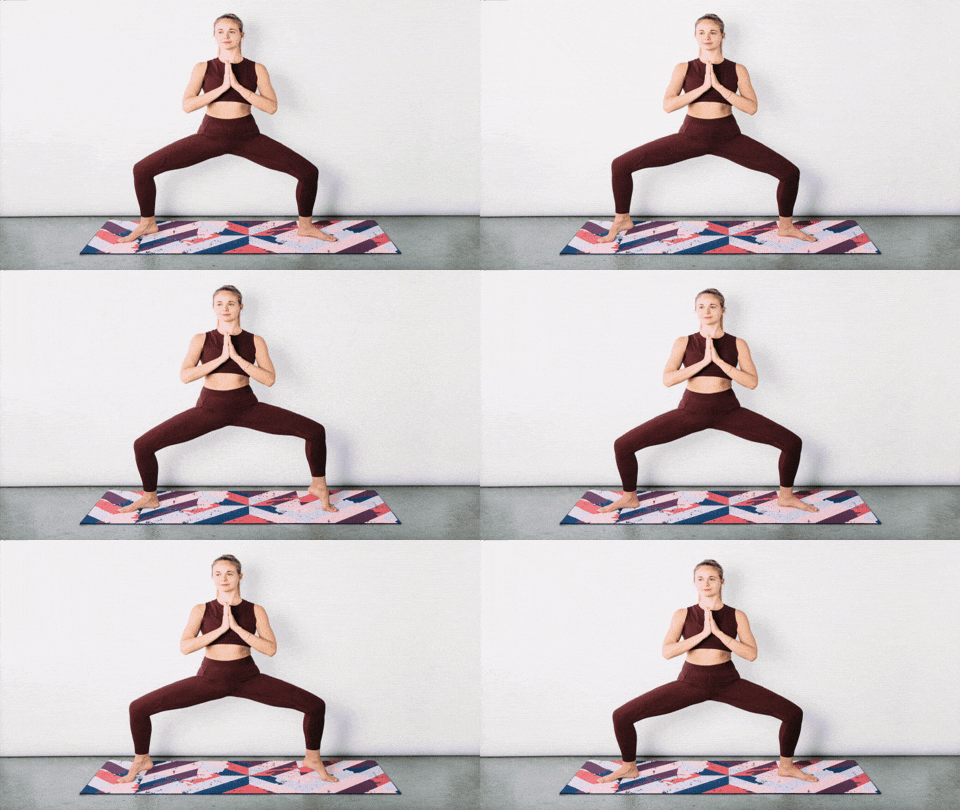
Unique Yoga Exercises: Squat for Ankle Strengthening (Ankle Strength Squat)
What’s the Benefit for the Muscles? The movements in this pose help to slightly "lubricate" the ankle joints, which tend to wear out due to intense physical activity or sports like running. Additionally, they engage the gluteal muscles and the back of the thigh, whose fitness is important and essential for our daily functioning.

How to Perform? Start by standing with a wide stance, with your feet pointing outward. Slightly bend your knees into a squat position as shown above. Press your palms together and bring them to the center of your chest - maintain as stable a stance as possible. Lift your right ankle and then lower it back down, then lift your left ankle and return it, and finally lift both ankles simultaneously and return them to the ground. Ensure full contact of each foot with the ground to avoid arch strain. Repeat the action 8 times. 
 
Exercise 2: Calf, Hamstring, and Achilles Stretch with a Yoga Block (Calf-Hamstring-Achilles Opener With Block)
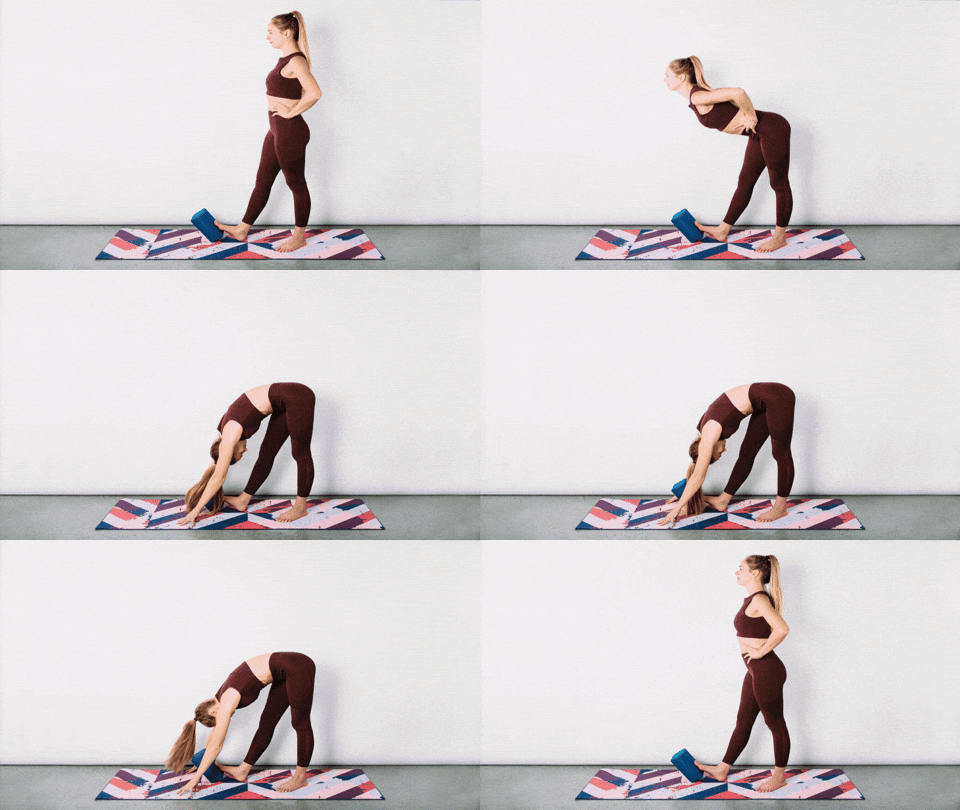
 
Unique Yoga Exercises: Calf, Hamstring, and Achilles Stretch with a Yoga Block (Calf-Hamstring-Achilles Opener With Block)

What’s the Benefit for the Muscles? People who spend most of their time standing need their muscles, especially those in the lower body, to be strong enough to efficiently bear their full body weight. This pose allows you to simultaneously release the calf, hamstring, and Achilles tendon muscles while keeping them fit, ensuring stable standing. 
 
How to Perform? Start in a standing position and touch the yoga block (or any stable object) with the ball of your right foot at a 45-degree angle, with your heel securely on the ground. Step your left leg slightly back and carefully bend your upper body forward along your extended right leg, touching the ground. Hold this position for 60 seconds. Return to the starting point and perform the same action with your left leg. 
 
Exercise 3: Cat-Cow Pose with Crossed Knees (Cat-Cow With Knees Crossed)
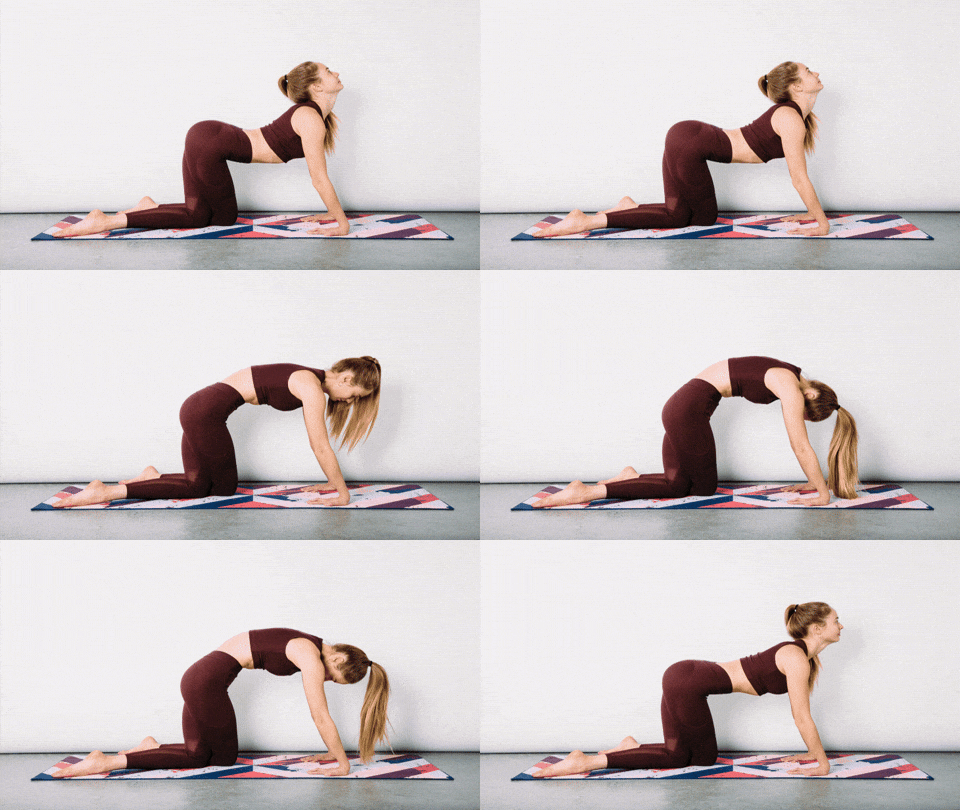
 
Unique Yoga Exercises: Cat-Cow Pose with Crossed Knees (Cat-Cow With Knees Crossed)

What’s the Benefit for the Muscles? This pose helps relieve significant pressure from the pelvic and lower back areas, improving the spine’s daily functioning. It also slightly releases the joints and provides rest to a worn-out body.

How to Perform? Start in a position where your knees, toes, and palms are simultaneously touching the ground - ensure your shoulders align with your hands, your hips align with your knees, and your palms face the center of your body. Now cross your knees by passing your left knee behind your right knee. Both knees should be touching, and your feet should be apart - forming an X shape. Take a deep breath, carefully arch your back, and lift your head upward (Cow Pose). Then exhale while lowering your head toward the floor and gently rounding your back (Cat Pose). Perform this action 20-30 times, then repeat with the other leg. 
 
 
Exercise 4: Child’s Pose on Toes (Child’s Pose on Toes)
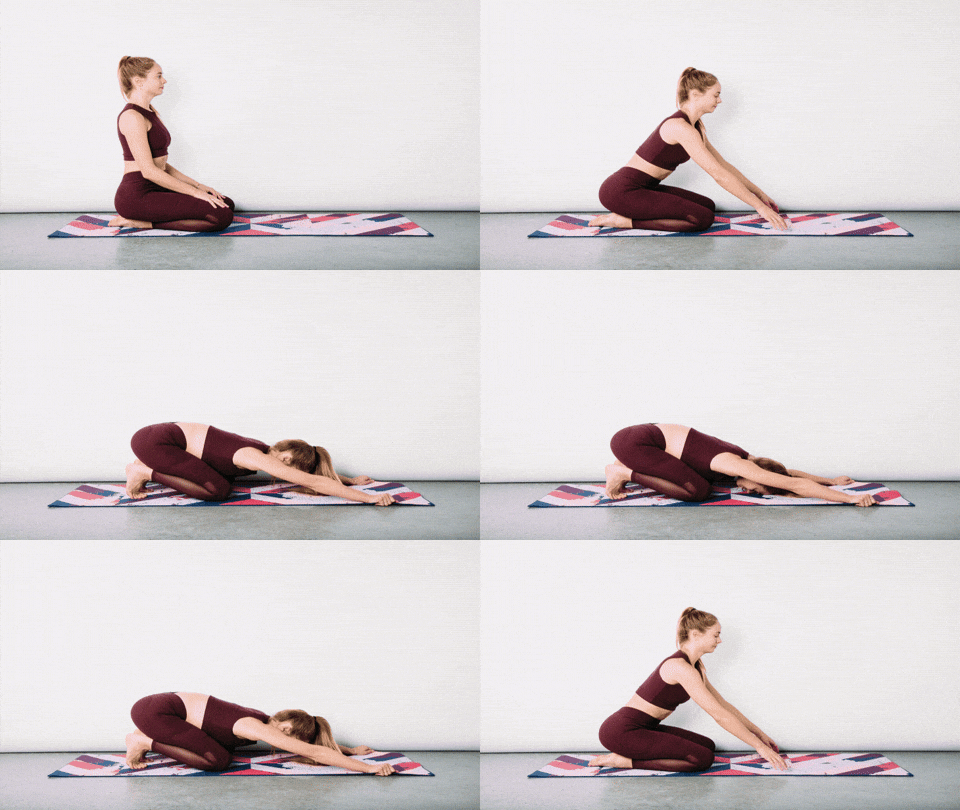
 
Unique Yoga Exercises: Child’s Pose on Toes (Child’s Pose on Toes)


What’s the Benefit for the Muscles? Every time we stand, walk, or run, it’s ideal for our foot’s contact with the ground to be correct and involve all possible parts. Pulling the toes will allow you to widen the foot joint, release the pressure applied to the arch during daily life, and ensure every step on the ground is stable and healthy. 
 
How to Perform? Start by sitting on both knees with an upright torso, hands resting on your knees. Pull your toes toward the center of your body and rest on them, lean your upper body forward while holding the edges of the mat with your hands, and lightly touch your forehead to the ground. Stretch your body by pulling your hips back and your hands forward. Stay in this position for a few deep breaths and release. Repeat the action 10 times. 
 
 
Exercise 5: Quad-Psoas Wall Stretch (Quad-Psoas Wall Stretch)
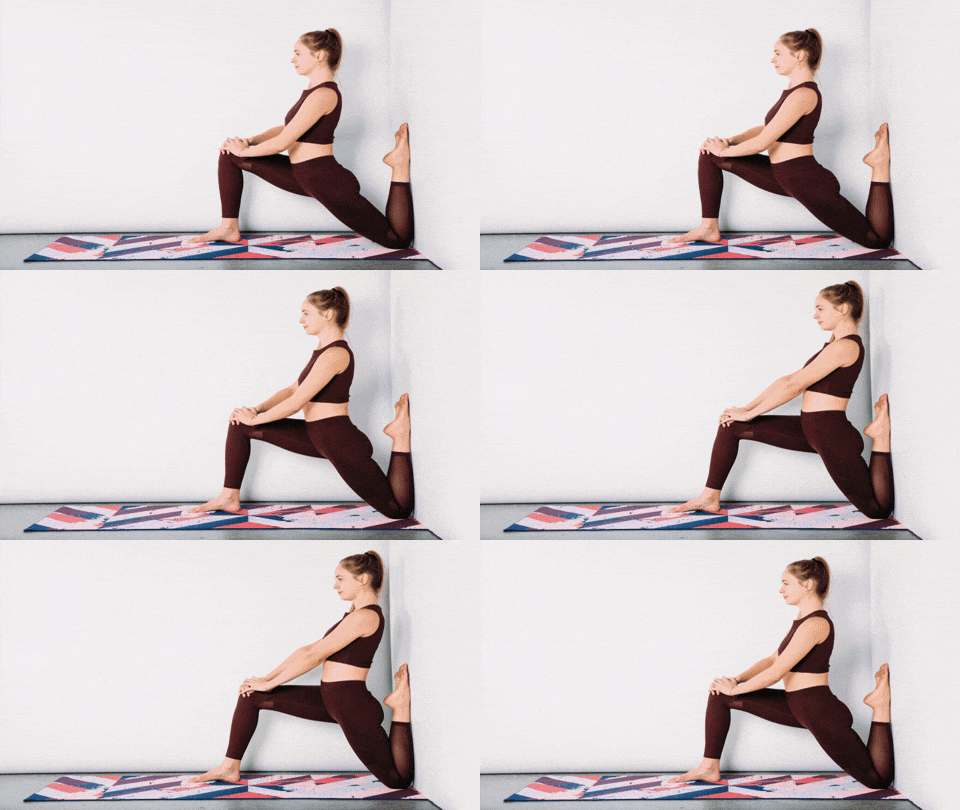
 
Unique Yoga Exercises: Quad-Psoas Wall Stretch (Quad-Psoas Wall Stretch)

What’s the Benefit for the Muscles? The psoas muscle is one of the most important muscles in the body, often called the "king of movement" - located deep in the upper body, it connects the pelvis to the back and thighs, significantly affecting our posture, range of motion, joint function, and core muscle activity. Strengthening this muscle will improve anyone’s stance and is especially crucial for athletes and those engaging in strenuous physical activity. 
 
How to Perform? Start in a lunge position, with your right leg extended forward and bent at a 90-degree angle, and your left knee placed at the junction of the wall and floor, with the entire section from foot to knee touching the wall (it’s recommended to use a mat or blanket between the leg and the ground to avoid knee injury). Place your hands on your right knee and push your hips forward. Then return your hips to their original position. Repeat this action 4-5 times in a slow motion for each leg.


Exercise 6: Shoulder Opener (Shoulder Opener)
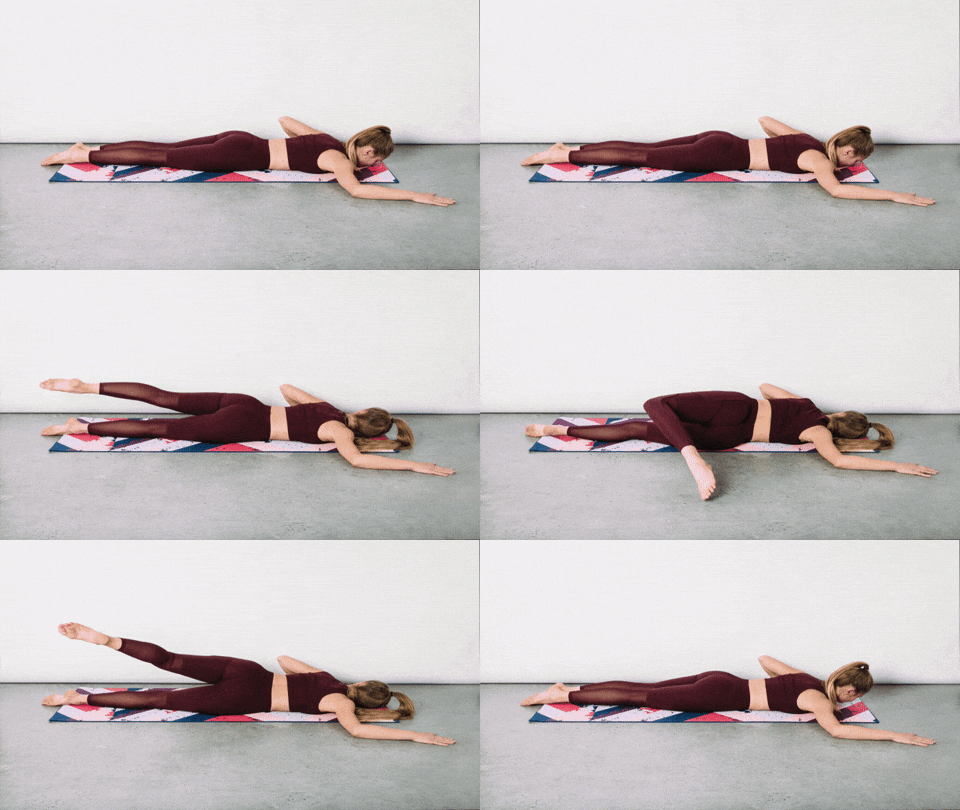
 
Unique Yoga Exercises: Shoulder Opener (Shoulder Opener)
What’s the Benefit for the Muscles? During intense physical activity or sports, we need an especially large amount of oxygen, and releasing pressure from the lung area can help improve our breathing. This pose is an excellent way to "open" the chest muscles. 
 
How to Perform? Lie on a yoga mat face down, with your right elbow resting beside you on the ground at a 90-degree angle. Turn your gaze to the left and carefully roll your lower body to the right, lifting your left leg and touching the ground to your right with your left foot. Stay in this position for 5-10 breaths, then repeat the same action on the other side. 
 
 
Exercise 7: Tabletop Shin Self Massage Saw (Tabletop Shin Self Massage Saw)
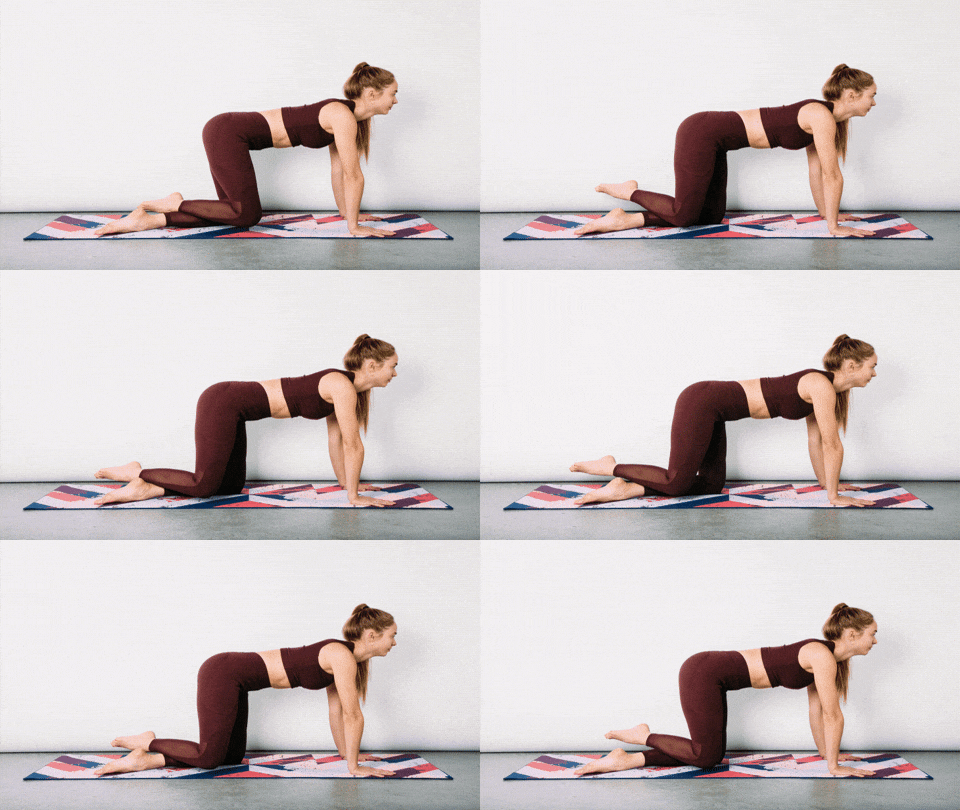
 
Unique Yoga Exercises: Tabletop Shin Self Massage Saw (Tabletop Shin Self Massage Saw)
What’s the Benefit for the Muscles? Spending too much time standing, especially during intense physical activity, puts a heavy burden on the lower legs, and this pose will allow you to improve blood flow and bring calm to that area. 
 
How to Perform? Start in a position where your knees, toes, and palms are simultaneously touching the ground - ensure your shoulders align with your hands and your hips align with your knees. Place your right shin bone on your left calf muscle and begin a "massage" by moving it forward and backward while pressing. Repeat this action 3-5 times with your right leg, then switch legs and perform it with your left leg. 
 
 
Exercise 8: Yoga Toe Stretch (Yoga Toe Stretch)
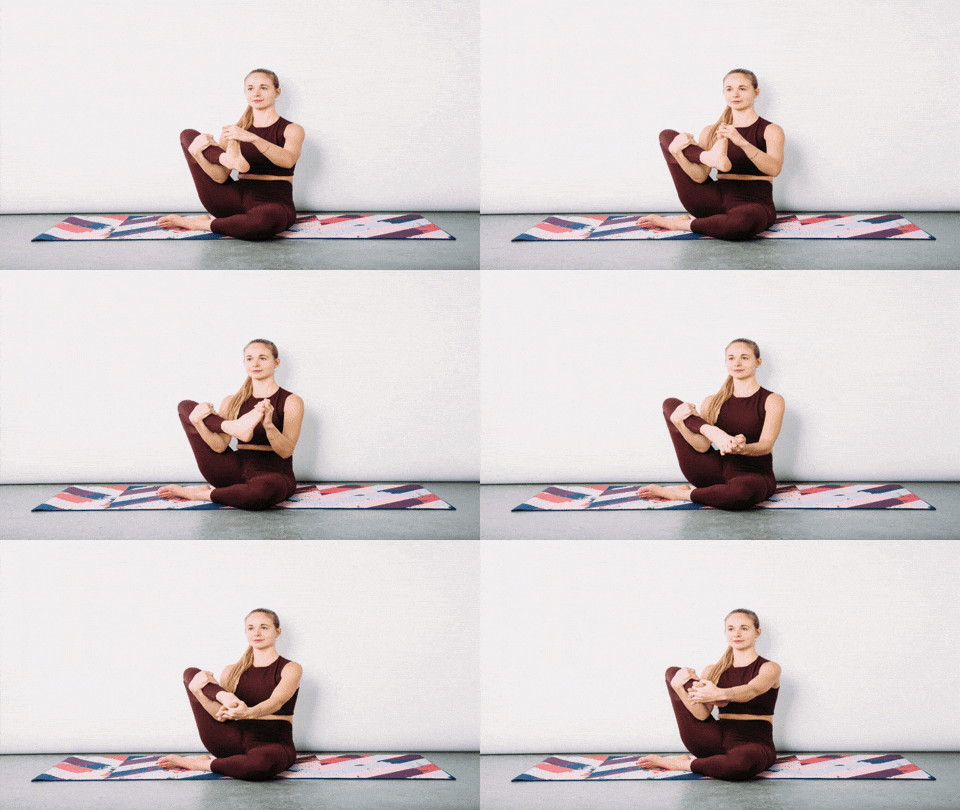
 
Unique Yoga Exercises: Yoga Toe Stretch (Yoga Toe Stretch)
What’s the Benefit for the Muscles? As mentioned, the toes play an important role in maintaining our stable stance, and their contribution increases when they can utilize most of the surface they’re placed on. The action in this yoga exercise will allow you to stretch your toes, helping them spread efficiently during activity and slightly lubricating the ankle joints. 
 
How to Perform? Sit on the floor in an "Eastern" seated position, lift your right leg and cradle it at the calf with your right hand. Insert the fingers of your left hand between the toes of your right foot and begin a gentle circular motion of the ankle clockwise. Do this for a few seconds, then perform the same action on your left leg.


This is only for your information, kindly take the advice of your doctor for medicines, exercises and so on.   


Labels: , , , , , , , , , , ,

Thursday, March 10, 2022

Lower Back Pain: The Best Mobility Exercises to Stretch and Strengthen a Sore Back

Back pain comes with a lot of fear. Feel it and you either assume that you’re aging before your time or have some irreparable damage. Don’t freak out – most of the time, back pain can be attributed to limited mobility, which can be fixed with the right intel.  

While sitting at our desks is to blame, it has less to do with your slumping posture and more to do with the sheer amount of time we spend in this said position. “A problem that we have, as a society, is we spend a really long time at our computers,” agrees strength and conditioning coach Pennie Varvarides. “It’s not that sitting in that position specifically is bad. What’s bad is only ever sitting in that position, as it teaches your body that it doesn’t need to move through other postures.” 

When you then try to ‘improve’ your positioning, by standing up taller or working out, you may notice a lot of back pain. The worst thing you can do for lower back pain as a result of reduced mobility is to go on bed rest though.

“Moving is particularly good for low back pain – especially doing stretches specifically for back pain. If you haven’t done something specific, such as fallen or had a spine injury, getting out of your chair is the most beneficial thing you can do,” says Pennie. Although it feels scary to move your spine about, it should be able to move in all directions. “The spine is made up of lots of vertebra because it is designed to bend, move and twist in lots of ways,” says Pennie.

Improving mobility isn’t just about pain reduction though – it also makes your workouts and day-to-day life easier. “It comes down to movement freedom,” says Pennie. “If someone can’t touch their toes because their back is so stiff, it’s annoying, sure. But it also makes movements such as picking stuff up off the floor, playing with their kids, or putting on shoes way harder. These are things we have to do all the time that are suddenly more difficult because you’ve lost basic human function.”

Along with getting up regularly, Pennie suggests a few moves that will ease the spine and hips to improve the mobility in your lower back and help you feel less pain. “Ideally, you would have your spine move in all of the directions, every day. That doesn’t mean you have to spend hours working on mobility – maybe 10 minutes a day is enough,” she says. 

Here are four moves mobility moves to help reduce lower back pain. 

Cat-cow

“Most people don’t do cat-cow very well, because they move dramatically and quickly. It should be about slowly curling the spine through the positions,” says Pennie. 

  1. Start in an all fours-position with your shoulders directly over your wrists and your hips directly over your knees. 
  2. Starting from the bottom of your spine, slowly curl your spine towards the ceiling, pushing away from the floor and curling your neck in.
  3. Inhale as you slowly unravel to arch the spine, tilting the head towards the ceiling and opening your chest. 

Repeat for 30 seconds

Jefferson curl

“Similarly to the cat-cow, it’s about getting the spine to lead the movement,” says Pennie. Although this may look and feel like everything you’re told not to do when deadlifting, it’s a great way to encourage spinal flexion. Once you’re familiar with the movement, try adding a light weight to encourage the pull through your back. 

  1. Stand up tall with the feet together. 
  2. Start the movement by tucking your chin in towards your chest and rolling down through the neck. 
  3. Continue rounding through the shoulders then slowly through the spine, until your upper body is folded as closely to your legs as possible. Think of folding down one vertebrae of your spine at a time.
  4. Keep the legs straight through the movement to feel the pull through your hamstrings. 
  5. Unroll slowly back up to standing. 

Repeat for 30 seconds

Windmill

This builds strength through the lower back and hips, as well as stretching your posterior chain. You can also add weight into your left hand when you’re comfortable with the exercise. 

  1. Take your feet into a stance just wider than hip-width and point both feet 45° to your right.
  2. Place your right hand inside your right knee and your left hand up towards the sky. Keep eye contact with your left finger tips.
  3. Bend your right knee and slowly lower your right hand down the inside of your leg while your left hand remains over head. 
  4. Push back up to standing. 

Do 10 reps each side

Cross legged side bends

This move bends your spine sideways, rather than forwards and backwards, to train a different movement pattern. Once you’ve nailed the form, hold a weight on the side you’re leaning towards to gain strength, along with mobility. 

  1. Stand up straight and place your left foot in front of your right foot with the outer edges touching. 
  2. Bend your left knee slightly and start to slowly lean your weight to the left. 
  3. When you’ve bent as far as you can, pull yourself back to the starting position. 

Repeat 10 times each side


This is only for your information, kindly take the advice of your doctor for medicines, exercises and so on.   

https://gscrochetdesigns.blogspot.com. one can see my crochet creations  
https://gseasyrecipes.blogspot.com. feel free to view for easy, simple and healthy recipes    
https://kneereplacement-stickclub.blogspot.com. for info on knee replacement


Labels: , , , , , , ,

Wednesday, November 20, 2019

6 easy yoga poses that will help to improve your flexibility


For most people, staying fit means building muscles and gaining body mass. The last thing we care about is increasing our flexibility. It is a general belief that flexibility is only for gymnasts, wrestlers and divers and if you are not associated with any of these sports, then you need not worry about how flexible you are. This is a common misconception among people. In reality, flexibility has a lot to do with how your muscles can move and it is crucial in carrying out day to day activity.

If your body is flexible, then you are less likely to get injured and you will remain healthy as you age. Here are 6 easy yoga poses that you can do to increase your flexibility. 


Seated Forward Bend (Paschimottanasana)

How to do it:
Step 1: Sit down on the ground with your legs stretched out in front of you and your hands resting by your side.
Step 2: Spread your hands out to the sides and then up above your head in a way that the tips of your fingers are pointing towards the ceiling.
Step 3: Take a deep breath and draw your spine up long.
Step 4: When you breathe out, bend forward to touch your toes with your hands.
Step 5: Your belly should be resting on your thighs and your nose should touch your knees. Stay in this position for 4-5 seconds and then go back from where you started.

Cat-Cow Pose (Marjaryasana-Bitilasana)

How to do it:
Step 1: Get on all your fours on an even surface. Your wrists should be under your shoulders and knees under your hips, while your toes should be tucked inside.
Step 2: Inhale and relax your belly so it moves towards the floor. Gently arch your back towards the ground, tilt your tailbone and try to look upward.
Step 3: Hold this position for 2-3 seconds. Now exhale and arch your spine towards the ceiling and tuck your chin into your chest.

Cobra Pose (Bhujangasana)

How to perform it:
Step 1: We have to start with the Makarasana position. Lie down on your stomach comfortably on the ground with your feet wide apart from each other and your hands folded in front of you. Rest your head on your hands and relax.
Step 2: Now join both your legs and extend your hands overhead. Rest your forehead on the ground and pull your hands back underneath your shoulders, keeping your elbows close to your body.
Step 3: Your elbows should be bent and palms should be resting by the side of your chest.
Step 4: Inhale and lift the upper half of your body. Your elbows should be in line with your body, legs stretched in such a way that you do not feel pressure on your waist.
Step 5: Stay in this position for 4-5 seconds and breathe in and breathe out. Then come back to the normal position.


this is only for your information, kindly take the advice of your doctor for medicines, exercises and so on.     
https://gscrochetdesigns.blogspot.com. one can see my crochet creations  
https://gseasyrecipes.blogspot.com. feel free to view for easy, simple and healthy recipes    
https://kneereplacement-stickclub.blogspot.com. for info on knee replacement


readmore

Bow Pose (Dhanurasana)

How to do it:
Step 1: Lie down on your stomach with your feet hip-width apart from each other and arms by your side.
Step 2: Now gently fold your knees and hold the ankles of both the legs with your hands.
Step 4: Inhale and lift your chest and legs off the ground. Pull your legs are much as you can, keeping your face straight.
Step 5: Hold the pose for a while and focus on your breathing. Your body should be tight like a bow.


Bridge Pose (Setu Bandha Sarvangasana)

How to do it:
Step 1: Lie down comfortably on your back with your feet hip-width apart and knees bent.
Step 2: Your arms should be resting on the sides of your body and your palms should be facing downwards.
Step 3: Take a deep breath, press your feet into the floor and gently lift your hips up rolling the spine off the floor.
Step 4: Press your arms and shoulders on the ground to lift your chest. Engage your legs and buttocks to lift your hips higher. Hold this position for 4-8 breaths.


Butterfly Pose (Baddha Konasana)

How to do it:
Step 1: Sit down on the ground with your back neutral and your knees bent.
Step 2: Move your knees to the outer side, so the soles of both your legs meet at the center. Hold the ankles of both the feet with your hands.
Step 3: Now engage your abs and slowly bend your body forward, towards your feet as far as you can. Hold the position for 30 seconds to 2 minutes.


Labels: , , , , , , ,