Thursday, March 20, 2025

Yoga Exercises to Relieve Muscle Tension

The more our muscles exert themselves during the day, the more our body craves rest - but beyond a night's sleep, there’s another way, full of benefits, to allow our body to receive its dose of calm, and that’s through performing yoga exercises. The following 8 yoga poses you’re about to discover might seem familiar at first, but in fact, each one is presented here in a unique version designed to relieve tired, tense, and sore muscles. So, if you regularly engage in sports, perform strenuous physical activity, or simply feel your muscles are exhausted, we recommend disconnecting from your surroundings for the next few minutes and recharging with renewed energy through the following poses.

Exercise 1: Squat for Ankle Strengthening (Ankle Strength Squat)
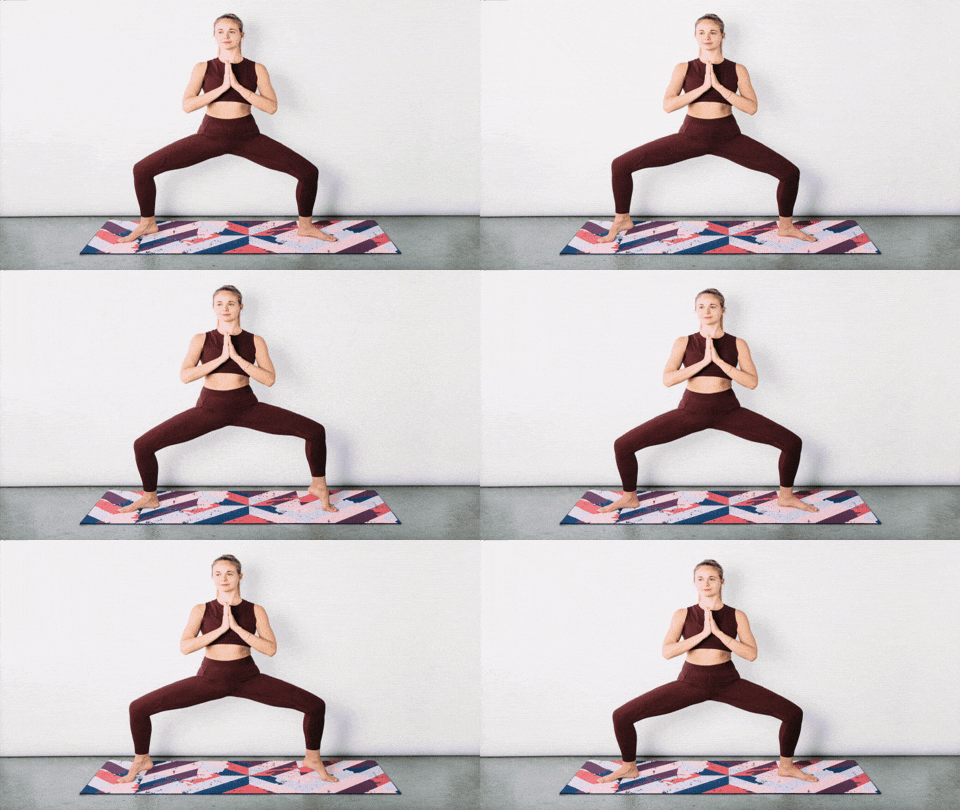
Unique Yoga Exercises: Squat for Ankle Strengthening (Ankle Strength Squat)
What’s the Benefit for the Muscles? The movements in this pose help to slightly "lubricate" the ankle joints, which tend to wear out due to intense physical activity or sports like running. Additionally, they engage the gluteal muscles and the back of the thigh, whose fitness is important and essential for our daily functioning.

How to Perform? Start by standing with a wide stance, with your feet pointing outward. Slightly bend your knees into a squat position as shown above. Press your palms together and bring them to the center of your chest - maintain as stable a stance as possible. Lift your right ankle and then lower it back down, then lift your left ankle and return it, and finally lift both ankles simultaneously and return them to the ground. Ensure full contact of each foot with the ground to avoid arch strain. Repeat the action 8 times. 
 
Exercise 2: Calf, Hamstring, and Achilles Stretch with a Yoga Block (Calf-Hamstring-Achilles Opener With Block)
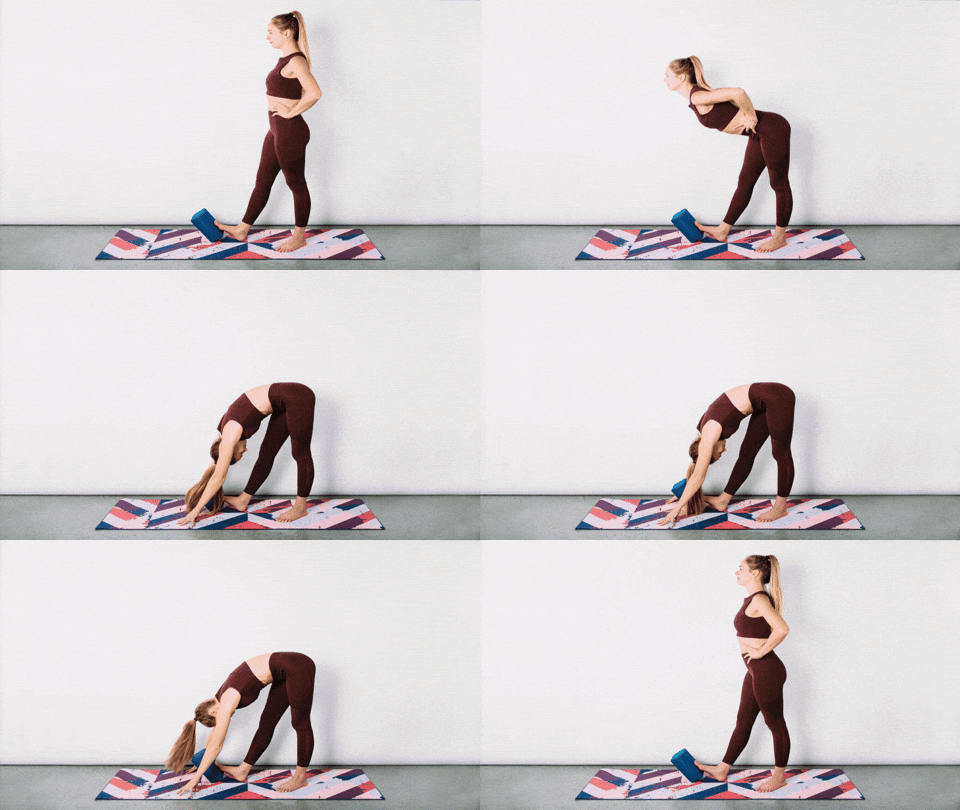
 
Unique Yoga Exercises: Calf, Hamstring, and Achilles Stretch with a Yoga Block (Calf-Hamstring-Achilles Opener With Block)

What’s the Benefit for the Muscles? People who spend most of their time standing need their muscles, especially those in the lower body, to be strong enough to efficiently bear their full body weight. This pose allows you to simultaneously release the calf, hamstring, and Achilles tendon muscles while keeping them fit, ensuring stable standing. 
 
How to Perform? Start in a standing position and touch the yoga block (or any stable object) with the ball of your right foot at a 45-degree angle, with your heel securely on the ground. Step your left leg slightly back and carefully bend your upper body forward along your extended right leg, touching the ground. Hold this position for 60 seconds. Return to the starting point and perform the same action with your left leg. 
 
Exercise 3: Cat-Cow Pose with Crossed Knees (Cat-Cow With Knees Crossed)
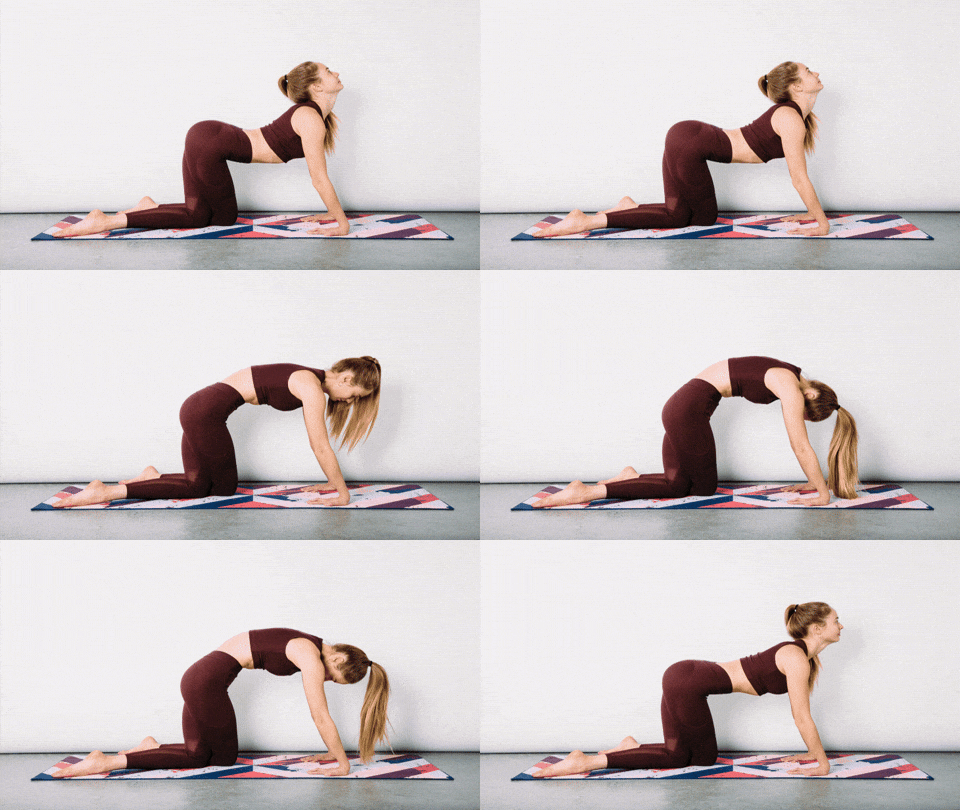
 
Unique Yoga Exercises: Cat-Cow Pose with Crossed Knees (Cat-Cow With Knees Crossed)

What’s the Benefit for the Muscles? This pose helps relieve significant pressure from the pelvic and lower back areas, improving the spine’s daily functioning. It also slightly releases the joints and provides rest to a worn-out body.

How to Perform? Start in a position where your knees, toes, and palms are simultaneously touching the ground - ensure your shoulders align with your hands, your hips align with your knees, and your palms face the center of your body. Now cross your knees by passing your left knee behind your right knee. Both knees should be touching, and your feet should be apart - forming an X shape. Take a deep breath, carefully arch your back, and lift your head upward (Cow Pose). Then exhale while lowering your head toward the floor and gently rounding your back (Cat Pose). Perform this action 20-30 times, then repeat with the other leg. 
 
 
Exercise 4: Child’s Pose on Toes (Child’s Pose on Toes)
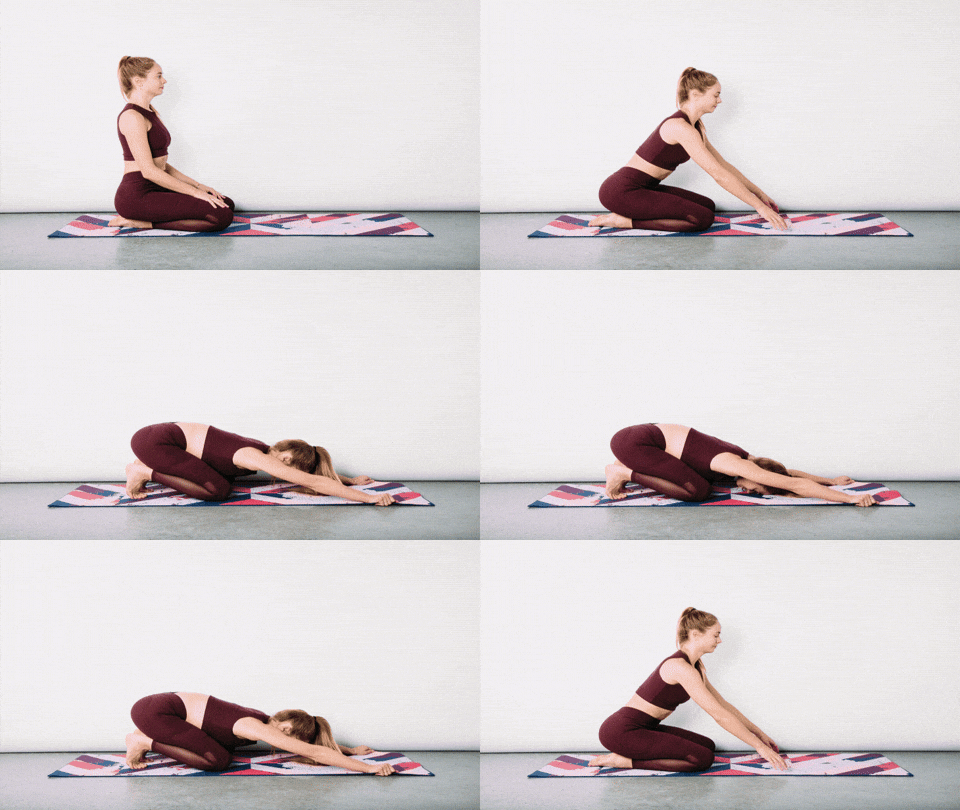
 
Unique Yoga Exercises: Child’s Pose on Toes (Child’s Pose on Toes)


What’s the Benefit for the Muscles? Every time we stand, walk, or run, it’s ideal for our foot’s contact with the ground to be correct and involve all possible parts. Pulling the toes will allow you to widen the foot joint, release the pressure applied to the arch during daily life, and ensure every step on the ground is stable and healthy. 
 
How to Perform? Start by sitting on both knees with an upright torso, hands resting on your knees. Pull your toes toward the center of your body and rest on them, lean your upper body forward while holding the edges of the mat with your hands, and lightly touch your forehead to the ground. Stretch your body by pulling your hips back and your hands forward. Stay in this position for a few deep breaths and release. Repeat the action 10 times. 
 
 
Exercise 5: Quad-Psoas Wall Stretch (Quad-Psoas Wall Stretch)
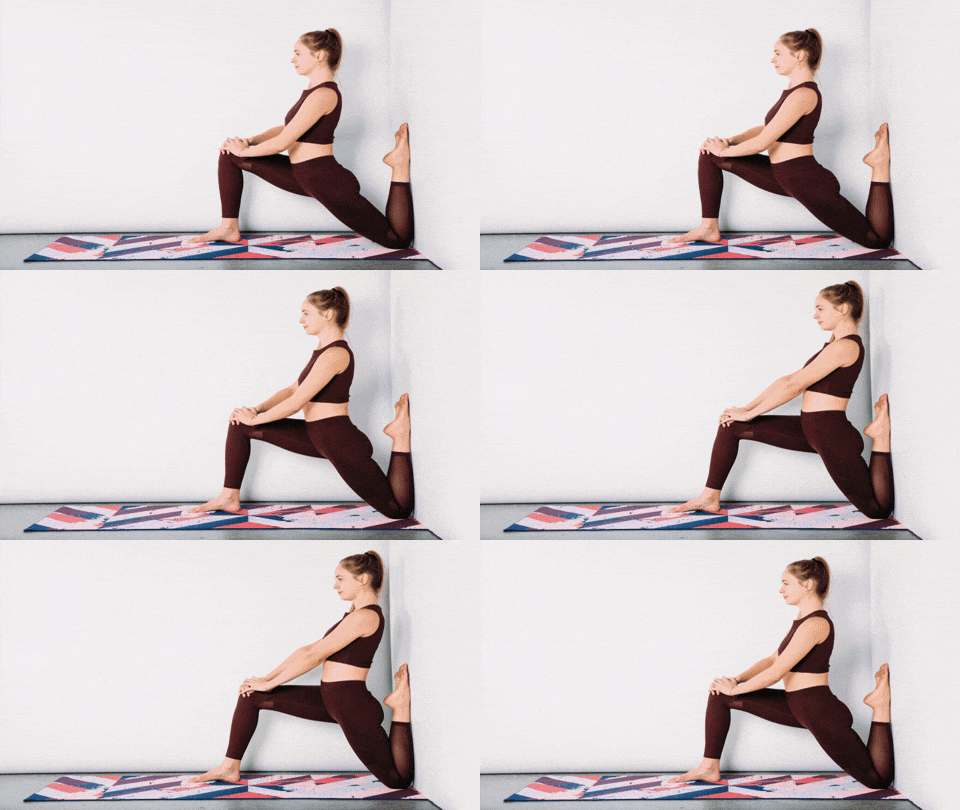
 
Unique Yoga Exercises: Quad-Psoas Wall Stretch (Quad-Psoas Wall Stretch)

What’s the Benefit for the Muscles? The psoas muscle is one of the most important muscles in the body, often called the "king of movement" - located deep in the upper body, it connects the pelvis to the back and thighs, significantly affecting our posture, range of motion, joint function, and core muscle activity. Strengthening this muscle will improve anyone’s stance and is especially crucial for athletes and those engaging in strenuous physical activity. 
 
How to Perform? Start in a lunge position, with your right leg extended forward and bent at a 90-degree angle, and your left knee placed at the junction of the wall and floor, with the entire section from foot to knee touching the wall (it’s recommended to use a mat or blanket between the leg and the ground to avoid knee injury). Place your hands on your right knee and push your hips forward. Then return your hips to their original position. Repeat this action 4-5 times in a slow motion for each leg.


Exercise 6: Shoulder Opener (Shoulder Opener)
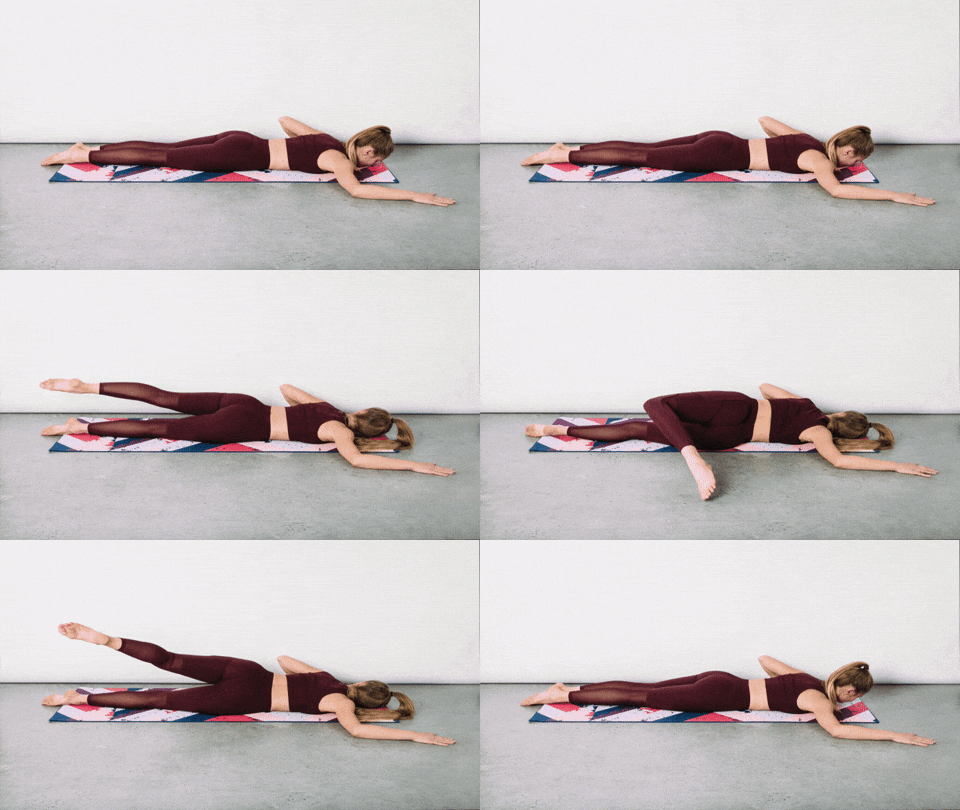
 
Unique Yoga Exercises: Shoulder Opener (Shoulder Opener)
What’s the Benefit for the Muscles? During intense physical activity or sports, we need an especially large amount of oxygen, and releasing pressure from the lung area can help improve our breathing. This pose is an excellent way to "open" the chest muscles. 
 
How to Perform? Lie on a yoga mat face down, with your right elbow resting beside you on the ground at a 90-degree angle. Turn your gaze to the left and carefully roll your lower body to the right, lifting your left leg and touching the ground to your right with your left foot. Stay in this position for 5-10 breaths, then repeat the same action on the other side. 
 
 
Exercise 7: Tabletop Shin Self Massage Saw (Tabletop Shin Self Massage Saw)
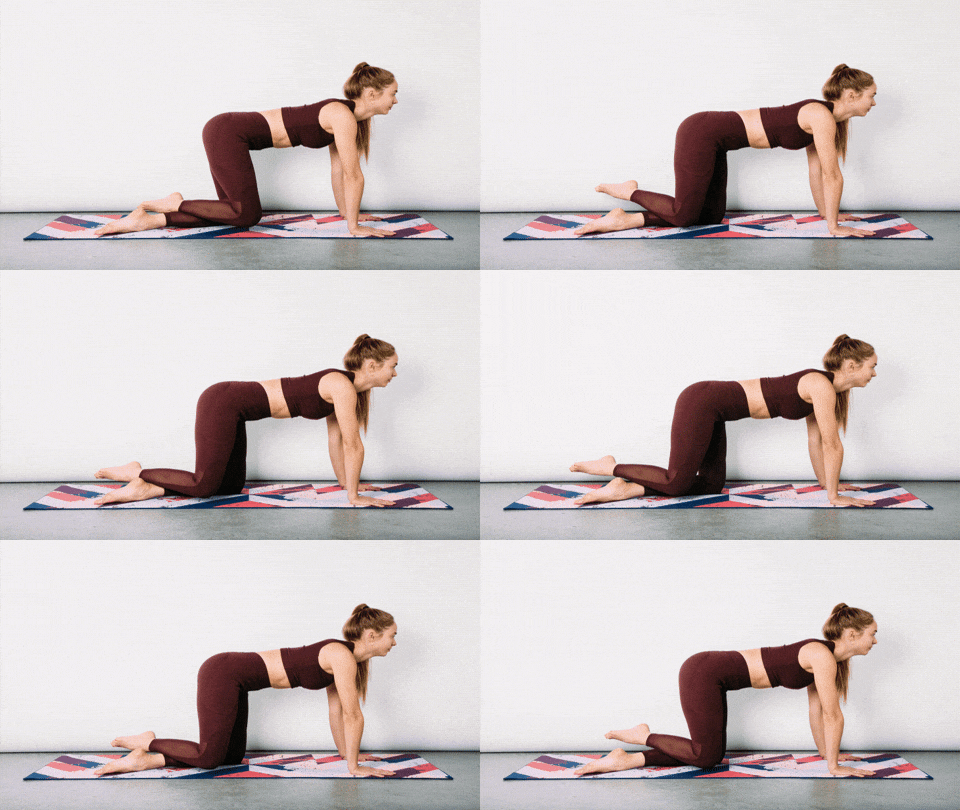
 
Unique Yoga Exercises: Tabletop Shin Self Massage Saw (Tabletop Shin Self Massage Saw)
What’s the Benefit for the Muscles? Spending too much time standing, especially during intense physical activity, puts a heavy burden on the lower legs, and this pose will allow you to improve blood flow and bring calm to that area. 
 
How to Perform? Start in a position where your knees, toes, and palms are simultaneously touching the ground - ensure your shoulders align with your hands and your hips align with your knees. Place your right shin bone on your left calf muscle and begin a "massage" by moving it forward and backward while pressing. Repeat this action 3-5 times with your right leg, then switch legs and perform it with your left leg. 
 
 
Exercise 8: Yoga Toe Stretch (Yoga Toe Stretch)
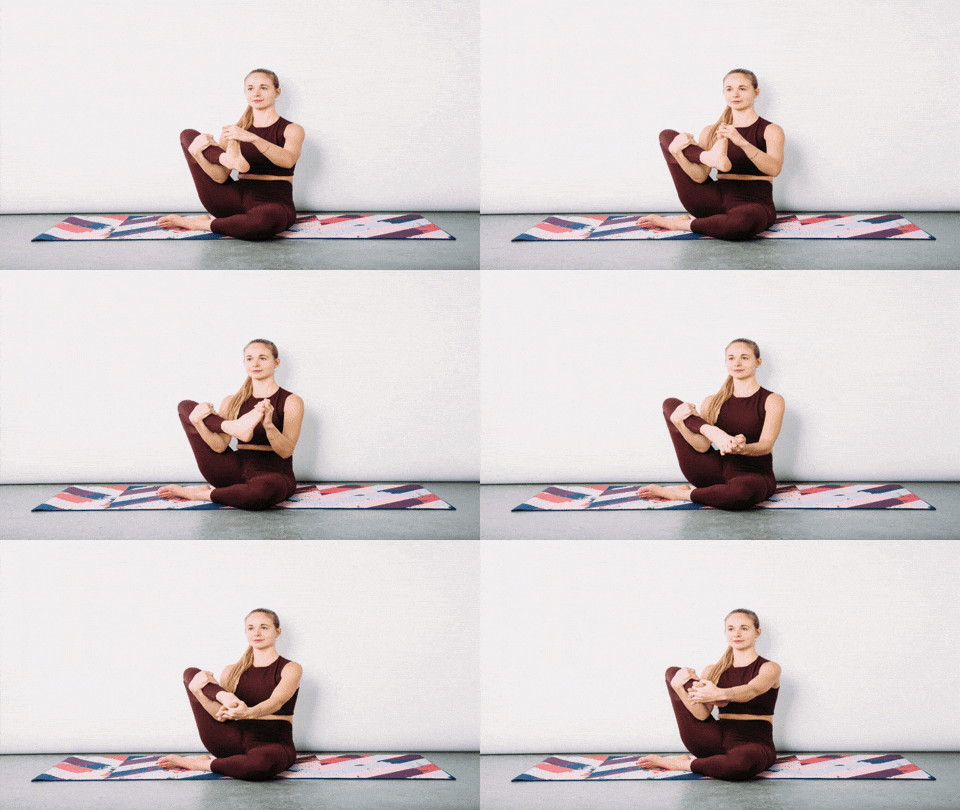
 
Unique Yoga Exercises: Yoga Toe Stretch (Yoga Toe Stretch)
What’s the Benefit for the Muscles? As mentioned, the toes play an important role in maintaining our stable stance, and their contribution increases when they can utilize most of the surface they’re placed on. The action in this yoga exercise will allow you to stretch your toes, helping them spread efficiently during activity and slightly lubricating the ankle joints. 
 
How to Perform? Sit on the floor in an "Eastern" seated position, lift your right leg and cradle it at the calf with your right hand. Insert the fingers of your left hand between the toes of your right foot and begin a gentle circular motion of the ankle clockwise. Do this for a few seconds, then perform the same action on your left leg.


This is only for your information, kindly take the advice of your doctor for medicines, exercises and so on.   


Labels: , , , , , , , , , , ,

Monday, January 31, 2022

Stretches That Help Maintain Your Hips

As we get older, many of us experience pain and stiffness in our hips. This is not surprising, given that the hips are two of the hardest-working joints in the body and many common, daily activities take their toll on them. Sitting in the same position for prolonged periods, twisting, turning and walking all have an impact over the years, and if your hips begin to suffer, it can also cause a pain 'chain reaction' which can affect your knees, back and thigh muscles. Luckily, there are a number of simple, everyday stretches that can help you maintain supple, pain-free hips.
Why Do Hip Stretches?  
The hip is a ball and socket joint designed to naturally facilitate a large range of motion. It is home to some of the largest muscles in the body, as well as some of the smallest, with each muscle having a specific function designed to allow the hip to flex, rotate and extend as required. 

Around 15 degrees of extension are required in order to allow us to walk normally. However, modern life often requires us to sit in the same position for prolonged periods of time - be it at work, home, or even in the car. Over time, this can cause the flexor and rotator muscles to tighten, and weaken the gluteal muscles responsible for extension. This degeneration will impair the mobility of the hips and negatively impact posture, while the back will frequently need to compensate for the lost movement, which can lead to back pain as well.  
 
The Significance of Tight Hips as We Get Older
Hips
Gait analysis studies have shown that our stride becomes shorter as we get older. Shortened step length can be both a cause and symptom of impaired hip rotation. Tight hip flexors will cause us to walk with a reduced stride, while over time, the tendency to walk with shorter steps will lead to tightness in the muscles and impaired balance. Hip stretches can be a great preventative strategy to help maintain posture and prevent falls as we grow older. 
 
As you age, other factors might lead you to become less mobile as well. The only activities that fully extend the hips are walking and running. It is important that we try to keep ourselves active for as long as possible, but if other issues have caused you to walk less than you once did, then hip stretches can compensate for the reduced extension of the pelvic muscles, and maintain the nimbleness of your hips.

Hip Stretches You Can Perform At Home 
 
The following stretches are all designed to be performed at home, by people of any age. However, if you have chronic hip pain, long term back pain or arthritis, please consult your Doctor or Physical Therapist before committing yourself to any exercise plan. 
 
1. Hip Extensor Stretches 
The hip extensors are comprised of the hamstrings (the long muscles at the back of the upper leg) and gluteus maximus (otherwise known as your backside!), and together they facilitate mobility when you walk or run. We don't need to stretch the gluteus maximus too often as it naturally exists in an extended state when we are seated. However, the hamstrings contract when we sit down and can often become tight. Here are two easy hamstring stretches you can do at home:

The Standing Hamstring Stretch
 
This stretch is proven to help hamstring flexibility, but is most effective if you are able to maintain a straight back while performing it: 
 
1. Place a low chair or table in front of you and gently raise your leg on to it, while keeping your chest and back straight. 
 
2. Bend forward at your hips (not your back) until you feel the muscle at the back of your thigh stretch. 
 
3. Try and hold the position for as long as it is comfortable, 30 seconds is a reasonable guideline.  
 
The Hamstring Stretch In a Doorway
1. Lie on the floor near an open doorway. Raise one leg so it rests against an adjacent wall, while lying the other flat against the floor and through the open doorway. 
 
2. Gently pull yourself closer to the wall so that you feel a stretch at the back of your extended thigh. 
 
3. Try and hold the position for as long as you comfortably can - again, 30 seconds is a reasonable guideline. 
 
 2. Hip Flexor Stretch
The hip flexors connect the hip, pelvis and abdomen and are responsible for flexing, as the name suggests. They are among the most powerful muscles in the body. Here's how you can help keep them supple: 
 
1. To stretch the left hip's flexor muscles, kneel on your left knee and extend your right foot out in front of you so that it creates a 90-degree angle. You can put a cushion or something similar under the knee if you find it uncomfortable. 
 
2. Rest your left hand on your left hip and push the left hip forward so that it moves ahead of your left knee, while leaving your right knee where it is. 
 
3. Keep your chest extended and ensure that your hips remain straight - do not bend forward. 
 
4. Swap knees and repeat the exercise for your right side flexors. 
 
3. Hip Rotator Stretches  
The internal and external hip rotator muscles are responsible for the twisting, turning and spinning motions of your lower body. We use these muscles countless times everyday, for a wide range of activities. These exercises can help keep them in good working order: 
 
Internal Rotator Stretches
1. Stretch your left side by sitting crossed-legged on a supportive chair with your left leg placed across your right leg. Your left ankle should sit on your right thigh. 
 
2. Use your left hand to apply gentle pressure to your left thigh until you feel resistance. 
 
3. Breathe out while tilting gently forward at the hips, keeping your back and chest straightened. It is important that you don't adopt a 'hunched' position. 
 
4. Hold the position for 30 seconds, or however long is feasible for you. Switch legs and repeat the exercise. 
 
 External Rotator Stretches
1. Work your left external rotators by again sitting on the chair, and crossing your left leg across your right thigh so your left ankle is resting upon it. 
 
2. Take hold of your left knee with both hands and slowly press it up towards your left shoulder. 
 
3. Press until you feel resistance; don't go beyond this position as you may feel pain. 
 
4. Hold the position for 30 seconds, or however long is comfortable for you. Switch legs and repeat the exercise. 
 
4. Hip Abductor Stretches 
The hip abductor muscles sit on the inside of your thighs. The long abductors cross both the hip and knee joint, while the short abductors cross only the hip joint. Here are some stretches that can help keep both types of abductor muscle supple
 
Short Abductor Stretches
1. Kneel onto your left knee and extend your right knee out in front of you at a 90 degree angle. 
 
2. Breathe in deeply, then slide your right knee out to the side and back. 
 
3. Exhale and raise your chest. 
 
4. Swap legs and repeat the exercise for the other hip.  
 
Long Abductor Sitting Stretches
1. You can stretch both of your long abductors at the same time by sitting with your legs placed together but stretched out in front of you and your back straight. 
 
2. Gradually try and work your legs apart as far as they will comfortably go. Relax and hold the pose for a few seconds. 
 
3. Breathe in deeply while using your hips to bend forward until you feel resistance. 
 
4. Be certain to keep your chest raised and maintain a normal curvature of the back; the bend should be at the hips. 
 
5. Hold the pose for as long as comfortable - 30 seconds if you can. 
 
5. Iliotibial Band Stretches
The Iliotibial band is an area of thickened muscle fibers that runs along the outside of the thigh and connects your hip to your lower leg. If yours is tight, it can cause you knee pain. This simple, preventative exercise will help stretch your left iliotibial band: 
 
1. Lean against a chair with your left hand, and place your left foot behind your right foot. Point the toes of your left foot at a 45-degree angle or thereabouts. 
 
2. Put your right hand on your right hip. Then push your left hip towards the chair while keeping your right leg straight. 
 
3. Do not bend forward at the hips, or rotate the entire body. Make sure you remain upright, keeping your upper body in line with a wall. 
 
4. Swap legs and repeat.


This is only for your information, kindly take the advice of your doctor for medicines, exercises and so on.   

https://gscrochetdesigns.blogspot.com. one can see my crochet creations  
https://gseasyrecipes.blogspot.com. feel free to view for easy, simple and healthy recipes    
https://kneereplacement-stickclub.blogspot.com. for info on knee replacement

Labels: , , , , , , , ,