Friday, March 17, 2023

Easy Exercises to Improve Blood Flow in the Body

When varicose veins appear in the feet, nails become weak, and hair loss occurs, these are indications that blood circulation is problematic. Proper blood flow is essential for carrying oxygen and nutrients to various body organs and removing toxins. Restricted blood flow can lead to various medical problems that can harm the body's systems and general well-being. If you strain certain muscles during the day or sit in front of the computer for long hours, it can impair blood flow to certain organs. To alleviate this problem, exercises, and stretches designed for different body parts can help improve blood flow, alleviate pain, and promote overall well-being. A feeling of coldness in the palms can also suggest blood circulation issues that can be addressed through exercise and stretches.
Blood Flow Exercises

1. Improving blood flow in the hands 
 Blood Flow Exercises
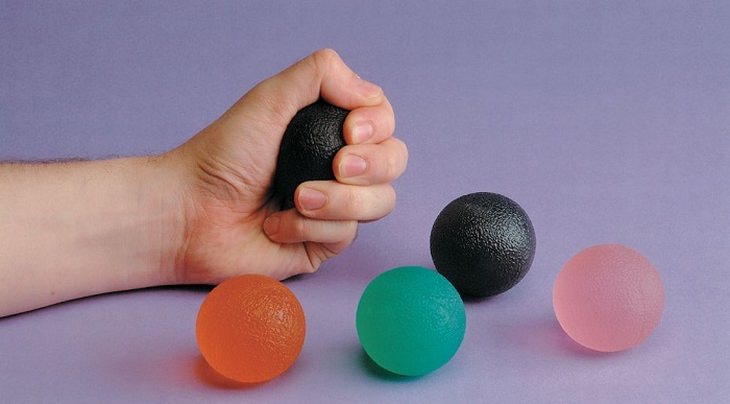
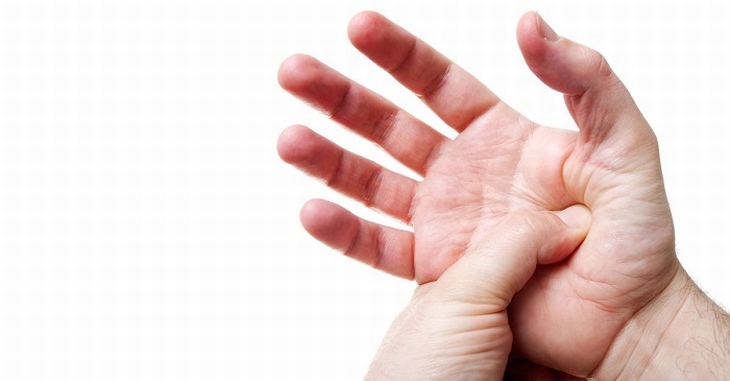
When blood circulation to the hand area is poor, it can cause discomfort or pain during daily activities. To regulate blood flow and strengthen hand muscles, the following exercises should be performed daily:

Instructions: 
1. Reach with your hands forward and shake them to increase blood flow. 
 
2. Tightly clench your hands into fists for 10 seconds and repeat 5-6 times. 
 
3. Stretch your fingers apart for a few seconds and repeat 4-5 times. 
 
4. Press the palms against each other or against a hard surface. Repeat this 3-4 times. 
 
5. Finish by massaging the muscles of each palm with the fingers of the other hand. 
 
 
2. Improving blood flow to the feet 
 
Similarly, to improve blood circulation in the feet, exercises can be performed to help regulate blood flow and strengthen foot muscles. These exercises are especially beneficial for individuals who sit for prolonged periods. They can be done barefoot or with soft-soled shoes. 
 
Instructions: 
 
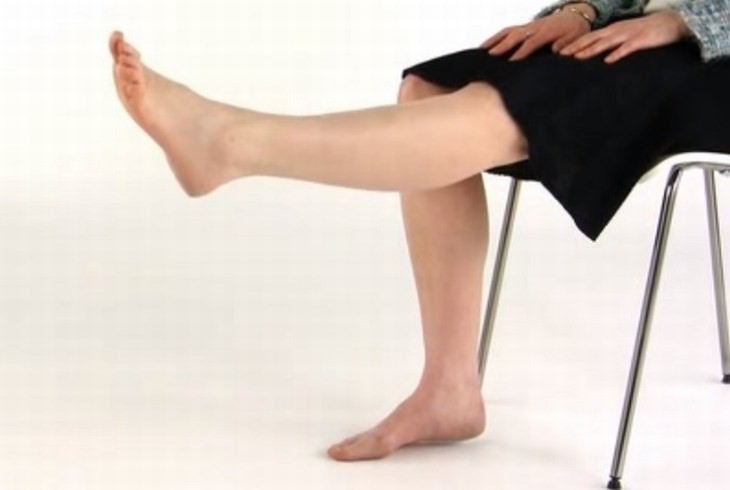
1. The first exercise involves sitting comfortably lifting each leg forward when straight and returning it to its original position. The exercise should be repeated five times for each leg.
Blood Flow Exercises

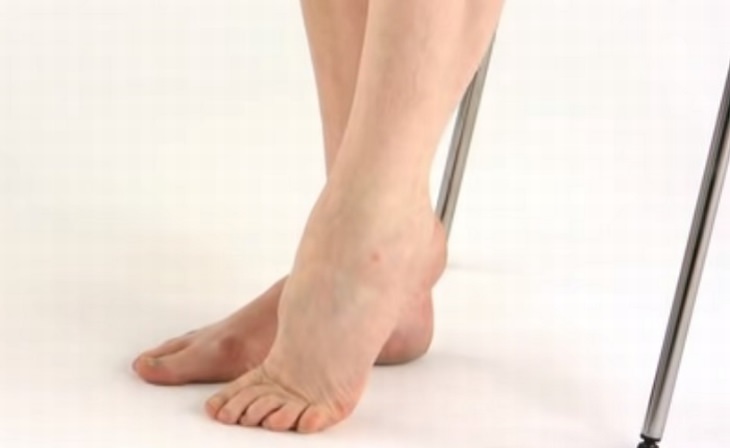
2. The second exercise involves placing both feet on the ground, lifting and lowering the heel of each foot to increase blood flow to the toes. This exercise should also be repeated five times for each foot.
Blood Flow Exercises
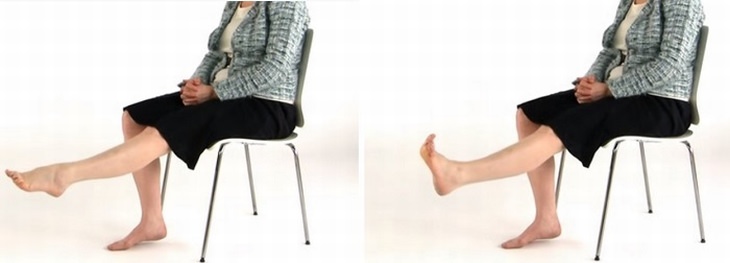
3. Step three of the exercise involves lifting your left leg to a comfortable height with your toes pointing toward the ceiling. Hold this position briefly and then point your toes forward, resembling the starting pose of a ballerina's point. This sequence should be repeated five times for each foot.
Blood Flow Exercises
4. Rotate your foot in clockwise and counterclockwise circles while holding it up in the air. Complete 10 rotations in each direction for both feet. 
 
 
3. Improving blood flow to the head and feet 
 
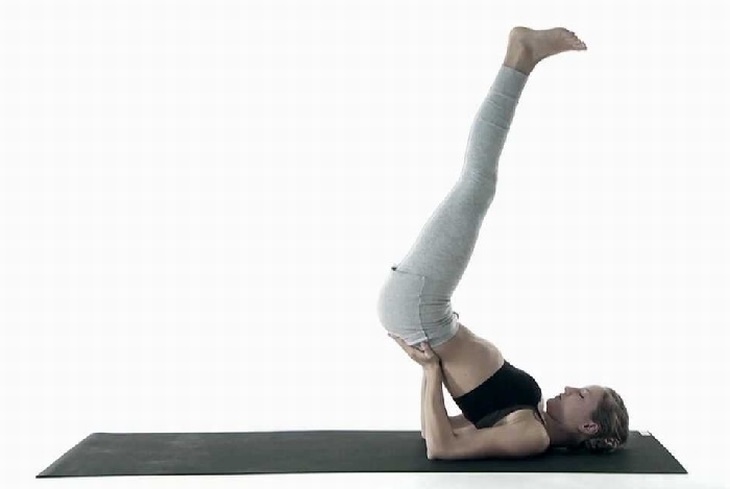
The following exercise is very effective for improving blood circulation and relieving strain in many organs in the body: it improves blood flow to the head and hair, as well as to the area of ​​the legs that hardly move if you sit for most of the day, and above all allows the heart to rest, since it does not have to circulate the blood against gravity to the head. There are two options for performing the exercise, so if you haven't done a candle stand lately, you should try and perform the exercise with your legs resting against a wall, and only later hold them in the air by yourself. 
 Blood Flow Exercises
Instructions: 
1. Lie on your back, fold your legs, and press them to your buttocks. 
 
2. For the next step, lift your legs and buttocks off the floor, so that your feet point towards the ceiling, and bring your chin closer to your chest. Avoid turning your head in order not to injure yourself. 
 
3. Use your hands to support your lower back, and take deep breaths. 
 
4. Stay in the position as long as you feel comfortable, up to 5 minutes.


4. The downward-facing dog position improves blood flow to the spine, brain, and limbs 
 
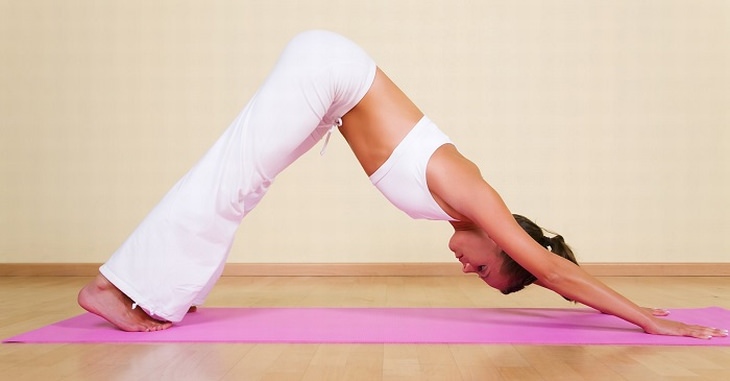
This exercise is an "inverted exercise" which places the body in a position it is not used to. The manner of standing increases the blood flow to the spine area and is therefore very beneficial for those suffering from back pain, and also allows better blood flow to the brain and limbs. 
 Blood Flow Exercises
 Instructions: 
 
1. Start in a six-legged position on the floor, then slowly straighten your legs and arms, while lifting your buttocks up. 
 
2. Be sure to keep your hands shoulder-width apart and your feet hip-width apart. 
 
3. Try to push the floor as much as possible with your hands and feet without moving, and feel how your spine lengthens. 
 
4. Stay in this position for about 30 seconds.


5. Triangle stretch to improve blood flow to the upper body and legs  
 
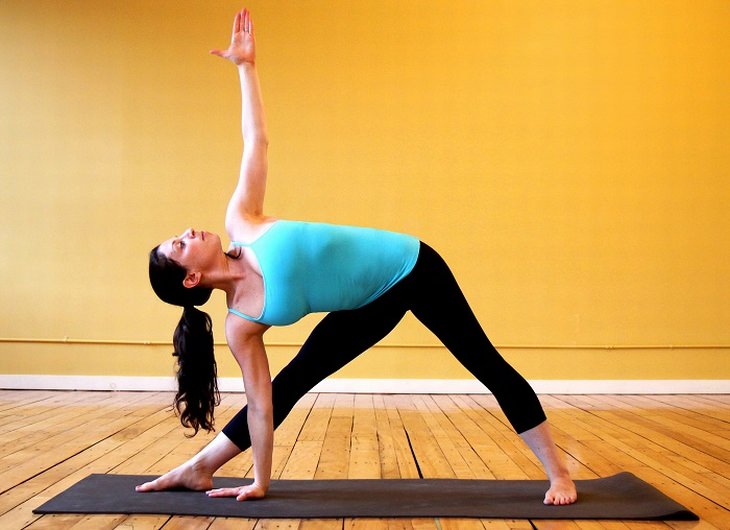
The following stretch will help you improve blood flow to your leg muscles, as well as your upper body. It doesn't strain the back muscles or over-activate them. 
Blood Flow Exercises
 Instructions: 
 
1. Begin by standing straight with your legs spread apart, with one leg turned to the side and the other leg extended. 
 
2. Stretch your right arm upwards and simultaneously reach down with your left hand to touch the floor. 
 
3. Hold this position for a few seconds, and repeat it four more times.
 
4. Switch your legs and perform five more stretches with your left hand up and your right hand down.


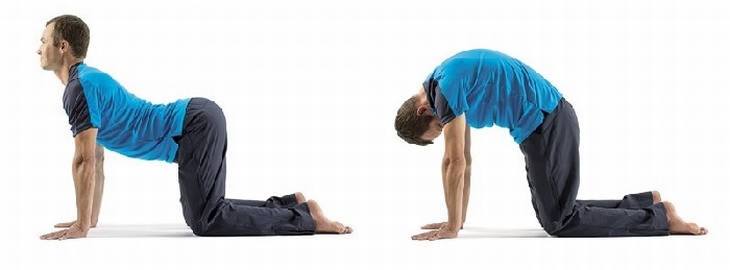
6. Cat-cow stretch to improve blood flow to the back, chest, neck, and head 
 
To improve blood flow to the back, chest, neck, and head, end the exercise sequence with the cat-cow position. This pose is particularly helpful for individuals who experience back or neck pain or spend prolonged periods sitting.
Blood Flow Exercises
Instructions: 
 
1. Start on all fours with your arms straight, legs bent, and hips spaced hip-width apart. 
 
2. The second step of the exercise involves inhaling and transitioning into the cat pose. This involves lifting your head without removing your hands from the floor, while simultaneously pulling up your chest and arching your lower back. 
 
3. The third step requires exhaling and moving into the cow position, where you lower your head as far as possible without bending your arms while arching your lower back and lowering your buttocks.
 
4. Repeat both parts of this exercise 10 times.

This is only for your information, kindly take the advice of your doctor for medicines, exercises and so on.  

https://gscrochetdesigns.blogspot.com. one can see my crochet creations  
https://gseasyrecipes.blogspot.com. feel free to view for easy, simple and healthy recipes    
https://kneereplacement-stickclub.blogspot.com. for info on knee replacement
https://GSiyers home remedies.blogspot.com     is my latest addition to my blogs. I'm going to add posts there, do give me your valuable feed back on my blogs. Thanks a lot, take care, be healthy and be happy. 

Labels: , , , , , , , , , , , ,

Sunday, April 03, 2022

4 health conditions that can make you more prone to heart attack

Know the risk factors of a heart attack

Cardiovascular diseases (CVDs) have become a major source of concern in India and across the globe. According to the World Health Organization (WHO), heart-related diseases are the leading cause of death globally. An estimated 17.9 million people died from CVDs in 2019, of which 85 percent were due to heart attack and stroke, says the global health agency.

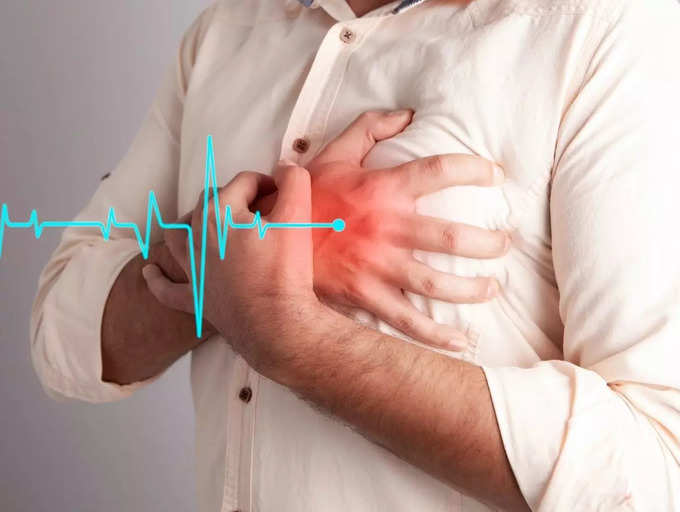
Heart attacks and cardiac arrest are some of the most common types of CVDs that are not only severe but can be life threatening. It refers to a blockage formed within the arteries that stops the flow of the blood to the heart. Without the blood, the heart can't get enough oxygen, causing damage to the heart muscles.

In recent times, many people, including young individuals are becoming more prone to heart attacks, which is highly concerning. While many just reduce the risk by certain lifestyle changes, there are certain health conditions you must take note of, which may be adding to your risk of a heart attack.

High blood pressure

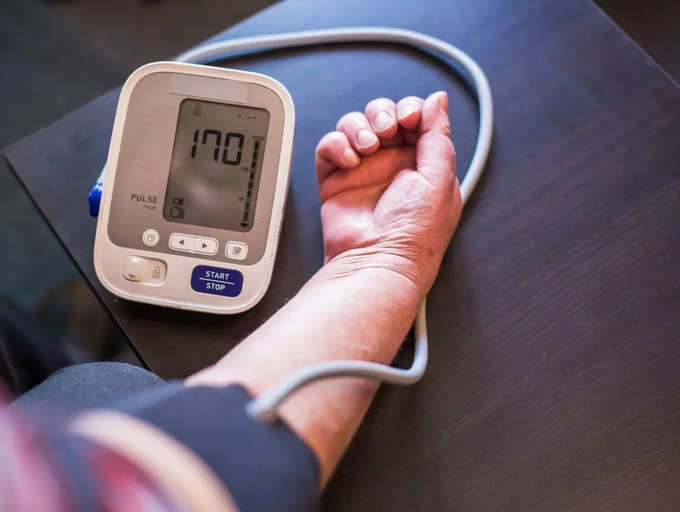
High blood pressure or hypertension is a condition that occurs when the force of the blood against the artery walls and other blood vessels is too high, causing the flow of the blood and oxygen to the heart to decrease. This in turn compels the heart to work harder to pump blood to the rest of the body, leading to the thickening of the left ventricle, which can increase your chances of heart diseases like heart attack, heart failure and cardiac arrest.

Normally, a high BP is defined as blood pressure above 140/90, and is considered severe if the pressure goes beyond 180/120. It is often known as a 'silent killer', since it comes with no symptoms.

Unhealthy levels of "bad" LDL cholesterol

There are two types of blood cholesterol: LDL (low-density lipoprotein) cholesterol and HDL (high-density lipoprotein) cholesterol. LDL cholesterol, also known as "bad" cholesterol, causes plaque buildup in your arteries, which is dangerous for the heart. Increases in bad cholesterol in the arteries can narrow down the blood vessels, decreasing the blood flow to the heart, brain, kidneys, and other parts of the body. On the other hand HDL or the "good" cholesterol helps prevent various heart diseases.

Obesity

Being overweight is another condition that can increase your risk of heart attack and other cardiovascular diseases. According to the Centers for Disease Control and Prevention (CDC), "Obesity is linked to higher “bad” cholesterol and triglyceride levels and to lower “good” cholesterol levels. Obesity can lead to high blood pressure and diabetes as well as heart disease." This suggests that obesity can be a root of many chronic health ailments, which is why one must maintain a healthy weight.

High blood sugar levels or diabetes

High blood sugar levels can damage, contract and narrow down the arteries in the long run. This happens because diabetes causes sugar build-up in the blood, since your body cannot use all the sugar present. Hence blocking and damaging the blood vessels that carry blood to and from the heart.

Signs of heart attack to watch out for

According to American Heart Association (AHA), warning signs and symptoms of heart attack include:

- Chest pain and discomfort

- Shortness of breath

- Pain and discomfort in the upper body including one or both arms, the back, neck, jaw or stomach.

- Cold sweat or light-headedness

On the onset of such symptoms, contact your nearest hospital immediately. 

This is only for your information, kindly take the advice of your doctor for medicines, exercises and so on.   

https://gscrochetdesigns.blogspot.com. one can see my crochet creations  
https://gseasyrecipes.blogspot.com. feel free to view for easy, simple and healthy recipes    
https://kneereplacement-stickclub.blogspot.com. for info on knee replacement


Labels: , , , , , , , , , , , , , ,

Tuesday, October 12, 2021

The Best Exercises For Seniors You Can Do in a Seated Position

Seated exercises are perfect for strengthening core muscles, the back, and improving mobility in the joints for those who have difficulty standing up for extended periods of time. While still effective, these exercises have a much lower risk of falls. For many people, sitting down provides the extra stability they need to focus on garnering flexibility in isolated joints without putting too much pressure on them.

Performing core strengthening exercises in a seated position is particularly beneficial for people with balance issues. These positions can be used as a stepping stone while performing more complicated balancing exercises is difficult.

The majority of exercises we mention in this article are based on yoga, and they can be easily completed while sitting on a carpet or seated in a chair or a stability ball. If sitting up straight in any of these exercises is difficult, sit on a folded blanket a yoga block, or a chair - this facilitates proper spinal alignment. Hold these positions around 5 deep breaths at a time, or around 30 seconds. 
 
1. Easy Pose (Sukhasana)
 Seated Exercises Easy Pose (Sukhasana)
What better way to start an exercise routine than a pose that is literally called ‘the easy pose’? This pose is often the beginning post in a yoga sequence, and it’s also the one most often used in meditation. The easy pose is considered to be a hip opener, and the main thing to note while performing it is proper spinal alignment. The spine or shoulders shouldn’t be rounded. If your lower back is curved and not straight, bolster your sits-bones with a blanket or block. 
 
The exercise itself is pretty straightforward. Here are the steps: 
1. Sit down with your legs crossed. 
2. Engage your core and straighten your spine, open the chest, and pull your shoulders down. 
3. Place your hands on the hips or knees - whichever is more comfortable. Relax your hips, legs, and feet as you breathe in and out. 
 
2. Raised Arms Pose (Urdhva Hastasana)
Seated Exercises Raised Arms Pose (Urdhva Hastasana)
The next pose is great for getting your blood pumping and start feeling your core, shoulders, and arms. In the long run, this pose will help your posture and prepare you for balancing core exercises. You can complete this pose anywhere - seated on the floor, on a stability ball, chair, or even the side of the couch. Follow these steps to complete the exercise: 
 
1. Sit down in a comfortable position. Keep your hands on the hips. 
2. As you inhale, raise your arms up and keep them up for 5 deep breaths. Really reach up and extend your entire spine, as if you were trying to grasp something from a high shelf. Engage your pelvic muscles to maintain a straight spine and take pressure off the arms and shoulders. 
3. On an exhale, lower your arms and return to the initial position. Repeat 3-5 times.

3. Butterfly Pose (Baddha Konasana)
Seated Exercises Butterfly Pose (Baddha Konasana)
If you suffer from tight hips and lower back pain, this mobility exercise is sure to open your hips and stretch the thigh muscles. This exercise is best performed sitting down on the floor and propped up with a block, pillow, or folded blanket. This helps get a deeper stretch and protects the lower back as you’re opening the hips. 
 
Avoid pushing down on the knees with your hands while doing this exercise. This may give you a deeper stretch, but it could hurt your spine or hips. Follow these steps to complete this pose: 1. Sit down with the knees bent and the soles of the feet together. 2. Bring the feet close to the body and let the knees extend out. Sitting up straight facilitates opening the knees out even further. 3. If your knees hurt, place a folded blanket, block, or pillow under each knee. 4. As you inhale, sit up as straight as you can. As you exhale, slowly start moving the torso forward until you begin to feel a deep stretch in the inner thighs while still maintaining a straight spine. Hold this position for 5 deep breaths, and then rise back up to the initial position. 
 
4. Seated Forward Bend (Paschimottanasana)
Seated Exercises Seated Forward Bend (Paschimottanasana)
This exercise stretches the entire back body - starting from the back all the way to the hamstrings and calves. As a beginner, you may find it difficult to keep your legs straight and lower back flat, so feel free to either bend the legs in the knees or curve the spine. Rounding the spine will give you a deeper hamstring stretch, but bending the legs is considered safer for the lower back. Follow the instructions to complete the pose: 
 
1. Sit down with legs stretched out forward and hands on the hips. On an exhale, lift your arms toward the ceiling. 
2. On an exhale, reach your arms down and over your legs, rotating the pelvis forward. 
3. Move as far forward as you can without feeling discomfort in the back or hamstrings. Don’t worry about reaching your hands with the feet. They can rest anywhere in-between: the ankles, calves, knees. You can also use a strap or belt around your feet for a more comfortable stretch. 
4. Once you reach a comfortable but active stretch, relax and take 5 deep breaths. On the last inhale, return to the initial position.

5. Seated Twist (Ardha Matsyendrasana)
Seated Exercises Seated Twist (Ardha Matsyendrasana)
This stretch is especially beneficial for those who suffer from lower back pain, as it stretches the piriformis muscle that connects the glutes and the lumbar spine. It also improves mobility in the upper back, pelvis, and side body. 
 
Keep in mind that all spinal twists should come from the upper and mid-spine. The lower back can become injured if you’ll try to twist it. Note that this position can also be done while sitting in a chair - this is an easier version. Follow these steps to complete the exercise: 
1. Sit with your legs outstretched. Place the right foot under the left thigh. 
2. Bend the left knee and place the left foot over the right thigh. If this is difficult, you can keep the right leg straight. 
3. On an exhale, twist the upper body to the left. Try to maintain a straight lower back and hold the twist for 5 deep breaths.

6. Staff Pose (Dandasana)
Seated Exercises Staff Pose (Dandasana)
When done correctly, this seemingly simple pose activates the entire body and improves postural awareness. This, in turn, will promote your sense of balance. To reap the maximal benefits from this posture, make sure to keep the entire body - including the arms, legs, glutes, and feet - activated while doing this pose. 
 
It’s crucial to maintain a straight spine in this pose, so we recommend using a prop like a folded blanket or block under the glutes. Follow these steps to complete the pose: 
 
1. Sit with your legs stretched out in front of you and hands or fingertips on the floor. Flex the feet to activate the legs. 
2. Engage your pelvic muscles, let the shoulders move down, and push your hands against the floor to straighten the back even more. It’s a tiny move, but you will feel it. 
3. Finally, make sure that your neck is in a neutral position and you’re not looking up or down. Keep the position for 5 deep breaths, then release.

7. Thunderbolt Pose (Vajrasana)
Seated Exercises Thunderbolt Pose (Vajrasana)
The tops of the thighs and feet are rarely stretched during everyday activities, so they’re usually quite tight. This pose stretches those muscles, as well as the side body and the shoulders. If sitting on the floor is tough on your knees or your sit-bones, sandwich blankets between the floor and you, and your bum and the calves. Here’s how to complete this posture: 
 
1. Sit in a kneeling position with the tops of your feet flat to the floor. Keep the legs as close to each other as you can. 
2. Straighten the spine, and then raise the right arm overhead. Reach the left arm behind your back and try to connect the two hands. You can also use a belt, scarf, or any other piece of fabric if your hands don’t touch. 
3. Hold this position for 5 deep breaths and then release the hands. Rest in a cross-legged position, if needed, or repeat the same steps on the other side right away. 
 
8. Chair Pigeon Pose (Eka Pada Rajakapotasana)
https://youtu.be/EnWXe_V8K34

This final pose we will show you is best performed in a chair or stability ball if you’re a complete beginner. The pigeon pose is one of the best poses for pain in the hips and lower back. It boosts the mobility in the hip flexors, lower back, and releases tension in the groin area. It is also said to support digestion. Follow the video above or the steps described below to complete this posture: 
 
1. Sit up straight in a chair. Lift the left leg and place the left ankle on the right thigh. Ideally, the knee and the ankle should be in line with each other. 
2. On an exhale, start moving your torso forward to amplify the stretch. Keep the back straight and stop when the stretch feels too strong or you notice that your lower back is no longer straight. 
3. Hold for 5 deep breaths. Then rise back up and place the left foot on the floor. Repeat on the other side.


This is only for your information, kindly take the advice of your doctor for medicines, exercises and so on.   

https://gscrochetdesigns.blogspot.com. one can see my crochet creations  
https://gseasyrecipes.blogspot.com. feel free to view for easy, simple and healthy recipes    
https://kneereplacement-stickclub.blogspot.com. for info on knee replacement


Labels: , , , , , , , ,