Friday, February 26, 2021

3 Simple DIY Hair Masks for a Healthy Scalp

From time to time, everyone gets a dry or slightly flaky scalp, with even such inevitable factors as weather change being a common cause of scalp discomfort. So, yes, having a dry scalp or dandruff once in a while is normal, but it doesn’t mean you have to suffer in silence and wait for it to go away. We personally swear by these 3 simple, at-home hair masks that will nourish your scalp and relieve the itching and flaking brought about by a dry or flaky scalp.
Disclaimer: if your symptoms are ongoing and you’re experiencing severe itching and discomfort, it’s best to see a trichologist, who will be able to diagnose your specific scalp condition, as there are numerous causes of an itchy scalp which require different treatments.

1. Castor and Tea Tree Oil Mask 
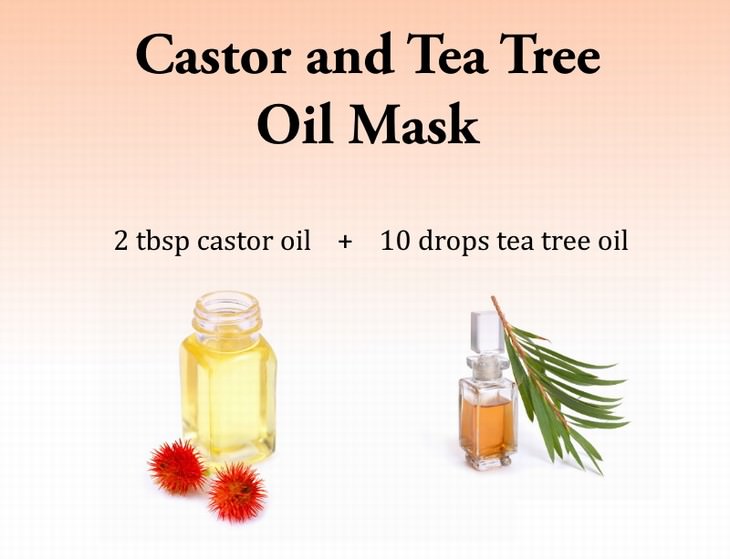
This simple, two-ingredient mask is antibacterial and deeply moisturizing for the scalp. Apart from relieving a dry and itchy scalp, it’s also a good one to use for hair growth. The tea tree essential oil in this mask is a potent antimicrobial and antifungal agent, so much so it’s often added into dandruff treatments and shampoos. Castor oil, in turn, will nourish and moisturize your scalp, promoting hair growth and long-term hair health. As with any of these masks, you can repeat this hair mask as often as you’d like and even use it as a preventative or complementary treatment.
scalp masks Castor and Tea Tree Oil Mask
Preparation: To prepare this mask, you will need to combine 2 tablespoons of castor oil and 10 drops of tea tree essential oil in a small bowl. You can warm the oil mix up a little bit to make the application process easier and help it penetrate the scalp better. Application: This hair mask, as any oil-based hair mask, really, should be applied on dry hair. 
 
Step 1. If you have long hair, divide your hair into sections and apply the mask onto your scalp using only a dye brush or just your hands. 
 
Step 2. Once you’ve coated your entire scalp with the mask, you can gently massage your scalp to help the mask penetrate the scalp more deeply. 
 
Step 3. Wrap your hair with a warm towel and let the mask do its job for at least 30 minutes. 
 
Step 4. Wash your hair as per usual. The castor oil is pretty thick, so you might need to shampoo twice to get all of the oil out of the hair.

2. Honey and Coconut Oil Mask and Scalp Scrub
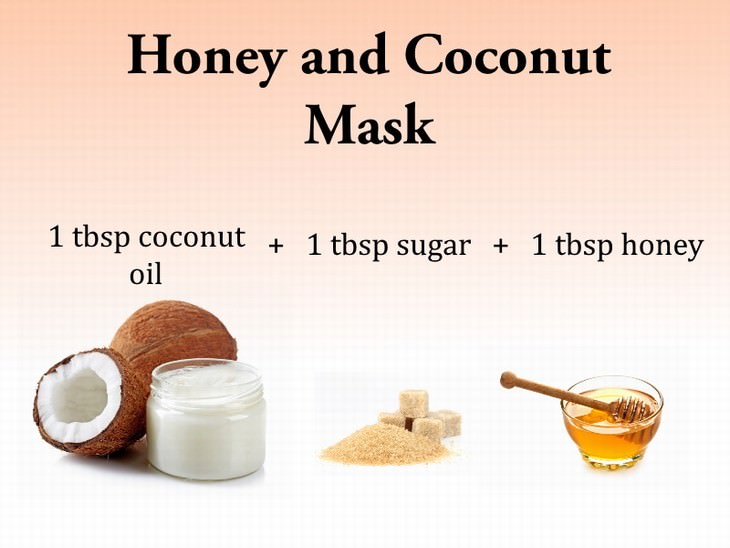
I’m a skeptic when it comes to coconut oil and I would never use it on my skin, as it can cause acne for many people, but it’s difficult to deny that coconut oil can do wonders for the hair, as it has an antimicrobial effect and helps to gently clean all the gunk and buildup from your scalp. Even using coconut oil alone on your scalp will be beneficial, but let’s amplify this mask even further with some honey, an excellent humectant and an antimicrobial agent, as well as some sugar that will help exfoliate and boost the circulation of the scalp area.
scalp masks Honey and Coconut Oil Mask and Scalp Scrub
Preparation: Melt 1 tablespoon of coconut oil in the microwave or on the stove and let it cool down just enough to be able to handle it, then add 1 tablespoon of honey and mix until blended. Finally, add in 1 tablespoon of sugar, which will act as a scrub for your scalp.

Application: The mixture will be a bit sticky but don’t worry, the coconut oil will make the mask easy to apply and wash off. 
 
Step 1. As previously, section off your dry hair if it’s longer and apply the mask concentrating on the scalp and not the entire hair length. 
 
Step 2. Massage your scalp very gently for a few minutes to help the sugar remove all the dead skin cells off your scalp and make the mask sink in, and then cover with a damp warm towel. It’s essential to keep this mask warm, as the coconut oil can solidify, which will make it less effective and more difficult to remove from your hair. 
 
Step 3. Keep the mask on for at least 30 minutes, preferably an hour, then wash your hair as usual. Shampoo twice if needed and make sure you thoroughly remove all traces of the mask, as any residue will make your hair look oily and dull. 
 
3. Shea Butter, Mint and Rosemary Mask
scalp masks Shea Butter, Mint and Rosemary Mask
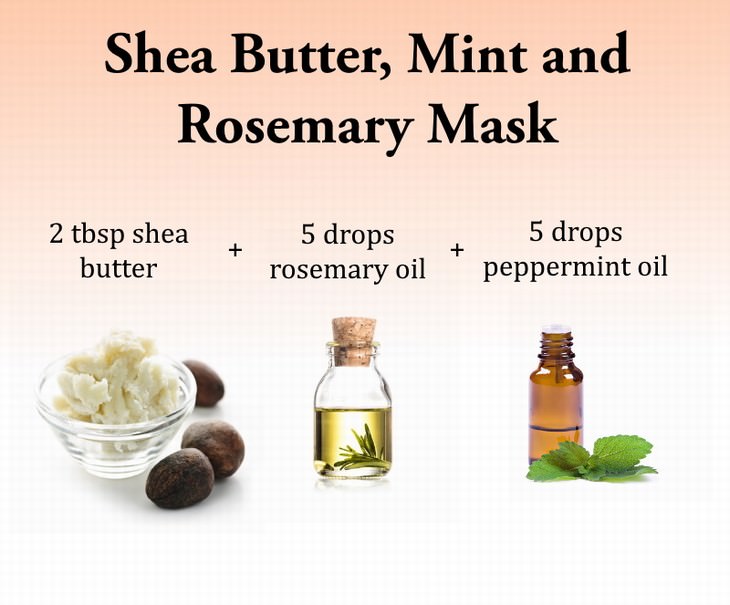
Doesn’t this mask sound like a refreshing drink? Well, it basically is one, but for your scalp. The peppermint oil in this mask will provide instant cooling and relief from an itching scalp while the rosemary oil will add that antibacterial, deep-cleansing action any good scalp mask needs.
 
But the star ingredient of this mask is certainly the shea butter, one of the most deeply moisturizing, luxuriously smelling oils on the planet that’s frequently used in creams and hair products to soothe skin inflammation. 
 
Preparation: Melt 2 tablespoons of raw shea butter and mix in 5 drops of rosemary essential oil and 5 drops of peppermint essential oil. 
 
Application: The application is identical to that of the Castor Oil and Tea Tree mask above, but be careful not to let this mask drop-down or get close to your eye area, as the essential oils may make your eyes watery or irritated. Use a tissue to wipe off any excess oils from your face and keep this mask on for an hour.

This is only for your information, kindly take the advice of your doctor for medicines, exercises and so on.     

https://gscrochetdesigns.blogspot.com. one can see my crochet creations  
https://gseasyrecipes.blogspot.com. feel free to view for easy, simple and healthy recipes    
https://kneereplacement-stickclub.blogspot.com. for info on knee replacement


Labels: , , , , , , , ,

Wednesday, January 22, 2020

A Natural Eczema Cream That Will Soothe Itchy And Irritated Skin

Eczema is a chronic condition that affects over 30 million Americans! It can affect people differently, but the most common symptoms of eczema are itchy, dry, and inflamed patches of skin. The areas of skin affected by eczema can be large or small, and can occur just about anywhere on your body. It isn’t known exactly what causes eczema, but doctors suspect it’s a combination of genetics and environmental factors.

If you struggle with eczema, your best bet for improving your symptoms is to make healthy changes to your lifestyle. Eating whole foods, staying hydrated, exercising regularly, and getting a good night’s sleep each night are all great ways to help avoid eczema flare-ups. Eating more probiotic foods can be helpful too! (Get more details about probiotics by reading the post below.)


While healthy lifestyle changes, can help improve your eczema over time, they don’t help much in the short term. But that’s where today’s post comes in! Today I’ll show you how to make a simple and natural cream that can help you soothe your itchy and inflamed skin. The recipe contains shea butter and oats, which are both incredibly moisturizing ingredients with skin-calming properties, as well as healing lavender essential oil. Here’s how to make it!


Homemade Eczema Cream

Ingredients:

    1/2 cup coconut oil
    1/4 cup shea butter
    1/4 cup oats
    2 tsp vitamin E oil
    20 drops lavender essential oil
Directions:

Start by using a blender, food processor, or spice grinder to grind the oats. You want to grind them pretty finely, so that the oats are more of a powder.

Then, place the coconut oil and sheet butter in a glass bowl or a mason jar. Place the bowl or jar in a pan of gently simmering water, and wait until the oil and butter have melted completely.

Next, remove the melted mixture from heat and add in the powdered oats. Stir well to incorporate.


Then pour the vitamin E oil and lavender essential oil into the mixture, and stir again.


Once all the ingredients are well incorporated, pour the mixture into a small tin or container. Leave it out on the counter to solidify, or let it set up in your fridge. (If you live in a warm climate, you may want to keep storing your finished cream in your fridge, to ensure that it stays solid.)


One more note – the oatmeal bits will sink to the bottom of the container as your cream sets up. But don’t worry – you’ll still get all of the benefits of the oatmeal! When you use up enough of the cream that you start unearthing the solid oat bits, just whip up a new batch of cream.


This is only for your information, kindly take the advice of your doctor for medicines, exercises and so on.     
https://gscrochetdesigns.blogspot.com. one can see my crochet creations  
https://gseasyrecipes.blogspot.com. feel free to view for easy, simple and healthy recipes    
https://kneereplacement-stickclub.blogspot.com. for info on knee replacement


source-onegoodthing 

Labels: , , , , , , , , , , ,

Sunday, September 15, 2019

3 Simple DIY Hair Masks for a Healthy Scalp

From time to time, everyone gets a dry or slightly flaky scalp, with even such inevitable factors as weather change being a common cause of scalp discomfort. So, yes, having a dry scalp or dandruff once in a while is normal, but it doesn’t mean you have to suffer in silence and wait for it to go away. We personally swear by these 3 simple, at-home hair masks that will nourish your scalp and relieve the itching and flaking brought about by a dry or flaky scalp.
Disclaimer: if your symptoms are ongoing and you’re experiencing severe itching and discomfort, it’s best to see a trichologist, who will be able to diagnose your specific scalp condition, as there are numerous causes of an itchy scalp which require different treatments.

1. Castor and Tea Tree Oil Mask

This simple, two-ingredient mask is antibacterial and deeply moisturizing for the scalp. Apart from relieving a dry and itchy scalp, it’s also a good one to use for hair growth. The tea tree essential oil in this mask is a potent antimicrobial and antifungal agent, so much so it’s often added into dandruff treatments and shampoos. Castor oil, in turn, will nourish and moisturize your scalp, promoting hair growth and long-term hair health.
As with any of these masks, you can repeat this hair mask as often as you’d like and even use it as a preventative or complementary treatment.
Preparation:
To prepare this mask, you will need to combine 2 tablespoons of castor oil and 10 drops of tea tree essential oil in a small bowl. You can warm the oil mix up a little bit to make the application process easier and help it penetrate the scalp better.
Application:
This hair mask, as any oil-based hair mask, really, should be applied on dry hair.
Step 1. If you have long hair, divide your hair into sections and apply the mask onto your scalp using only a dye brush or just your hands.
Step 2. Once you’ve coated your entire scalp with the mask, you can gently massage your scalp to help the mask penetrate the scalp more deeply.
Step 3. Wrap your hair with a warm towel and let the mask do its job for at least 30 minutes.
Step 4. Wash your hair as per usual. The castor oil is pretty thick, so you might need to shampoo twice to get all of the oil out of the hair.

2. Honey and Coconut Oil Mask and Scalp Scrub


I’m a skeptic when it comes to coconut oil and I would never use it on my skin, as it can cause acne for many people, but it’s difficult to deny that coconut oil can do wonders for the hair, as it has an antimicrobial effect and helps to gently clean all the gunk and buildup from your scalp.
Even using coconut oil alone on your scalp will be beneficial, but let’s amplify this mask even further with some honey, an excellent humectant and an antimicrobial agent, as well as some sugar that will help exfoliate and boost the circulation of the scalp area.
Preparation:
Melt 1 tablespoon of coconut oil in the microwave or on the stove and let it cool down just enough to be able to handle it, then add 1 tablespoon of honey and mix until blended. Finally, add in 1 tablespoon of sugar, which will act as a scrub for your scalp.
Application:
The mixture will be a bit sticky but don’t worry, the coconut oil will make the mask easy to apply and wash off.
Step 1. As previously, section off your dry hair if it’s longer and apply the mask concentrating on the scalp and not the entire hair length.
Step 2. Massage your scalp very gently for a few minutes to help the sugar remove all the dead skin cells off your scalp and make the mask sink in, and then cover with a damp warm towel. It’s essential to keep this mask warm, as the coconut oil can solidify, which will make it less effective and more difficult to remove from your hair.
Step 3. Keep the mask on for at least 30 minutes, preferably an hour, then wash your hair as usual. Shampoo twice if needed and make sure you thoroughly remove all traces of the mask, as any residue will make your hair look oily and dull.

3. Shea Butter, Mint and Rosemary Mask

scalp masks Shea Butter, Mint and Rosemary Mask
Doesn’t this mask sound like a refreshing drink? Well, it basically is one, but for your scalp. The peppermint oil in this mask will provide instant cooling and relief from an itching scalp while the rosemary oil will add that antibacterial, deep-cleansing action any good scalp mask needs.
But the star ingredient of this mask is certainly the shea butter, one of the most deeply moisturizing, luxuriously smelling oils on the planet that’s frequently used in creams and hair products to soothe skin inflammation.
Preparation:
Melt 2 tablespoons of raw shea butter and mix in 5 drops of rosemary essential oil and 5 drops of peppermint essential oil.
Application: The application is identical to that of the Castor Oil and Tea Tree mask above, but be careful not to let this mask drop-down or get close to your eye area, as the essential oils may make your eyes watery or irritated. Use a tissue to wipe off any excess oils from your face and keep this mask on for an hour.
this is only for your information, kindly take the advice of your doctor for medicines, exercises and so on.   
https://gscrochetdesigns.blogspot.com. one can see my crochet creations 
https://gseasyrecipes.blogspot.com. feel free to view for easy, simple and healthy recipes    
https://kneereplacement-stickclub.blogspot.com. for info on knee replacement


Labels: , , , , , , , , , ,

Thursday, November 15, 2018

Home-Made Natural Eczema Cream

Eczema is a chronic condition that affects around 30 million Americans. It can affect people differently, but the most common symptoms of eczema are dry, itchy, and inflamed patches of skin. The areas affected can be small or large, and it can occur anywhere on the body. No one knows what exactly causes eczema, but doctors suspect it’s a combination of environmental factors.
If you struggle with eczema, your best bet for improving your symptoms is to make healthy changes to your lifestyle. Staying hydrated, eating whole foods, exercising regularly, and getting a good night’s sleep each night are all fantastic ways to help you avoid eczema flare-ups.
While these lifestyle changes can help improve your eczema over time, they don’t help much in the short term. Thankfully, this is where this post comes in. Here we’ll show you how to make a simple and natural cream that will help soothe your itchy and inflamed skin.
Homemade Eczema Cream
Ingredients
• ½ cup coconut oil
• ¼ cup shea butter
• ¼ cup oats
• 2 teaspoons vitamin E oil
• 20 drops lavender essential oil 

Directions
1. Grind the oats in a blender, food processor or spice grinder.
2. Place the coconut oil and shea butter in a mason jar or glass bowl. Place the bowl or jar into a pan of gently simmering water, and wait until the oil and butter have melted completely.
3. Remove from the heat and add the powdered oats. Stir well.
4. Pour the vitamin E oil and lavender essential oil into the mixture, and stir again.
5. Once all the ingredients are well incorporated, pour the mixture into a small container or tin. Leave it on the kitchen counter to solidify, or let it set in your fridge.

THIS IS ONLY FOR INFORMATION, ALWAYS CONSULT YOU PHYSICIAN BEFORE HAVING ANY PARTICULAR FOOD/ MEDICATION/EXERCISE/OTHER REMEDIES.                                                                                                                                                                                                             PS- THOSE INTERESTED IN RECIPES ARE FREE TO  VIEW MY BLOG-                                                                                           https://gseasyrecipes.blogspot.com/   

FOR INFO ABOUT KNEE REPLACEMENT, YOU CAN VIEW MY BLOG-                                                                                                    https:// kneereplacement-stickclub.blogspot.com/                              

FOR CROCHET DESIGNS                                                                                                                                                                                                                                 https://gscrochetdesigns.blogspot.com

Labels: , , , , , , , , , , ,

Wednesday, November 22, 2017

Natural Eczema Cream

Eczema is a chronic condition that affects many people around the globe. It can affect people differently, but the most common symptoms of eczema are dry, itchy, and inflamed patches of skin. The areas affected can be small or large, and it can occur anywhere on the body. No one knows what exactly causes eczema, but doctors suspect it’s a combination of environmental factors.

If you struggle with eczema, your best bet for improving your symptoms is to make healthy changes to your lifestyle. Staying hydrated, eating whole foods, exercising regularly, and getting a good night’s sleep each night are all fantastic ways to help you avoid eczema flare-ups.
While these lifestyle changes can help improve your eczema over time, they don’t help much in the short term. Thankfully, this is where this post comes in. Here we’ll show you how to make a simple and natural cream that will help soothe your itchy and inflamed skin.
Homemade Eczema Cream
Ingredients
• ½ cup coconut oil
• ¼ cup shea butter
• ¼ cup oats
• 2 teaspoons vitamin E oil
• 20 drops lavender essential oil 


Directions
1. Grind the oats in a blender, food processor or spice grinder.
2. Place the coconut oil and shea butter in a mason jar or glass bowl. Place the bowl or jar into a pan of gently simmering water, and wait until the oil and butter have melted completely.
3. Remove from the heat and add the powdered oats. Stir well.
4. Pour the vitamin E oil and lavender essential oil into the mixture, and stir again.
5. Once all the ingredients are well incorporated, pour the mixture into a small container or tin. Leave it on the kitchen counter to solidify, or let it set in your fridge.


THIS IS ONLY FOR INFORMATION, ALWAYS CONSULT YOU PHYSICIAN BEFORE HAVING ANY PARTICULAR FOOD/ MEDICATION/EXERCISE/OTHER REMEDIES.   

PS- THOSE INTERESTED IN RECIPES ARE FREE TO VIEW MY BLOG-                      

HTTP:GSEASYRECIPES.BLOGSPOT.COM/
FOR INFO ABOUT KNEE REPLACEMENT, YOU CAN VIEW MY BLOG-                                                                       
HTTP://KNEE REPLACEMENT-STICK CLUB.BLOGSPOT.COM/
FOR CROCHET DESIGNS

HTTP://MY CROCHET CREATIONS.BLOGSPOT.COM
 

Labels: , , , , , , , , , , , ,