Saturday, April 30, 2022

9 Exercises for Rehabilitating and Strengthening the Hand

Many people suffer from an inability to move their hand and use it as they had in the past, often after a tendon injury, stroke, or other injuries, and sometimes just because of natural aging. People who suffer from this condition occasionally try to use their hands as before and fail, and as a result, lose hope. However, do not despair, because there are some exercises that you can start regularly, starting today, to strengthen and restore your hand, and they are all recommended by occupational therapists. Here are 9 exercises that are divided into 3 levels of difficulty, choose your set based on your hand’s strength level. In the end, you will also see a video that fully demonstrates how each exercise is performed as well as more level 1 exercises that are suitable for everyone.

Level 1 exercises for hand rehabilitation 
If you have difficulty performing simple hand movements, these are the exercises you should start with. For them, you will only need a table, and your strong hand to help you work your weak hand until it can do the exercises on its own.  
 
1. Palm up and down
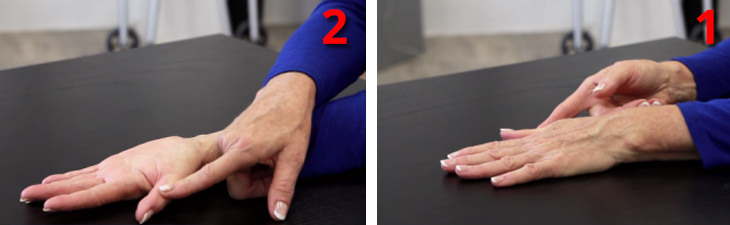
hand exercisesPlace your weaker palm on the table facing downward. 
Use your stronger hand to flip your palm upward. Use only your stronger hand’s fingers when assisting. Flip your palm back with your strong hand and repeat 10 times.

2. Bend the wrist up and down
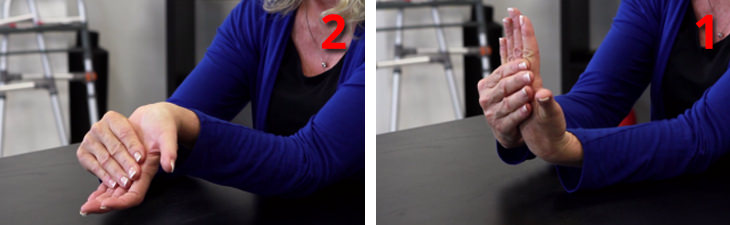
hand exercises
Place your elbow on the table and use your stronger hand to stretch the wrist up and down. 
Perform the exercise slowly 5 times.
 
3. Bend the wrist to the sides
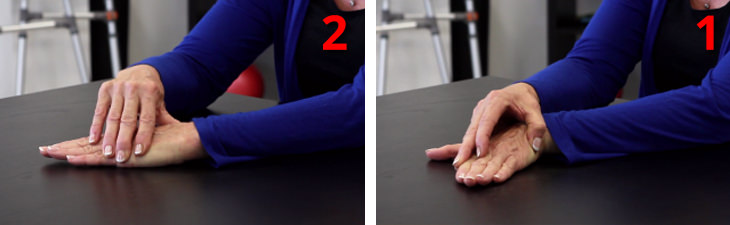
hand exercises
Place the weak palm on the table facing downward. 
Use the stronger hand to move the weaker hand from side to side. Make sure the movement is done from the wrist. 
Repeat the exercise slowly 5 times. 
 
Level 2 exercises for palm rehabilitation 
After you’ve achieved some control over your weaker hand, proceed to level 2. For these exercises, you’ll need a table, pen and a small bottle filled with water. Note that even at this level, it is still recommended to perform level 1 exercises as a warm-up  
 
1. Finger bending
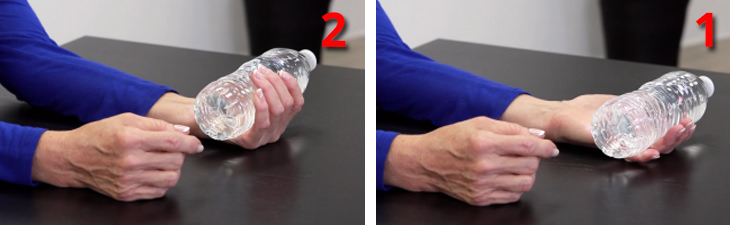
hand exercises
Place your weaker palm on the table, facing up. 
Place a small bottle filled with water on your palm and keep your fingers relaxed. 
Slowly bend your fingers to catch the bottle, then release. 
Repeat the exercise 5 times. 
 
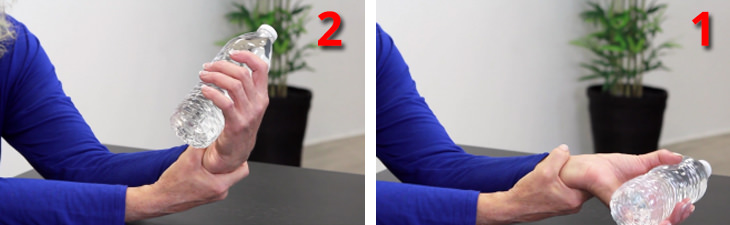
2. Wrist curl
hand exercises
Put your elbow on the table, hold a bottle in your weak hand, and hold the weaker hand’s arm with your stronger hand. 
Bend the wrist upward and then release it slowly. 
Repeat the exercise 10 times.  
 
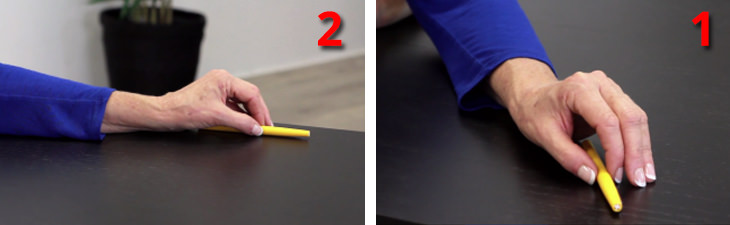
3. Grip and release
hand exercises
Place a pen on the table and hold it with your weak fingers. 
Then, slide the pen on the table from one side to the other, and release it. 
Make sure your fingers gently grip the pen and use as little force as possible to move it. 
Repeat the exercise 5 times. 
 
 Level 3 exercises for palm rehabilitation 
These exercises are a bit more complex, and if you can do them you can regain control of your hand. They may be a little challenging, but the results will be very good. For them, you will need a table, a pen, and 8 coins.  
 
1. Pen spin
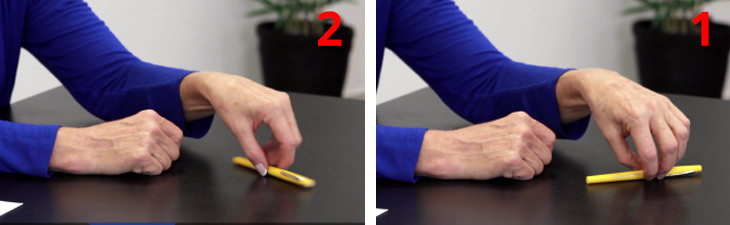
hand exercisesPlace a pen on the table and use your thumb and index finger to spin it. 
Try not to move your shoulder during the exercise, although you will be tempted to do so. You should use only your thumb and index finger. 
If you can, try to slowly pick up the speed. 
Spin the pen quickly for 15 seconds.  
 
2. Coin drop
hand exercises
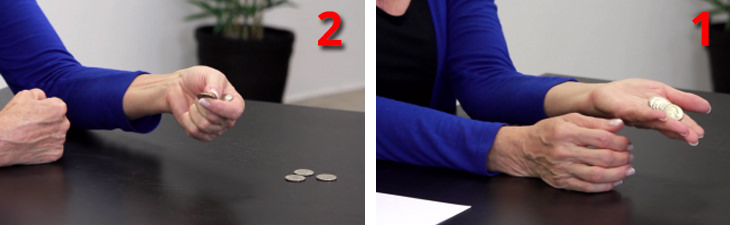
Start by placing eight coins in a row on your weaker hand’s palm. 
Use your thumb to slide one coin so you can catch it with your index finger and thumb. 
Place the coin on the table and continue to do so with the other coins. 
 
3. Finger curl
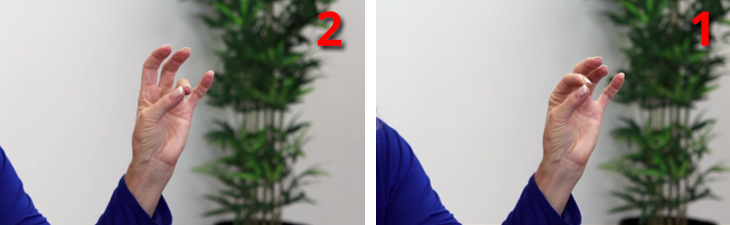
hand exercises
Place the elbow of the weaker hand on the table, and bend it so that your palm is at shoulder height. Make the OK sign by bringing your thumb and index finger together, press and release. 
Repeat this with your middle, ring and pinkie finger, and do it 7 times in total with each. 
 
As mentioned above, Level 1 exercises can be used as a warm-up for level 2 and 3 exercises.

This is only for your information, kindly take the advice of your doctor for medicines, exercises and so on.   

https://gscrochetdesigns.blogspot.com. one can see my crochet creations  
https://gseasyrecipes.blogspot.com. feel free to view for easy, simple and healthy recipes    
https://kneereplacement-stickclub.blogspot.com. for info on knee replacement

Labels: , , , , , , , , , ,

Thursday, November 28, 2019

Hand exercises for Arthritis


This involves stretching thumbs and your individual fingers. You can also flex your wrists and rotate your hands for immediate relief. The infographic above from Yoffie Life also outlines some wrist stretches, finger bends and taps.

It also recommends a hand roll and an exercise that includes a rubber band. Be sure to follow the recommended repetitions too.


                 Massaging your hands and fingers in a gentle motion will also aid your condition. Bathe your hands in warm water prior to doing the exercises to limber them up.

this is only for your information, kindly take the advice of your doctor for medicines, exercises and so on.     
https://gscrochetdesigns.blogspot.com. one can see my crochet creations  
https://gseasyrecipes.blogspot.com. feel free to view for easy, simple and healthy recipes    
https://kneereplacement-stickclub.blogspot.com. for info on knee replacement


Labels: , , , , , , ,

Wednesday, March 30, 2016

Reduce Pain in Your Wrists & Hands with these 7 Exercises

THIS IS ONLY FOR INFORMATION, ALWAYS CONSULT YOUR PHYSICIAN BEFORE HAVING ANY PARTICULAR FOOD/ MEDICATION/EXERCISE/OTHER REMEDIES.


FOR INFO ABOUT KNEE REPLACEMENT, YOU CAN VIEW MY BLOG
HTTP://KNEE REPLACEMENT-STICK CLUB.BLOGSPOT.COM/

FOR CROCHET DESIGNS- http://My Crochet Creations.blogspot.com/


When daily tasks get difficult due to stiffness, swelling, or pain in your hands, the right exercises can help get your hands back in motion. In fact, it is vital that you do not neglect exercising your hands during your workout regimes (the fingers, palms and wrists should be given priority while warming up). Doing so will help improve your range of motion and ease aches and pains.
 
Painful Hands: The Cause
When dealing with hand pain, arthritis is often the cause. It wears away at the cartilage of a joint (the cushioning material between bones). Consequently, this can cause inflammation and irritation of the synovial lining, which produces the synovial fluid that helps protect and lubricate the joint. The pain can get worse, particularly when used frequently for repetitive tasks, such as typing on a computer keyboard, or gripping kitchen utensils. Strength in your hands may also be diminished, making them weak, which consequently can make it hard to perform even the simplest of tasks.
Treating Hand Pain
Medicinal options are available for treating hand arthritis, such as taking pain-relieving medicines orally. Injections and steroid medicines, which decrease swelling in the joints, can also support and protect your hands. If a joint is actually damaged, surgery may be your best option. However, regardless of whether you have arthritis in your hands or not, one easy and non-invasive way to keep your hands pain-free is to do hand exercises to increase flexibility in the joints and improve their range of motion. Exercising your wrists, palms and fingers will help strengthen the muscles that support the hand joints, enabling you to perform hand movements with less discomfort. Exercise will also help keep ligaments and tendons flexible, as well as increase the production of synovial fluid, improving joint function.

7 Exercises to Alleviate Hand Pain

Exercise 1: Make a Fist
hand exercises

Here's How: This easy exercise can be done anywhere and any time your hand feels stiff. Hold your hand out straight and slowly bend it into a gentle fist, placing your thumb on the outside of your hand. Do not squeeze your hand tightly. Repeat the exercise 10 times, then repeat the whole sequence with the opposite hand.
Exercise 2: Finger Bends
hand exercises

Here's How: Hold your hand up straight. Bend your thumb down toward your palm, hold it for a couple of seconds, then straighten it back up. Bend your index finger toward your palm, hold it for a couple of seconds and release back into its neutral position. Repeat the process with each finger on your hand, then repeat the entire sequence on your opposite hand.
Exercise 3: Thumb Bend
hand exercises

Here's How: Hold your hand out straight. Bend your thumb inward toward your palm. Stretch out your thumb, as much as you can, toward the bottom of your pinky finger. Hold this position for a couple of seconds and return your thumb to the starting position. Repeat 10 times, then repeat the exercise on your right hand.
Exercise 4: Make an 'O'
hand exercises

Here's How: Start with your hand in the starting position (straight out). Then, curve all of your fingers, forming an 'O' shape. Hold for a couple of seconds, then straighten your fingers out again. Repeat the exercise a couple of times on each hand, and whenever it feels achy or stiff.
Exercise 5: Table Bend
hand exercises

Here's How: Place the side of your hand (the pinky finger) on a table, pointing your thumb upward. Bend the other four fingers until your hand makes an 'L' shape. Hold the position for a couple of seconds, then straighten your fingers, moving them back into the starting position. Repeat for a total of 10 times, and repeat the sequence on the opposite hand.
Exercise 6: Finger Lift
hand exercises

Here's How: Place your left hand, palm down, on a flat surface. Lift your thumb slowly off the table, holding for a couple of seconds, then lower. Repeat this process with each finger, then repeat the entire sequence on your opposite hand.  
Exercise 7: Wrist Stretch
hand exercises

Here's How: Exercising your wrists is just as important, because arthritis tends to make them sore and stiff. Hold your right arm out in front of you, palm facing down. With your left hand, press down on your right one as indicated in the image, until you feel a stretch in your wrist and arm. Hold the position for a couple of seconds and repeat the process 10 times. Once done, repeat the entire sequence on your opposite hand.

Labels: , , , , , ,