Thursday, April 01, 2021

14 Explained Stretches for Pain Relief

Many of us tend to stretch after a workout while doing yoga, or in order to wake up in the morning refreshed, but do you really know what muscles you’re working on? When we stretch the muscles, we actually extend their fibers helping muscles maintain flexibility, reducing pain, preventing injury and improving our mobility. The following exercises will allow you to understand which muscles you’re stretching during each exercise so that you know stretches to perform and enrich your knowledge of muscle function.

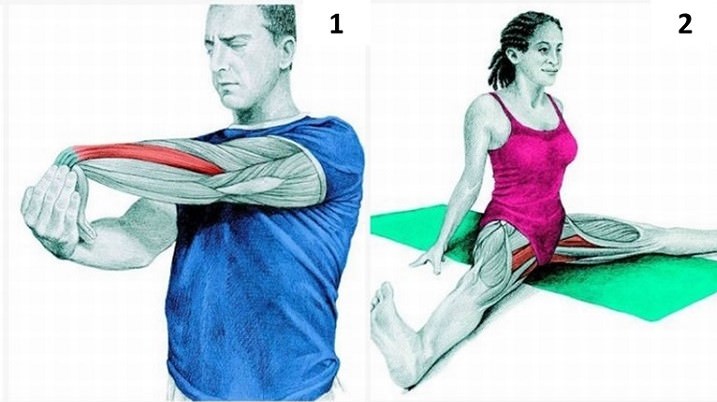
1. Forearm extensor stretch - stretching the forearm muscles (fig.1) 
This stretch stretches the extensor muscle, which is the muscle that is colored red in the image. 
How to do the stretch: Move your shoulder up and down, then reach your hand forward keeping it in line with your shoulder. Now place the opposite hand on the palm on which the stretch is being done apply moderate pressure. You can perform a more advanced stretch by looping your fingers while stretching. 
 
2. Wide forward fold - stretching the thigh muscles (fig. 2)  
This stretch extends the adductor muscles, which are located at the back of the thigh. 
How to do the stretch: Begin the stretching with your knees bent and your spine straight. After a few seconds, you can slowly straighten your legs to the side, as shown in the picture, and roll your back and stretch your arms toward your feet as much as possible. If you can reach your feet, gently pull at the balls of your feet to extend the calf muscles as well. If you can’t reach your feet, use a belt or a towel. You can do the same stretch lying on your back with your feet up on the wall.
muscles
3. Neck extension - Stretching neck muscles (fig. 3 
This stretch helps relieve neck pain or and release the Sternocleidomastoid (SCM), a pair of muscles found in the nape of the neck, whose main role is in turning the head opposite them and bending the neck forward. 
How to do the stretch: Place your hands on your thighs, keeping an elongated spine. Tilt your head back very carefully until you feel a stretch.

4. Lateral side flexion of the neck - Stretching neck muscles (fig. 4) 
This exercise also stretches the SCM and relieves neck pain.
How to do the stretch:  
Keep your neck straight and carefully tilt your ear towards your shoulder. You can perform a more advanced stretching by sitting on a chair while holding the lower part of the seat, which will help you create consistent stretching along the arm and neck.
muscles
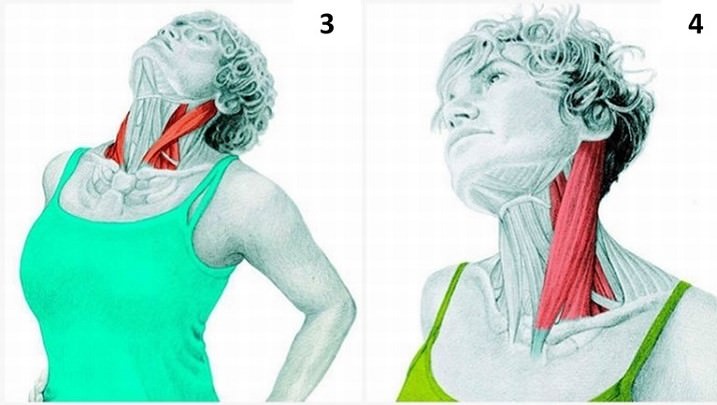
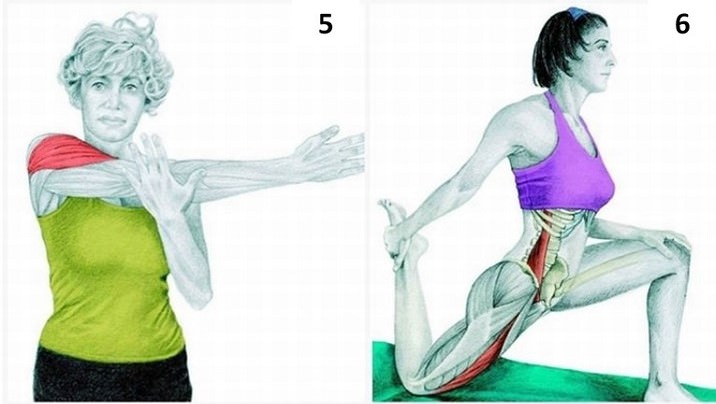
5. Lateral shoulder stretch - Stretching the shoulder muscles (fig. 5)  
This stretch extends the side deltoid, which envelops the shoulder and gives it its round shape. 
How to do the stretch: Stretch your hand toward the opposite side, as shown in the picture, and apply slight pressure with your palm resting on the elbow. 
 
6. Half kneeling quad - stretching the muscles of the knee and thigh (fig. 6) This stretch extends the quadriceps muscles, which are usually used during routine activities such as walking, running, jumping, getting up from a chair, and so on. 
 
How to do the stretch: Start with a half-kneeling position, so that only one leg is bent forward and the other is stretched backward. Grab the back leg, as shown in the picture, and tighten your buttocks to increase the stretch on the hip flexors.
muscles
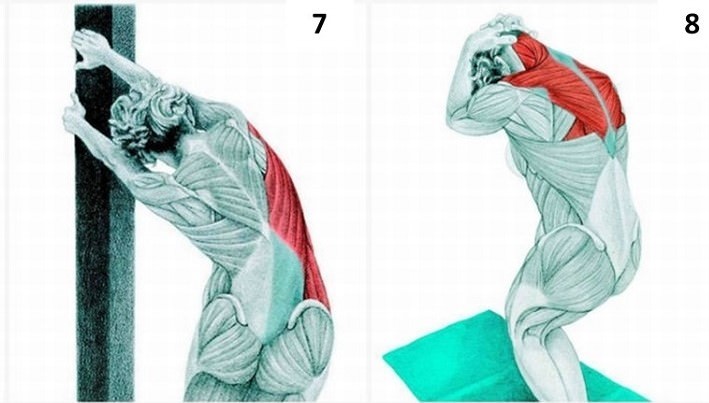
7. Lat stretch at the wall - Stretching the back muscles (fig. 7)  
This stretch works on the main back muscle, Latissimus Dorsi, which is an internal rotator muscle and is responsible for the limitations of movement in this area. 
How to do the stretch: Place both hands on a corner of a wall or a post. As you keep an elongated spine, slowly push your thighs to the far side away from the wall. Avoid this stretch if you have lower back, avoid this stretch. 
 
8. Standing assisted neck flexion - stretching the muscles of the neck and upper back (fig.8) 
This stretch extends the trapezius muscle, which connects the shoulder belt to the skull and spine in different directions and is used to move the shoulder bone (part of the shoulder belt). 
How to do the stretch: Start by standing upright. Slowly bend your knees, roll your upper back forward, put your hands together on the back of your head and bring your chin close to your chest, applying light pressure with your palms.
muscles
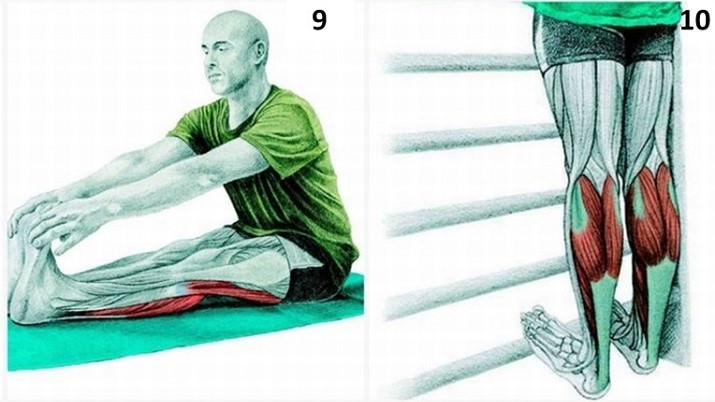
9. Seated forward fold - stretching the muscles of the hamstring (Fig. 9) This stretch extends the hamstring muscles, which work when bending the knee. When walking, the hamstrings play an important role as having the opposite effect of the quadriceps, which is expressed by the slowing of the forward movement. 
How to do the stretch: Start by sitting on the floor and stretching your legs forward. Its best to keep them straight but if you need to bend them that’s fine too. If you have back problems, keep your spine as straight as possible. Try touching your feel, and hold for a few seconds. Over time, it will be easier for you to move closer toward your toes. The exercise can be performed lying on your back with your feet on the wall. 
 
10. Standing calf stretch - Stretching the calf muscles (fig.10) This stretch works on the soleus and gastrocnemius muscles, located at the back of the calf. 
How to do the stretch: This stretch must be performed on the edge of the step. Hold your toes on the step and gently twist your ankles inwards and then outwards.
muscles
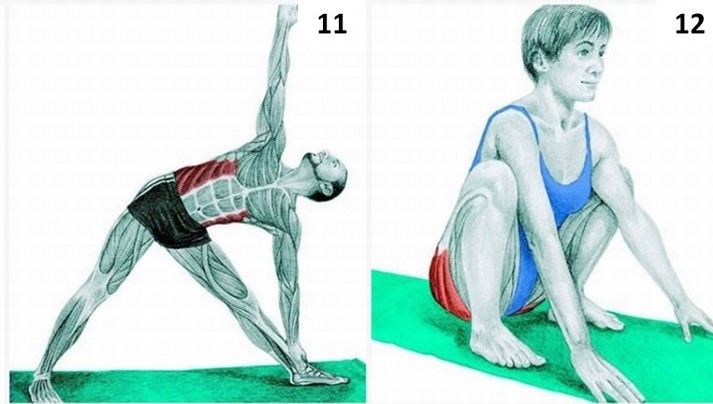
11. Triangle pose – stretching the abdominal muscles (fig.11) 
This stretch lengthens the external oblique muscle, one of the muscles that form the abdominal wall and control trunk movement. It also supports the internal organs of the abdominal cavity and keeps them in place. 
How to do the stretch: Stand with one leg forward, so that you create a 90-degree angle with the back leg, as shown in the picture. Stretch to the side, place your hand on top of the front leg, and lift the opposite hand in the air while looking up. 
 
12. Deep Squat - Stretching the Muscles of the Buttocks (fig. 12) This stretch extends the glutes and has a general effect on your entire body. if you have knee problems or have trouble keeping your heels on the floor, you should practice before doing this stretch. 
How to do the stretch: Stand with your feet shoulder width apart, and slowly begin to bend down with your buttocks tilted back and your knees not passing your toe line until you reach the positio n shown in the picture. Now, place your arms between your thighs, and touch the floor in front of you
muscles
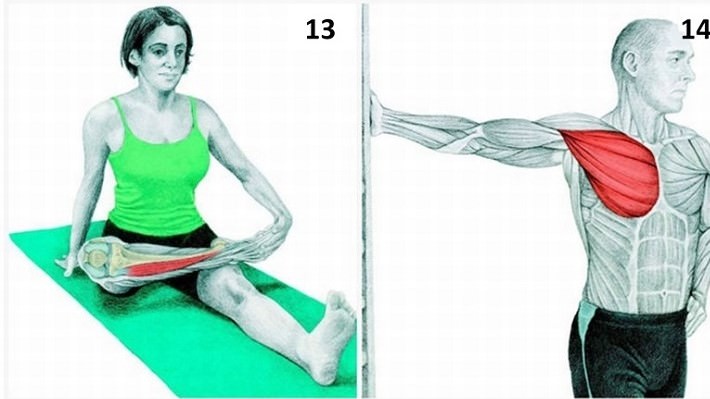
13. Seated half pigeon variation - Stretching the front calf muscles (fig. 13)  
This stretch lengthens the Anterior tibialis. Dysfunction of this muscle may lead to drooping of the foot. How to do the stretch: Sit on your buttocks with both legs in front of you. Lean back on one arm, and with the other hand place the opposite leg over the other leg, just above the knee. Apply a slight pressure to the foot using the opposite hand, as shown in the picture. 
 
14. Chest stretch at the wall - stretching the chest muscles (fig. 14) This stretch stretches the pectorals, muscles that allow the arm to rotate. 
How to do the stretch: Start by facing the wall and place your hand on it with your thumb facing up. If your right hand is the one holding the wall, turn to the left side until you feel a stretch at the bottom of the chest muscle, as described in the picture. If you feel a stretch in the shoulder joint, this means you’re stretching the area too much.
muscles

This is only for your information, kindly take the advice of your doctor for medicines, exercises and so on.     

https://gscrochetdesigns.blogspot.com. one can see my crochet creations  
https://gseasyrecipes.blogspot.com. feel free to view for easy, simple and healthy recipes    
https://kneereplacement-stickclub.blogspot.com. for info on knee replacement


Labels: , , , , , , , , ,

Sunday, May 10, 2020

Best exercises for new moms

Pregnancy brings with it many changes. But the major changes happen in your body. When you get pregnant, your body adapts itself for your baby. As the baby grows, the muscles in your abdomen stretches to make room for your baby. Sometimes, it also causes the separation of the two main muscles in your abdomen. Your pelvic floor also undergoes many changes. This may lead to problems like urinary and fecal incontinence. That is why it is so important to exercise after delivery. But any exercises will not do for you. You need to choose those exercises that are best for you. This will resolve problems quickly and also help you avoid any injuries and complications. The wrong exercises may sometimes cause complications especially after delivery. As we get ready to celebrate Mother’s Day, let us take a look at a few exercises that you can perform. 

Pelvic Tilt

This is a great exercise that helps you tighten and strengthen your abdominal muscles and pelvis.

Lie on your back, with your knees bent and soles on the floor.

Your lower must be flat on the ground.

Inhale deeply through your nose and feel your tummy expanding.
Exhale slowly and while doing so roll your pelvis back.

Inhale and roll the pelvis forward.

Repeat 10 times.


Head Lifts

This will make your back muscles strong.

Directions

Lie on your back with your arms along your sides.

Keep your lower back on the floor and bend your knees.

Your soles must be flat on the floor.

Relax your abdominal muscles as you inhale.

Now exhale and slowly lift your head and neck off the floor.

Inhale and lower your head back down.

Repeat 10 times.


Shoulder lifts

They tone the tummy and abs and burn calories.

Directions

Lie on your back with your arms along your sides.

Keep your lower back on the floor and bend your knees.

Your soles must be flat on the floor.

Relax your belly.

As you exhale, raise your head and your shoulders off the floor.

Reach your arms and hands toward your knees.

Inhale as you lower your head and shoulders back down.


Curl-ups

These moves will also tone the tummy and abs and burn calories.

Directions

They tone the tummy and abs and burn calories.

Relax your tummy.

Lift your torso until it’s about halfway between your knees and the floor behind you.

Reach toward your knees and hold this position for 2 to 5 seconds.

Slowly lower yourself down.

Repeat 10 times.


Kegels

This helps tone bladder muscles and reduces risks of incontinence associated with childbirth.

Directions

Here, you have to contract and hold the muscles that control the flow of urine.

Start by doing the exercise when you use the bathroom.

As you urinate, stop the flow in the middle. Hold for some time.

Release and let the urine flow again.

You can also do this anytime, anywhere, once you get the hang of it.

Repeat 10 times at a time.

Ideally try to do this as many times as you can throughout the day. It will help.


This is only for your information, kindly take the advice of your doctor for medicines, exercises and so on.     

https://gscrochetdesigns.blogspot.com. one can see my crochet creations  
https://gseasyrecipes.blogspot.com. feel free to view for easy, simple and healthy recipes    
https://kneereplacement-stickclub.blogspot.com. for info on knee replacement

Labels: , , , , , , , , , ,

Thursday, May 16, 2019

5 Poses for Spinal Strength

"You're only as young as your spine is flexible."
I often remind myself of this well-known saying whenever I roll out my yoga mat. Each time I practice, I ensure that I dedicate a portion of my session to some much-needed backbends, whereby I focus on building spinal strength, and flexibility. Yoga aims to promote the correct curvature of the spine through building the strength of the muscles surrounding the spine. To do so, your muscles have to contract with more force than they are used to in your daily activities. Here are five yoga poses that you can add to your daily exercise regime for a strong back.
1. Low Cobra Pose
yoga poses for spinal strength
Benefits: This pose aims to tone, strengthen and massage the deep, superficial muscles of the back.
Here's How:
1. Lie on your stomach, forehead to the floor with your legs and feet together.
2. Keep your hands by your chest, with your fingertips spread wide.
3. As you inhale, lift your head and chest without putting any pressure on the hands.
4. Lift the hands about an inch off the floor for a more challenging backbend.
5. Hold for several breaths, then lower as you exhale. 
2. Snake Pose
yoga poses for spinal strength
Benefits: This pose gives similar benefits to Cobra pose, yet it has a more profound strengthening effect on the back muscles. This pose will also help correct rounded shoulders.
Here's How:
1. Lie on the stomach, your feet and legs together, chin on the floor.
2. Interlock your fingers behind you, resting your hands on your buttocks.
3. Inhale and lift your head and chest, raising your arms and reaching them toward your feet.
4. Hold the pose for several breaths, then exhale to lower. 
3. Warrior I Pose
yoga poses for spinal strength
Benefits: As the arms are raised in this pose, Warrior I acts as a mild backbend. Keeping your arms raised also has a strengthening effect on the back muscles. As the upper back is straightened, the curve of the lower back is slightly increased. In this pose, it is therefore essential that you tuck the tailbone under. 
Here's How:
1. Start in tadasana, mountain pose.
2. Step your left foot back about three to four feet, turning your toes out about 45 degrees.
3. Inhale and reach the arms up.
4. Exhale and bend the right knee to a 90-degree angle.
5. Hold the pose for several breaths, then repeat on the other side. 
4. Half-Locust Pose
yoga poses for spinal strength
Benefits: This pose is excellent for toning the back muscles and is especially recommended for beginners or those with weak or stiff backs. 
Here's How:
1. Lie on the stomach and interlock the fingers, placing your hands under your pelvis.
2. Keep your arms straight and place your chin on the ground.
3. Inhale, raising one leg slowly, ensuring that you do not twist the pelvis.
4. Exhale and slowly lower the leg, then switch your legs.
5. Repeat the movements several times on each side. 

5. Bridge Pose
yoga poses for spinal strength
Benefits: This pose fully contracts the muscles. It strengthens the back, particularly the lumbar region. 
Here's How:
1. Lie on your back, bend the knees, bring your heels near your buttocks keeping them hip-distance apart.
2. Place your arms alongside the body, keeping your palms face down.
3. Exhale and tilt the tailbone toward the pubic bone to flatten the lower back.
4. Inhale and lift the hips, reaching the chest toward the spine.
5. Hold bridge pose for several breaths, then exhale to lower. 
THIS IS ONLY FOR INFORMATION, ALWAYS CONSULT YOU PHYSICIAN BEFORE HAVING ANY PARTICULAR FOOD/ MEDICATION/EXERCISE/OTHER REMEDIES.                                    PS- THOSE INTERESTED IN RECIPES ARE FREE TO  VIEW MY BLOG-                                                                                           https://gseasyrecipes.blogspot.com/    
                                                                                                                                                     FOR INFO ABOUT KNEE REPLACEMENT, YOU CAN VIEW MY BLOG-                                                  https:// kneereplacement-stickclub.blogspot.com/  

                            FOR CROCHET DESIGNS                                                                                                                                                                                                  https://gscrochetdesigns.blogspot.com 


Labels: , , , , , , , , , ,