Sunday, June 28, 2026

8 Exercises to Strengthen Your Back and Back Arm Muscles

There’s nothing more unpleasant than putting on one of the nicest outfits you have in your closet only to find unflattering back and arm flab hanging out. In fact, this unpleasantness happens to almost all of us, because even if we exercise, our focus is usually on the body parts we can see in the mirror - the abdominal muscles, the legs, and the buttocks - and we completely ignore our back muscles which are less exposed. 

In order to make sure you don’t forget them and then discover unwanted flab, we’ve put together a series of 8 excellent exercises to strengthen your back, chest and back arm muscles to help you sculpt these areas without too much effort. 

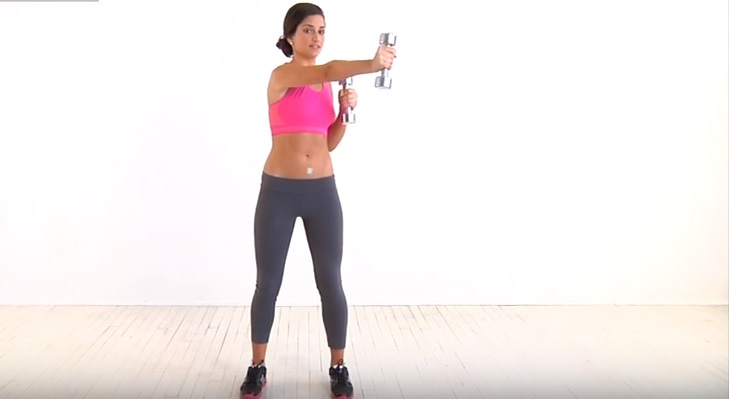
1. Punching with weights 
 exercises

The next exercise is taken from boxing, but there’s no need to enter the ring to perform it. All you have to do is get a pair of weights and lots of energy. This exercise will help you work on your back and arms, as well as keeping your abdomen tight and improving your speed and stability. Make sure to use light weights.

Stand with your feet apart, slightly wider than your hips, and your knees bent slightly. Hold the weights in both hands, and keep your arms close to your body. 

Bend your arms up, then punch your left arm forward. 

Return to the starting position, then punch forward with your right arm. Continue to switch between the arms for 60 seconds. 

Repeat the exercise 3 more times as you change hands, with intervals of 20-30 seconds between reps.

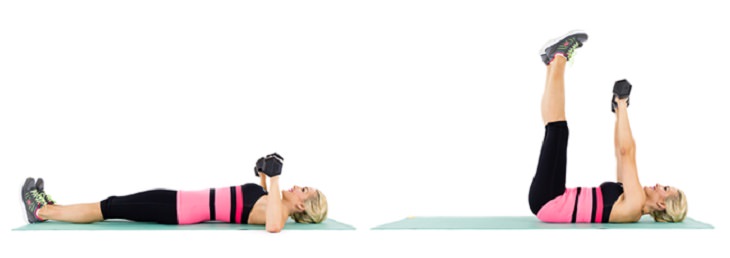
2. Chest press with extended legs  

This exercise will provide full movement to all parts of your body - helping to strengthen the chest muscles, abdomen, back, and triceps, as well as improving posture and body flexibility. So what are you waiting for? Get a pair of weights and go for it.

exercises

Lie on your back with your arms slightly above and in line with your chest, and your legs straight. 

Push your arms up directly over your shoulders and straighten your feet in the air. 

 Return to the starting position and repeat the exercise three more times, with intervals of 20-30 seconds between reps. 

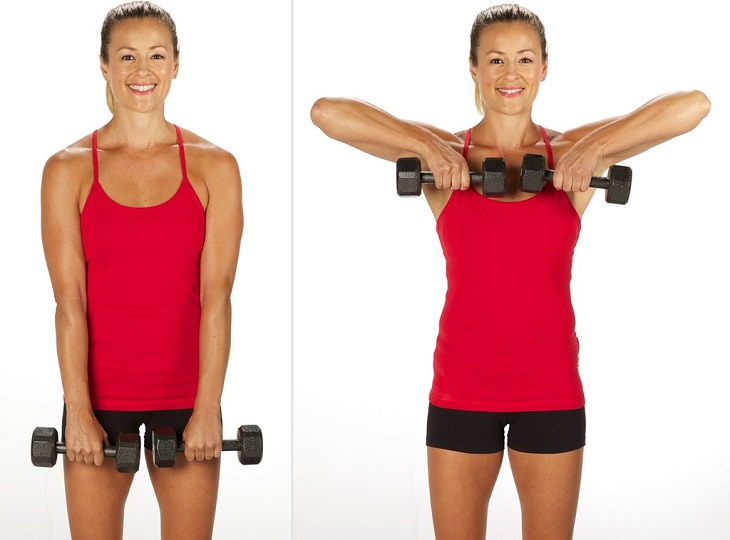
 3. Weight lifting 

The following exercise works directly on the upper and middle back muscles and helps to strengthen and improve the symmetry of the body's core, as well as to ensure proper and balanced posture. In order to perform it, you will need to equip yourself with a pair of weights, or alternatively with one weight that is not particularly heavy.

exercises

Stand straight and hold a weight in each hand. 

Lift the two weights at the same time until they reach your chest. 

Slowly lower them down.

Repeat the sequence three more times, with intervals of 20-30 seconds between reps. 

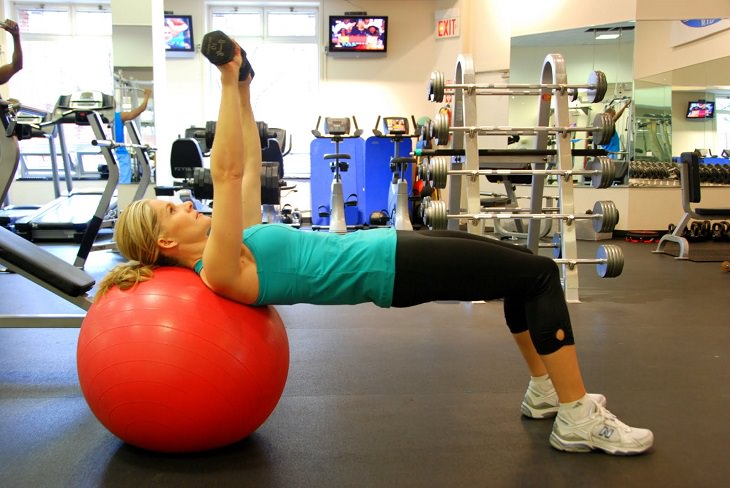
4. Chest compressions on an exercise ball 

Shoulders, triceps and chest muscles - all of these will be greatly enhanced by the next exercise. In order to do this, you’ll need to equip yourself with a gym ball in addition to weights, to help increase your range of movement. If you do not have an exercise ball, you can do this exercise on the floor as well.

exercises

Place the center of your upper back on the exercise ball, with the weights in your hands, your arms raised up, and your hands facing each other. 

Spread your arms to the sides, and keep your elbows slightly bent. 

Return your arms to the center of the body, and repeat the sequence three more times with intervals of 20-30 seconds between reps. 

5. Curtsy lunge with side kick 

The complex movement that the next exercise produces makes it capable of strengthening all your muscles. You can start doing it with no weights in your hands, but once you feel ready and want to increase your effort, add them in.
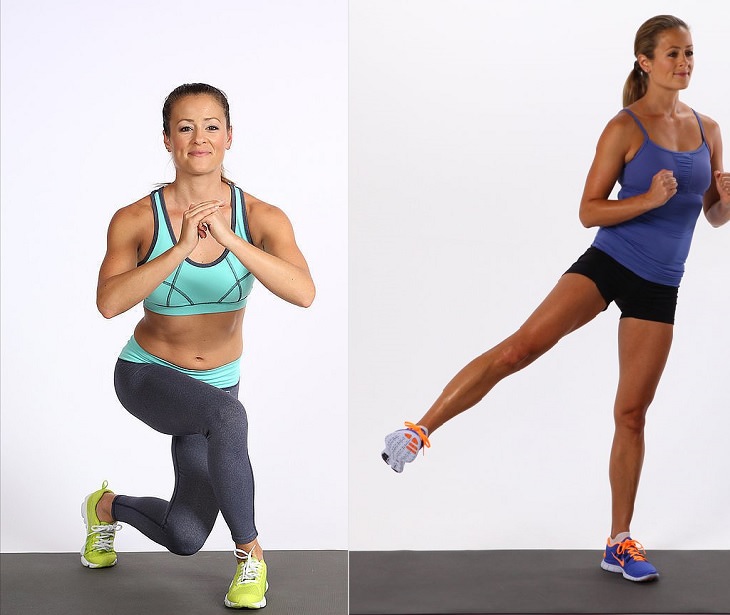

exercises

Stand straight with both legs straight and close to each other, then take a big step backward with your left leg, slide it behind your right leg and kneel down. 

From this position return to standing, stretching out the left leg with a kick. At the same time, raise your left hand to shoulder height. 

Return to the starting position, repeat the exercise for 30 seconds, and then switch sides. 

Repeat the sequence three more times, with intervals of 20-30 seconds between reps. 

 6. Plank rotations 

The Plank, also known as static abdominal exercise, is a great way to improve flexibility and strengthen the body's core muscles, while the circular motion we add to it during this exercise only serves to improve and intensify its effect. You can start doing it without weights, but if you feel ready to increase the level of difficulty later, add them in.
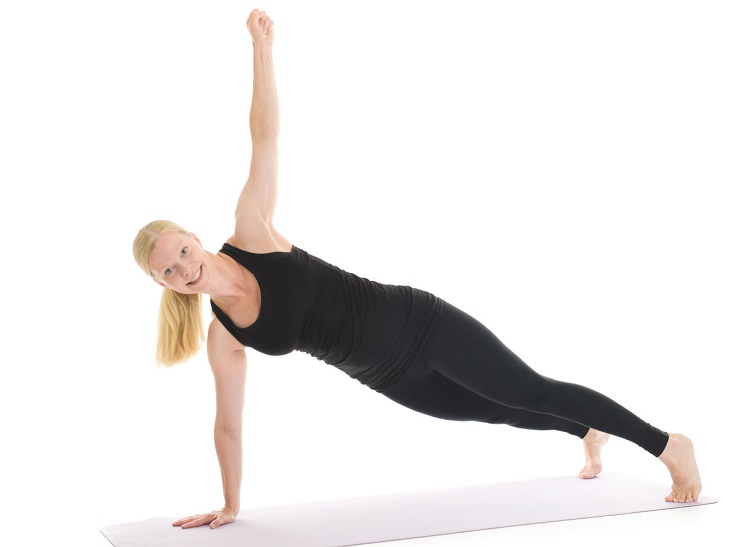

exercises

Lie down on your stomach and bring your body into plank position - with your arms stretched straight under your shoulders and your legs slightly apart at waist width. 

Turn your body to the left and lift your left hand toward the ceiling. 

Bring your left hand back down to the floor and return to the starting position. Repeat, but this time rotate your body to the right and lift your right arm. 

Repeat the exercise while swapping sides about 3 more times, with intervals of 20-30 seconds between reps.

7. Superman pose 

Although the name of the pose sounds like it's only for superheroes, it's actually a fairly simple exercise that is considered one of the most popular back exercises. The Superman pose provides you with an excellent exercise to strengthen and stabilize your body’s core muscles.
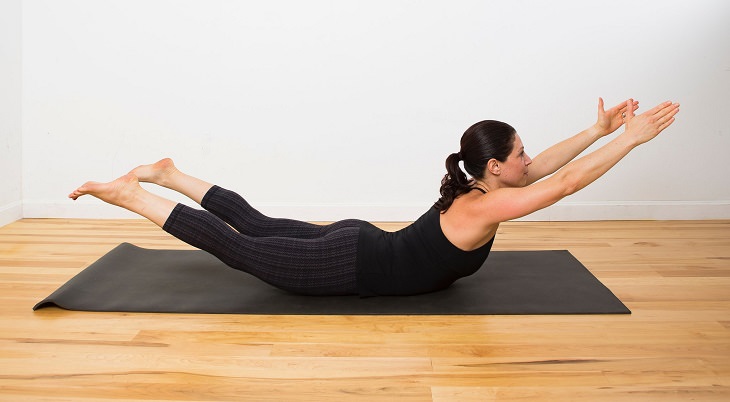

exercises

Lie facing down on the floor, with your arms laying forward above your head. 

Tighten your core and buttocks and stretch your arms and chest forward and your legs back and up. Turn your palms so that they face each other. 

Hold your body like this for 20 seconds, then lower your arms, chest, and legs down toward the floor and return to the starting position. 

Repeat the exercise three more times, with intervals of 20-30 seconds between reps.

8. Back extension over an exercise ball 

 Finish your effortless and fun workout with a slight back extension. You are welcome to do this in any way you know, but we recommend using an exercise ball because it allows you to effectively stretch your lower back by giving you greater freedom of movement.
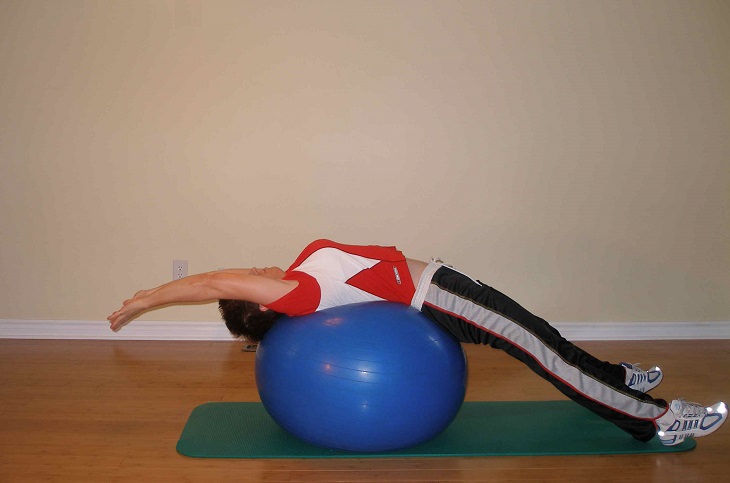

exercises

Place the center of your back on the ball. 

Carefully stretch out. 

Spread your legs and hands slightly. 

Stay that way for 20 seconds, then release and finish your workout.


This is only for your information, kindly take the advice of your doctor for food, medicines, exercises and so on.   


Labels: , , , , , , , ,

Tuesday, October 21, 2025

World Osteoporosis Day: 5 Easy Exercises to Strengthen Your Spine

 World Osteoporosis Day 5 Easy Exercises to Strengthen Your Spine 

Osteoporosis is one of the most debilitating diseases that weakens your bones. It makes your bones thinner and less dense than they should be, and makes you prone to broken bones and fractures. Doctors say that while your bones are usually dense and strong enough to support your weight and absorb most kinds of impacts, they begin to lose density as you age. And so, if you have osteoporosis, your bones become fragile, and the only way to prevent that is to work out and exercise, apart from eating a good diet.

How does exercise help strengthen bones?

Doctors say exercise reduces or slows bone loss in those with osteoporosis of the spine, apart from strengthening muscles and improving balance, reducing the risk of falls and injuries. Strengthening the muscles that support the spine is particularly important for people with osteoporosis in this region of the body.
And while working out may not be able to fully reverse or cure osteoporosis, it does have a range of important benefits for people with this condition. Regular exercise:
  • Reduce bone loss, slowing the progression of the disease
  • Conserve remaining bone tissue
  • Strengthen muscles
  • Increase mobility
  • Reduce pain
  • Reduce the risk of fracture

Best exercises to do if you have osteoporosis

A few workouts that you can do to relieve pain and discomfort of spine osteoporosis include: 
 Stretching
Simple stretching techniques like hamstring, calf, and shoulder stretches are a great way to keep your spine strong and pain-free. All of these – which you can do easily by sitting on your chair- help with maintaining flexibility and can be a warm-up before doing other exercises.
However, make sure to always speak with a doctor before beginning any new exercise routine.

Extensor muscle strengthening

Your extensor muscles run alongside the spine, helping to stabilize it. To do this exercise, you can stand straight with your back facing a wall. Place a bouncy ball between the upper back and the wall, holding it in place by leaning gently against it. Press back against the ball while keeping your spine, hips, and knees straight, pivoting from the ankles. This movement is suitable for all ability levels.

Chest raises

You need to lie on your stomach before trying this exercise. Place a pillow under the stomach to make it easier, and then, pull your shoulder blades together, and smoothly lift the head and chest while continuing to look straight down. It may take time to be able to lift the head or chest, so this may require practice. Hold for 5 seconds, followed by a 2-seond rest.

Neck press

According to experts, this particular workout is suitable for all abilities. To do it, simply lie on your back with a pillow under your head to support a neutral spine position. Push the head down firmly to straighten and lengthen the spine. Then tuck the chin while keeping the head facing upward, avoiding any jerky or sudden movement. Hold for a slow count of 5, then relax for a few seconds.
Doctors recommend doing this exercise early in the morning and evening daily for quick relief.

Bridge exercise

To do this, lie on your back with your knees bent and your feet flat on the floor. Keep your shoulders and head relaxed on the floor and tighten the muscles in your belly and buttocks. Then raise your hips to form a straight line from your knees to your shoulders. Try to stay that way long enough to take three deep breaths. Go back to where you started and repeat. Begin by doing five repetitions a day and slowly work up to 30.


This is only for your information, kindly take the advice of your doctor for medicines, exercises and so on.   

Labels: , , , , , , , , , ,

Wednesday, February 10, 2021

8 Useful Stability Ball Exercises for a Full-Body Workout

It’s known by many names – exercise ball, stability ball, gym ball, balance ball, and even Swiss ball – and has several wonderful benefits. These big bouncy balls are found in every gym these days but can also be used at home to include in your exercise regimen. In fact, these balls are a great way to improve strength, cardio endurance, and balance.

Leading fitness experts say that stability balls can help train your abs, improve your posture and balance, and can strengthen your back and core. The best part about this ball is that you don’t need to be a gym expert to use it and can easily incorporate it into your workout routine at home by learning how to use it effectively. Moreover, it won’t even take much space, is cheap and lightweight, and can be quickly inflated and deflated.

Stability Ball Exercises, woman exercising with gym ball
Before you decide on getting one of these balls, however, you must know which is the right size for you. For example, people between 5 feet and 5.5 feet should choose a 55-centimeter ball. Those who are between 5'6 and 5'11 should opt for a 65-centimeter ball. Lastly, a 75-centimeter ball would be ideal for people between 6 feet and 6'3 in height. 
 
Now, let's take a look at some common and easy stability ball workouts that will be beneficial for your whole body.
 
1. Single-Leg Bridge
Benefits: Increased posterior chain strength, improved proximal hip and core stability, and better hip dissociation. 
 
Step 1: Lie face-up on the floor behind the ball with your knees bent. Place your feet on the ball and your arms on the floor by your sides. Now slowly raise your hips off the floor until your upper back is stabilized. 
 
Step 2: Pause and then slowly raise one leg straight up. Lower the leg and then return to start. Repeat after 30 seconds and keep alternating the legs. Perform 2-3 sets on each side.

2. Incline plank
Stability Ball Exercises, plank
Benefits: Works on the abdominal muscles as well as the other ab muscles and the core muscles that run from the pelvis along the spine and up to the shoulder girdle. 
 
Step 1: Place the stability ball on the floor and get into a pushup position with your hands on it. Rest your weight on your elbows on it. 
 
Step 2: Hold your body in a straight line from head to heels. Make sure that your hips don’t sag. Maintain this position for at least 20-30 seconds. Do 3-5 sets and rest for 30 seconds after each set. 
 
3. Wall Squats
Benefits: Works your quadriceps, gluteal muscles (a set of smaller muscles located in the buttocks), hamstrings, hip flexors, and core. 
 
Step 1: Place the stability ball up against a wall and make sure it braces against your back. Now, lower down into a squat position until your legs form 90-degree angles at the knees. 
 
Step 2: Use the ball to support your back and roll it from your lower back to your shoulder blades. Squat down low to deepen the move and provide more stability. Complete 10 to 15 reps (repetitions). 
 
Note: Make sure that your knees don’t roll out to the sides during the exercise. They should be in line with the rest of your body.
 
4. Hamstring curl
Benefits: Works your gluteal muscles, hamstrings, and core. 
 
Step 1: Lie on your back and put your calves and heels on the stability ball. Your arms should be on your sides and your palms should be facing down. 
 
Step 2: Move your hips upward by squeezing your gluteal muscles and hamstrings until your body is straight. Engage your core and extend your legs straight out, moving the ball away from you. Slowly lift your hips and bend your knees.
 
Step 3: Roll the ball back in by pulling your heels towards your buttocks until the soles of your feet touch the ball. Now, stretch your knees and lower your hips and back to the floor. Repeat. Complete 12 to 15 reps.

5. Back Extension
Benefits: Strengthens the muscles of the lower back. 
 
Step 1: Place the front of your body from hips to ribs on the ball. Your legs should be extended straight behind while your toes must rest on the floor. Your body should form one, long line. 
 
Step 2: Raise your chest high and hold on to the ball for balance. Pull your shoulders back as you exhale and keep your neck in line with the spine. Return to a relaxed position. Complete 12–15 reps. 
 
6. Push-ups
Stability Ball Exercises, Push-ups
Benefits: Works your chest and shoulder muscles. Also helps activate a number of core muscles. 
 
Step 1: Lie with your stomach on the stability ball with both feet and hands on the floor, hip- and shoulder-width apart. Place your hands on the ball at the sides of your chest and your toes on the floor with your legs straight. Now, push your body up until your arms are almost straight. Make sure that your elbows aren’t locked. 
 
Step 2: Hold and balance for two seconds. Return to the starting position slowly and continue for 8–10 reps. 
 
7. Chest press
 Stability Ball Exercises, Chest press

Benefits: Works your shoulders and triceps. Strengthens both your chest and core muscles. 
 
Step 1: Lie your back down on the ball while holding one dumbbell in each hand. Keep your feet flat on the floor with your ankles directly under your knees. Bring both weights up to meet your shoulders while bending your arms with your elbows out wide. 
 
Step 2: Engage your core with your hips lifted. Exhale slowly as you press the weights toward the ceiling. Make sure that you are holding the dumbbells by your chest with your palms facing forward. Hold this position for a second. 
 
Step 3: Lower the dumbbells back to the starting position slowly. Repeat while using your abs to keep your body still. Complete three sets of 10-12 reps keeping your hips lifted all through.
 
8. Mountain Climber
Benefits: Great cardio workout. Also works at your core. 
 
Step 1: Begin by resting your hands on either side of the ball. Extend your feet out behind you in a way that you are leaning on the ball in a high plank position. 
 
Step 2: With your core engaged, bring your right knee forward under your chest. Switch legs quickly, bringing the left knee forward while sending your right foot back. Return to the starting position. Complete 12 reps, alternating legs.
 
This is only for your information, kindly take the advice of your doctor for medicines, exercises and so on.     

https://gscrochetdesigns.blogspot.com. one can see my crochet creations  
https://gseasyrecipes.blogspot.com. feel free to view for easy, simple and healthy recipes    
https://kneereplacement-stickclub.blogspot.com. for info on knee replacement


Labels: , , , , , , , , , , , ,