Monday, July 06, 2026

8 Easy and Important Stretches for Everyday

Many of us, maybe even most of us, have daily schedules that include about 8 hours of sitting in front of a screen or performing the same tasks every day. With busy days and the power of routine, it’s easy to forget the importance of stretching the muscles. But there are consequences. After a long period of being static for many hours without stretching, one might start experiencing pain, muscle stiffness, and other nagging problems, according to fitness trainer Jamie Costello. To treat and prevent these issues, Costello recommends a series of light stretches that fit all abilities. It's best if you pick 4 stretches off the list and do each one for 2 minutes, at least once a day. If you stick to it, you may start seeing improvement in your flexibility in a matter of weeks.

1. Foam roll Foam Roll

This simple stretch is especially important if you have a history of heel pain. The main area affected by this stretch is the plantar fascia, which is a ligament connecting your heel to the front of your foot. Almost 50% of Americans suffer from heel pain, and the most common cause is plantar fasciitis (This stretch may help ease the pain, but of course if you happen to suffer from plantar fasciitis it is recommended to consult a chiropractor as well). 

How It’s Done: 

• Grab a ball about the size of a golf ball and place it on the floor in front of you 

• Stand with your back straight and your arms at the sides of your body as shown in the picture and place the center of your foot over the ball. 

• Curve your toes forward as though you’re trying to wrap your foot around the ball, and try to stay in that position for 2 minutes, or repeat a few times with breaks if you need. 

• Repeat with the second foot.

2. Foot Flex with a Resistance Band

 
Foot Flex with a Resistance Band

This is another very simple stretch, which improves flexibility in two important parts of your leg: the calf muscles and the Achilles tendon, which is the largest and strongest tendon in the body. You will need an elastic stretch band and a padded flat surface to lie on, like a yoga mat. Both things can easily be found in sports stores or online. 

How It’s Done: 

• Lie on your back on the mat, bend your knees and place both feet flat on the floor. 

• Lift up your left leg and wrap the band around the ball of your foot. 

• Pull the ends of the band towards you, and lift up your left leg without locking your knee. 

• Try to gently push upwards with your left foot, as much as you can without locking the knee. 

• Try to remain in the position for 2 minutes, and then switch to your right leg.

3. Figure 4 stretch

 Figure 4 Stretch

The figure 4 stretch got its name because when practicing it your legs create a shape similar to the number 4. This exercise is mobilized to stretch the hip muscles, like the glutes and piriformis. Since tight hips can cause back stiffness, the figure 4 stretch can also be used to prevent back pains. 

How It’s Done  

• Lie on your back and place your left ankle over your right knee, as shown in the picture. 

• Lift your legs so the right leg is in a 90 degree angle. 

• Bend forward and wrap your hands around your right thigh. Meanwhile, make sure your left foot is parallel to the ground. 

• Try to remain in that position for about 2 minutes, then release gently, go back to the starting point and switch to your other leg. 

4. Hip Stretch
Hip Stretch

The core movement of this stretch is probably not one that you naturally do often. That might be the reason you experience lower back pain or soreness in your glute muscles after exercise. This stretch works exactly in those areas and might prevent such problems. 

How It’s Done 

Lie down with your knees bent upwards and with both feet flat on the ground. 

Place your left ankle over your right knee. 

If you don't feel comfortable try placing your foot on your upper inner thigh. 

Without lifting your shoulder, turn your hips to the left until your left knee touches the ground or until you feel you’ve reached your limit. 

You can arch your right foot as shown in the picture, but do not lift it off the ground. 

Try to remain in this position for 2 minutes while taking deep breaths. 

Recover, relax and switch to the other leg. 

5. Torso Twist

Torso Twist

This stretch is also centered on the waist area. It improves the overall flexibility of the area and can prevent back pain. This time it’s the upper body that’s being stretched, and because the exercise is done while seated some might find it easier.

How it is done-

• Sit up with a straight back with your legs extended in front of you. 

• Bend your right knee and bring your right foot over your left leg, place your foot right below the left knee. Make sure your foot is flat on the ground. 

• Twist your upper body (including neck and face) to the left while placing your right arm on the inner right thigh as shown in the picture. Support yourself by placing your left hand behind you. 

• Try not to lean on your left arm but keep your back and neck upright for 2 minutes, or until you’ve reached your limit. Go back to the starting point carefully and repeat the stretch in the opposite direction.

6. Thread and needle stretch

Thread the Needle Stretch 

This stretch is a bit challenging compared to the previous ones, but it’s worth a try, especially if you suffer from pain and stiffness around your shoulders and upper back. If the mat you’re using is thin, you may add a blanket (or any soft material) underneath your knees, to prevent pain.

How It’s Done: 

• Begin on your hands and knees. Keep your hands under your shoulders and your knees under your hips. • Open up your chest to the right as you extend your right arm over the ceiling. 

• Begin to move your right arm under your chest toward the mat. Your torso should naturally shift to face downwards. 

• Continue to slide your right arm onto the mat, allowing your right shoulder to rest on the mat. Meanwhile, extend your left arm overhead, and rest the side of your head on the mat. 

• Try to remain in the position for 2 minutes, and repeat the exercise in the opposite direction.

7. Standing Quad stretch

  Standing Quad Stretch

The name actually stands for the muscle that is being stretched – the quadriceps, which is the largest muscle in the body. It requires a bit of balance, so you may place a chair nearby to hold onto in case you stumble. 

How It’s Done: 

• Bend your left knee backward by grasping your ankle with one hand. 

• Assist in bending your knee back as far as possible. 

• Find a spot to focus your gaze on and stretch your right arm in a 90-degree angle as shown in the picture. 

• Try to maintain the position for 2 minutes and repeat the exercise with your other leg. 

8. Chest on the Ground Stretch

 
Chest on the Ground Stretch

This last stretch may seem challenging, but it’s worthwhile as it works on your chest muscles, pelvis, and upper shoulder area. If you’re having a hard time keeping your head up during the exercise, you may support your head with a small pillow. 

How it's done- 

Lie on your stomach with your arms stretched to the sides, hands facing the mat and feet flexed backward. 

Bend your left knee, lift your leg and bent it to the right along with the right side of your pelvis and lower chest. 

Make sure your left shoulder stays firmly on the ground. 

Try to touch the ground with your toes (of the left foot) as shown in the picture, only if you feel you’re capable. 

Remain in the position for about 2 minutes, then carefully go back to the starting point and repeat with the other side of your body.

This is only for your information, kindly take the advice of your doctor for food, medicines, exercises and so on.   


Labels: , , , , , , , ,

Friday, November 01, 2024

6 Energizing Stretches to Jumpstart Your Day

Without a doubt, we're all familiar with the saying "rise and shine", but having a happy-go-lucky attitude towards mornings is becoming ever more difficult as the years go by. Some may be grumpy before their morning coffee, others may feel pain in the joints, or are already stressed out about daily errands and work. Whatever the cause of your dim view towards mornings may be, we can help you make your mornings more enjoyable and make sure you have a positive start of your day every day!


In this post, we'd like to be more specific and show you a set of 6 simple stretches that will help you feel more energized throughout the day. You can do this sequence in any order or follow the order we present, either way, it will take less than 10 minutes and is perfect for beginners. Apart from keeping you fit and alleviating any muscle pain and crams you might have gathered during the night, these stretches will also stimulate the nervous system and increase your self-confidence, what's not to like? 
 
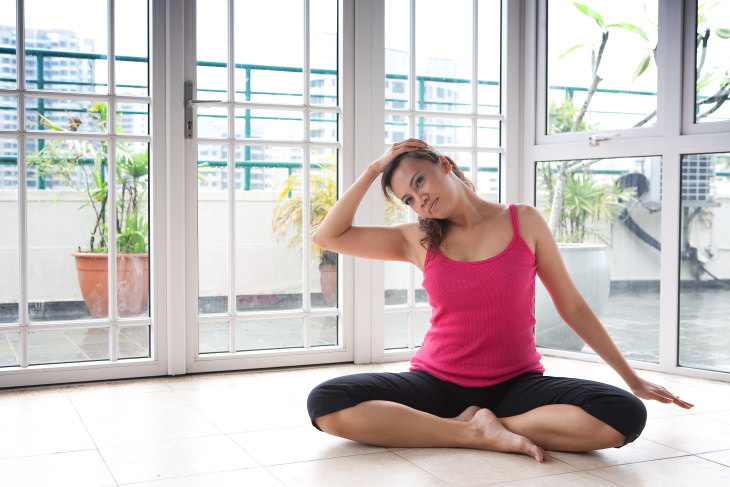
1. Neck and Shoulder Stretch
Morning Stretches Neck and Shoulder Stretch
We say start the morning slow, after all, you've just recently rolled out of bed. This neck and shoulder stretch is the best way to relieve the tension from the upper body, especially if you're a side sleeper and one side of your neck tends to be tense after sleep, which could actually even cause headaches. 
 
This side rotation exercise is one of the most effective ways to reduce tension and tiredness in the neck and shoulders, and best of all, you can do it while seated on the ground or even a chair. To do this exercise, sit in a comfortable position and follow these steps: 
 
1. Start by sitting with both hands on the knees. 
 
2. Raise the right hand overhead and place it on the left side of the head, over the left ear. Make sure your neck is straight, and start slowly stretching the head to the right until you feel a stretch in the left side of your neck and the left shoulder. 
 
3. Hold this stretch for 15-30 seconds, and then return to the initial position. Repeat on the other side. You can repeat this exercise up to 10 times in total.

 
2. Standing Quad stretch
Morning Stretches Standing Quad Stretch
Now that your neck and shoulders are relaxed, let's move on to the legs. Don't skip this exercise, as this stretch will release the tension in the hip flexors, which is a common culprit behind lower back pain and stiffness in the legs and hips. It's also an important component of good posture and spinal health. 
 
To do this stretch, stand up with your legs about shoulder-width apart. If you're worried that you might not be able to maintain balance on one leg, we recommend standing near a wall or chair to hold onto. Here are the steps of the exercise: 
 
1. Stand up and hold onto a chair or wall with your right hand. 
 
2. Bend the left knee and try to grab your left foot or ankle with the left hand. If this is difficult and you're not reaching your foot or ankle, you can wrap a yoga strap, a tie, or a regular scarf around your foot and hold the sides of the strap with your left hand, adjusting the length until you feel a stretch in the left thigh and hip. Hold for up to 15 seconds. 
 
3. Switch sides and repeat. You can do up to 3 repetitions of this exercise. 
 
 
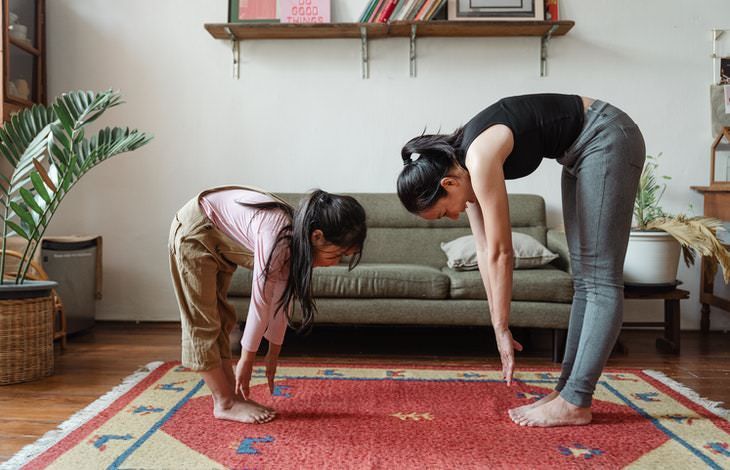
3. Forward Bend
Morning Stretches Forward Bend 
Now that you're warmed up, you can start doing deeper stretches, and the forward bend is one of the best choices for the morning. This is because this pose calms the brain, relieves fatigue, and stimulates the internal organs just before breakfast. It is an excellent choice if you're feeling anxious or overwhelmed, too. 
 
To complete the stretch, follow these steps: 
 
1. Stand up with your legs about shoulder-width apart. Lift your hands up and stretch on an inhale. When you exhale, slowly start folding forward at your hip joints until your hands reach the floor (ideally). Don't worry if they don't, as this is the case with most people, and just rest your hands wherever they land - your thighs, knees, or shins. 
 
2. If you have back problems, bend your knees gently until you feel no pressure on the lower back. The most important thing here is to keep the spine as straight and long as possible. 
 
3. Stay for 5 deep breaths in this position, and then rise very slowly, as getting up too early may make you a bit dizzy. You can repeat this stretch 2-3 times. 
 
 
4. Donkey kicks
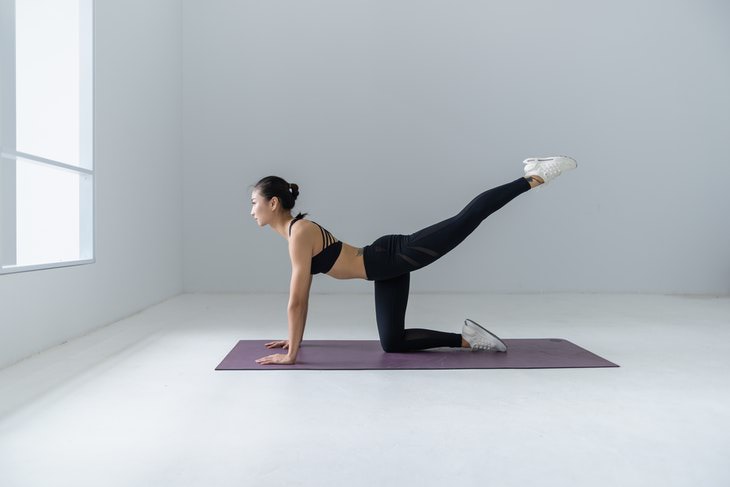
Morning Stretches Side Kicks
 
With this exercise, you'll stretch your legs and improve the mobility of the spine even more. In the long run, this exercise will improve your posture and strengthen your core, glutes, and thigh muscles, too. To complete the exercise, follow these steps: 
 
1. Start on all fours on a mat or carpet. If you have knee problems, place a towel or blanket to cushion the knees. 
 
2. Place your hands directly under your shoulders, and knees under your hips. 
 
3. Lift one of the knees slowly, but steadily, keeping the leg either bent or straight. Try to distribute the weight evenly throughout the body when your leg is raised, push down on the ground with your hands to make lifting the leg easier. 
 
4. Lower the knee and return to the initial position. Switch legs, and repeat up to 5 times on each side in total.


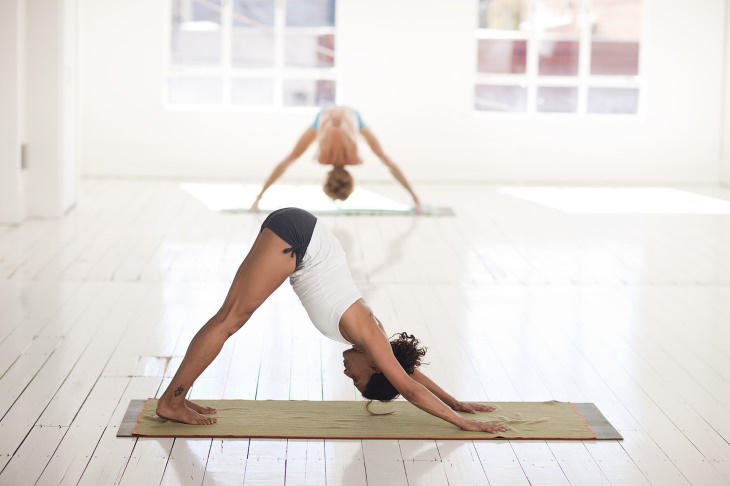
5. Downward facing dog
Morning Stretches Downward-Facing Dog 
We've nearly made it to the end, just 2 more stretches left. This is the downward dog, a truly iconic yoga pose that's widely appreciated for its ability to resets the nervous system and energize the entire body. This position is also known to alleviate sciatica pain and relieve fatigue, so it's especially beneficial for those who wake up tired or have lower back pain. The downward dog is a full-body stretch, awakening, and stretching most of your muscles. Here's how to do it:

1. Start on all fours. Then start raising your knees and hips, pushing your bum up and gripping the mat firmly with your hands. As in the forward bend stretch, the focus here is to straighten and lengthen your spine, so don't worry if your legs aren't straight or your heels don't touch the ground. 
 
2. Stay in this position for 5 breaths, keeping your hands straight and move your shoulder blades down to further straighten the back. Then slowly lower your body back down, bending in the knees, and get back to all fours. Repeat up to 3 times. 
 
 
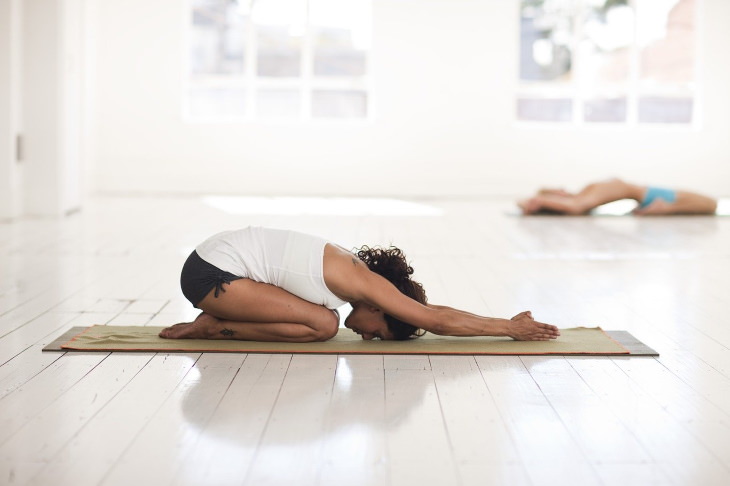
6. Child's Pose
Morning Stretches Child's Pose 
After the deep stretching you've done, you deserve a pleasant and calming rest, which is exactly what this last position is. Child's pose is also borrowed from yoga, and it's known for being the ultimate resting and calming position, and a gentle stretch for the hips and spine. You can stay in this position as long as it feels comfortable. Here's how to do the child's pose: 
 
1. Begin on all fours, knees aligned under the hips, and hands aligned under the shoulders. 
 
2. Take your buttocks back until they reach the heels, arms stretched out straight as if in a prayer position. 
 
3. Simply rest here, with your forehead touching the ground or even a pillow if you want. You can also put a pillow or yoga block underneath your buttocks if you feel tension in the lower back. Breathe deeply and stay in this position as long as you'd like.


This is only for your information, kindly take the advice of your doctor for medicines, exercises and so on.   

https://gscrochetdesigns.blogspot.com. one can see my crochet creations  


https://gseasyrecipes.blogspot.com. feel free to view for easy, simple and healthy recipes  

 
https://kneereplacement-stickclub.blogspot.com. for info on knee replacement
https://cancersupportindia.blogspot.com  for infor on cancer and health related topics


https://GSiyers home remedies.blogspot.com   is the latest addition to my blogs. 

I'm going to add posts there, do give me your valuable feed back on my blogs. Thanks a lot, take care, be healthy and be happy.

Labels: , , , , , ,