Monday, July 06, 2026

8 Easy and Important Stretches for Everyday

Many of us, maybe even most of us, have daily schedules that include about 8 hours of sitting in front of a screen or performing the same tasks every day. With busy days and the power of routine, it’s easy to forget the importance of stretching the muscles. But there are consequences. After a long period of being static for many hours without stretching, one might start experiencing pain, muscle stiffness, and other nagging problems, according to fitness trainer Jamie Costello. To treat and prevent these issues, Costello recommends a series of light stretches that fit all abilities. It's best if you pick 4 stretches off the list and do each one for 2 minutes, at least once a day. If you stick to it, you may start seeing improvement in your flexibility in a matter of weeks.

1. Foam roll Foam Roll
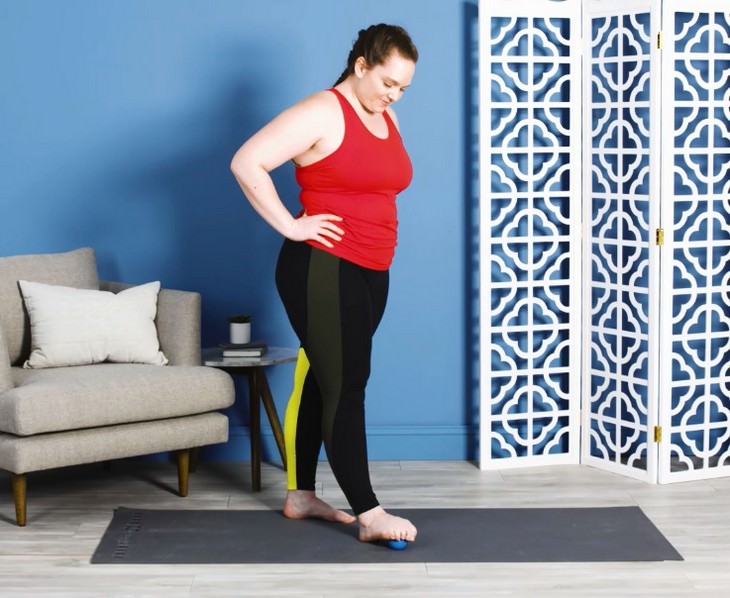
This simple stretch is especially important if you have a history of heel pain. The main area affected by this stretch is the plantar fascia, which is a ligament connecting your heel to the front of your foot. Almost 50% of Americans suffer from heel pain, and the most common cause is plantar fasciitis (This stretch may help ease the pain, but of course if you happen to suffer from plantar fasciitis it is recommended to consult a chiropractor as well). 

How It’s Done: 

• Grab a ball about the size of a golf ball and place it on the floor in front of you 

• Stand with your back straight and your arms at the sides of your body as shown in the picture and place the center of your foot over the ball. 

• Curve your toes forward as though you’re trying to wrap your foot around the ball, and try to stay in that position for 2 minutes, or repeat a few times with breaks if you need. 

• Repeat with the second foot.

2. Foot Flex with a Resistance Band
 
Foot Flex with a Resistance Band

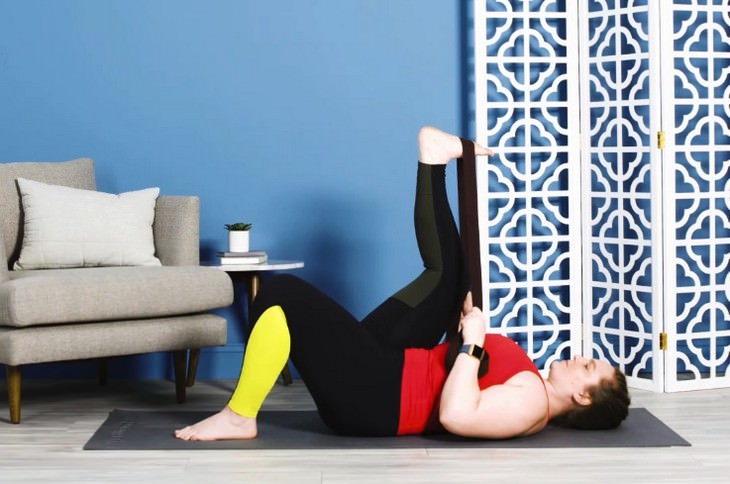
This is another very simple stretch, which improves flexibility in two important parts of your leg: the calf muscles and the Achilles tendon, which is the largest and strongest tendon in the body. You will need an elastic stretch band and a padded flat surface to lie on, like a yoga mat. Both things can easily be found in sports stores or online. 

How It’s Done: 

• Lie on your back on the mat, bend your knees and place both feet flat on the floor. 

• Lift up your left leg and wrap the band around the ball of your foot. 

• Pull the ends of the band towards you, and lift up your left leg without locking your knee. 

• Try to gently push upwards with your left foot, as much as you can without locking the knee. 

• Try to remain in the position for 2 minutes, and then switch to your right leg.

3. Figure 4 stretch
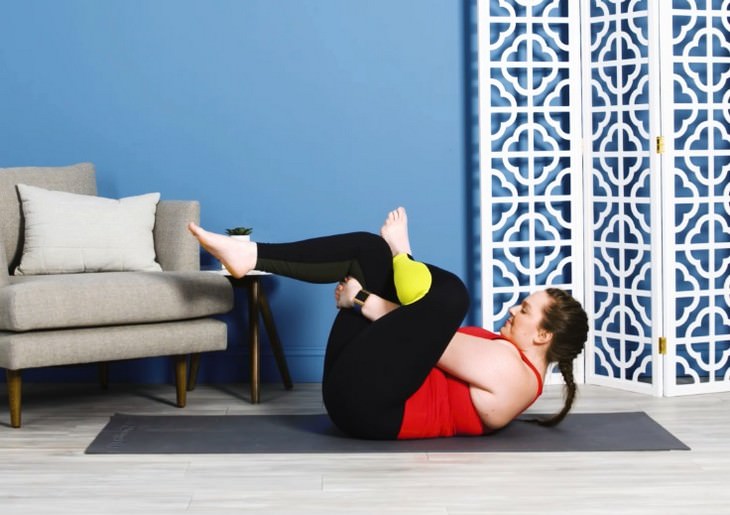
 Figure 4 Stretch

The figure 4 stretch got its name because when practicing it your legs create a shape similar to the number 4. This exercise is mobilized to stretch the hip muscles, like the glutes and piriformis. Since tight hips can cause back stiffness, the figure 4 stretch can also be used to prevent back pains. 

How It’s Done  

• Lie on your back and place your left ankle over your right knee, as shown in the picture. 

• Lift your legs so the right leg is in a 90 degree angle. 

• Bend forward and wrap your hands around your right thigh. Meanwhile, make sure your left foot is parallel to the ground. 

• Try to remain in that position for about 2 minutes, then release gently, go back to the starting point and switch to your other leg. 

4. Hip Stretch
Hip Stretch

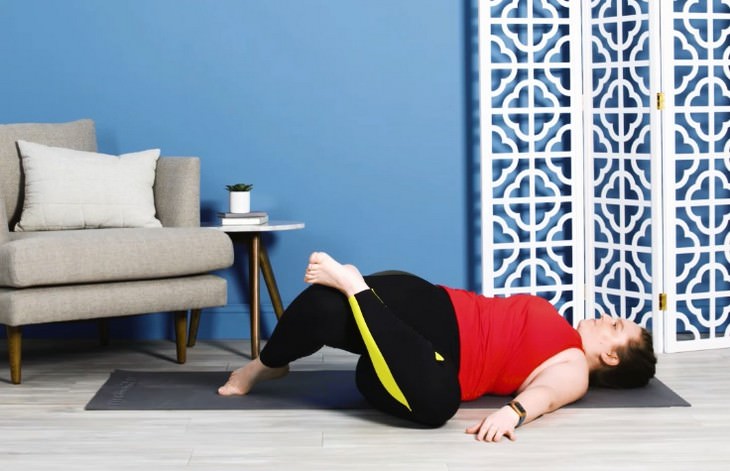
The core movement of this stretch is probably not one that you naturally do often. That might be the reason you experience lower back pain or soreness in your glute muscles after exercise. This stretch works exactly in those areas and might prevent such problems. 

How It’s Done 

Lie down with your knees bent upwards and with both feet flat on the ground. 

Place your left ankle over your right knee. 

If you don't feel comfortable try placing your foot on your upper inner thigh. 

Without lifting your shoulder, turn your hips to the left until your left knee touches the ground or until you feel you’ve reached your limit. 

You can arch your right foot as shown in the picture, but do not lift it off the ground. 

Try to remain in this position for 2 minutes while taking deep breaths. 

Recover, relax and switch to the other leg. 

5. Torso Twist
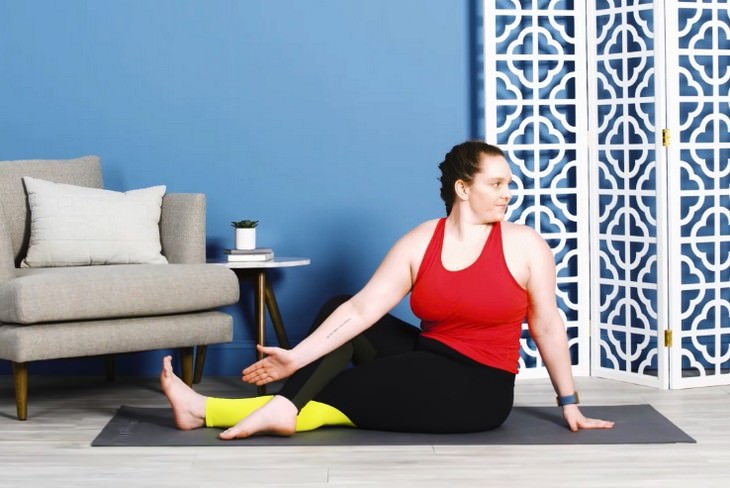
Torso Twist

This stretch is also centered on the waist area. It improves the overall flexibility of the area and can prevent back pain. This time it’s the upper body that’s being stretched, and because the exercise is done while seated some might find it easier.

How it is done-

• Sit up with a straight back with your legs extended in front of you. 

• Bend your right knee and bring your right foot over your left leg, place your foot right below the left knee. Make sure your foot is flat on the ground. 

• Twist your upper body (including neck and face) to the left while placing your right arm on the inner right thigh as shown in the picture. Support yourself by placing your left hand behind you. 

• Try not to lean on your left arm but keep your back and neck upright for 2 minutes, or until you’ve reached your limit. Go back to the starting point carefully and repeat the stretch in the opposite direction.

6. Thread and needle stretch
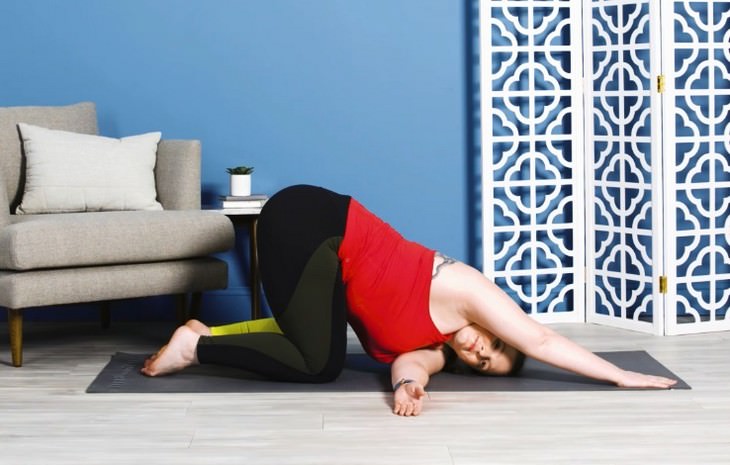
Thread the Needle Stretch 

This stretch is a bit challenging compared to the previous ones, but it’s worth a try, especially if you suffer from pain and stiffness around your shoulders and upper back. If the mat you’re using is thin, you may add a blanket (or any soft material) underneath your knees, to prevent pain.

How It’s Done: 

• Begin on your hands and knees. Keep your hands under your shoulders and your knees under your hips. • Open up your chest to the right as you extend your right arm over the ceiling. 

• Begin to move your right arm under your chest toward the mat. Your torso should naturally shift to face downwards. 

• Continue to slide your right arm onto the mat, allowing your right shoulder to rest on the mat. Meanwhile, extend your left arm overhead, and rest the side of your head on the mat. 

• Try to remain in the position for 2 minutes, and repeat the exercise in the opposite direction.

7. Standing Quad stretch
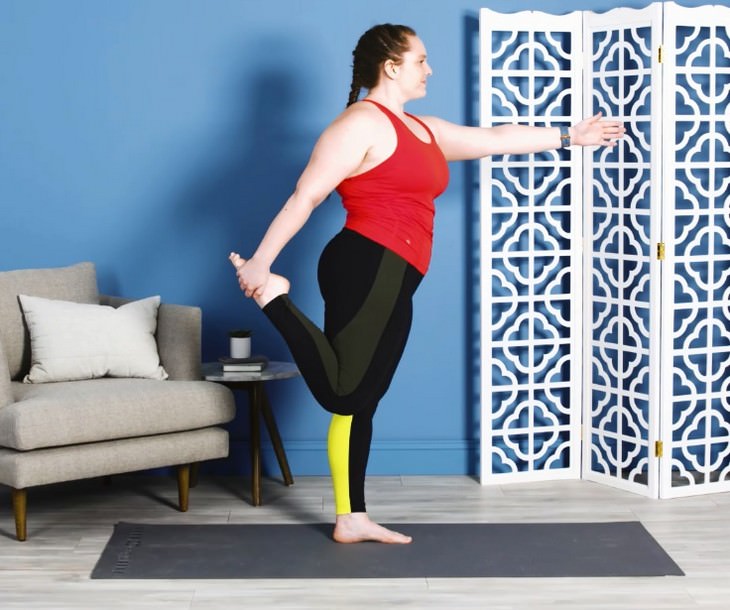
  Standing Quad Stretch

The name actually stands for the muscle that is being stretched – the quadriceps, which is the largest muscle in the body. It requires a bit of balance, so you may place a chair nearby to hold onto in case you stumble. 

How It’s Done: 

• Bend your left knee backward by grasping your ankle with one hand. 

• Assist in bending your knee back as far as possible. 

• Find a spot to focus your gaze on and stretch your right arm in a 90-degree angle as shown in the picture. 

• Try to maintain the position for 2 minutes and repeat the exercise with your other leg. 

8. Chest on the Ground Stretch
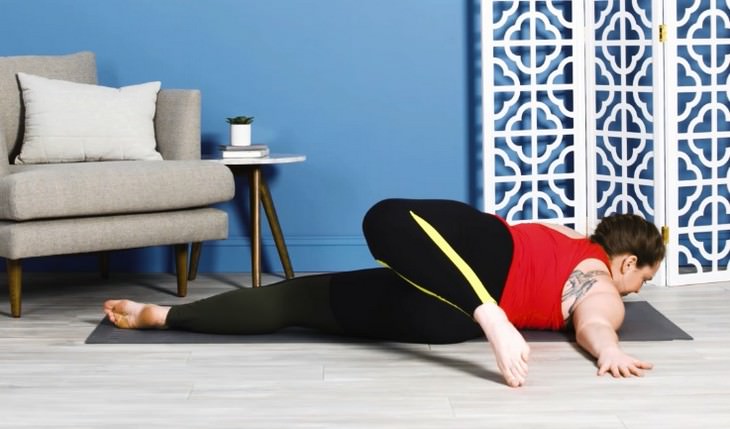
 
Chest on the Ground Stretch

This last stretch may seem challenging, but it’s worthwhile as it works on your chest muscles, pelvis, and upper shoulder area. If you’re having a hard time keeping your head up during the exercise, you may support your head with a small pillow. 

How it's done- 

Lie on your stomach with your arms stretched to the sides, hands facing the mat and feet flexed backward. 

Bend your left knee, lift your leg and bent it to the right along with the right side of your pelvis and lower chest. 

Make sure your left shoulder stays firmly on the ground. 

Try to touch the ground with your toes (of the left foot) as shown in the picture, only if you feel you’re capable. 

Remain in the position for about 2 minutes, then carefully go back to the starting point and repeat with the other side of your body.

This is only for your information, kindly take the advice of your doctor for food, medicines, exercises and so on.   


Labels: , , , , , , , ,

Monday, May 12, 2025

How to Sleep More Easily With Axial Spondyloarthritis

 Nighttime pain is common with this condition, but there are things you can do to feel a lot more comfortable.

If you’re one of the 2.7 million Americans living with axial spondyloarthritis (axSpA), you know the autoimmune condition can make falling and staying asleep difficult. “The type of back pain with axSpA is inflammatory back pain. It gets worse with prolonged rest—your back stiffens, which can wake you up,” says an associate professor of medicine.

This feeling can be so uncomfortable that you have to get up and walk around or stretch in the middle of the night, something that’s not exactly conducive to sleep. And all of that waking up can have a domino effect, with research showing that axSpA’s sleep disturbances are linked to higher levels of stress, pain, and disease activity, as well as a poorer quality of life.

Sound familiar? Well, you don’t have to resign yourself to yet another sleepless night. There are things you can do to help yourself feel better at night, including pre-bed stretches, lifestyle changes, disease-management practices, and tweaks to your sleeping habits.

Bedtime stretches

Before you turn off the lights, take a few minutes to do these six stretches from an expert. Conveniently, all of them are meant to be done on your bed. You can also give them a try if you wake up in the middle of the night—they can help you get back to sleep more quickly.

Chest T stretch
  • Lie in the center of the bed and place a pillow lengthwise under your head and upper back.
  • With your knees bent and your feet flat on the bed, reach your arms out to the sides in a T shape and let them relax down toward the bed. You should feel a stretch across the front of your chest.
  • Hold for 30 to 90 seconds.
Crossover stretch
  • Lying in the same T position you were in for the chest stretch, reach one arm across your body and touch your other hand.
  • Try to move only from your upper to mid-back and minimize any motion at your waist. Return to a T shape and repeat on the other side.
  • Do five to 10 reps per side.
Simple lumbar twist
  • Remove the pillow and lie flat on your back.
  • Keeping one leg straight on the bed, bend the other knee and use your opposite hand to pull it across your body until you feel a stretch in your lower back. Try to keep both shoulders in contact with the bed so that you’re only rotating from your waist.
  • Hold for 30 to 90 seconds, then repeat on the other side.
Windshield wipers
  • Lie with your knees bent and feet flat on the bed. Allow your knees to fall to one side, return to the center, and then fall to the other side. Use slow and controlled movements.
  • Do five to 10 reps per side.
Figure-four stretch
  • Bend one knee, keeping that foot flat on the bed.
  • Cross the ankle of the other leg over the bent knee, making a figure four with your legs.
  • Use one of your hands to gently apply pressure to the thigh of the top leg until you feel a stretch.
  • Hold for 30 to 90 seconds, then repeat on the other side.
Modified Thomas stretch
  • Lying down, scoot over to the edge of the bed. Bend the knee that's farther from the edge, keeping that foot flat on the bed. This will support and protect your lower back. Then allow your outside leg to fall off the side of the bed. You should feel a stretch in the front of your hip.
  • Hold for 30 to 90 seconds, then repeat on the other side.

Additional things that may help

On top of doing those stretches, making a few changes to your daily routine and the way you manage your condition can have a big impact on your sleep quality. Here are some other worthwhile steps you can take.

Find a medication routine that works.

If you’re not already taking medication for your arthritis, that’s a great place to start. “Getting treated for axSpA should help with the nocturnal back pain,” says Dr. Danve. “And the first line of treatment is NSAIDs.” NSAID is short for nonsteroidal anti-inflammatory drug, a category that includes common painkillers like ibuprofen (Advil) and naproxen (Aleve). If NSAIDs aren’t doing the trick, though, other medications, including biologics, may help improve axSpA back pain. Your doctor can tell you which medicine you should take for your symptoms.

Try physical therapy.

Equally as important as medication and stretching before bed is physical therapy. “With other inflammatory conditions, like lupus, we don’t harp much on physical therapy, but with axSpA regular stretching exercises and supervised physical therapy are very important,” says Dr. Danve. “If you’re doing those things, plus stretching right before bed, your nocturnal back pain will get much better.”

Add some heart-pumping exercise to your week.

You may not feel like being very active when you’re dealing with axSpA-related back pain, but movement can actually help. And don’t be afraid to go hard. One study found that after three months of doing three 60-minute high-intensity workouts a week (40 minutes of cardio plus 20 minutes of strength training), participants with axSpA reported improvements in sleep, fatigue levels, and mood. Study participants did strength moves like squats, deadlifts, rows, and bench press, and got their cardio in by walking, running, and cycling. But any exercises that feel comfortable (and safe) to you are fair game.

That doesn’t mean you should necessarily jump right into a HIIT class, though. “Always start off slow, try a few reps, and see how you feel,” says Culbertson. “If it hurts, stop.” Another good idea before kicking off an exercise routine: For activities that involve spinal twisting and bending, talk with your physical therapist to get tips on proper form.

Focus on your sleep posture.

While it can be hard to change your sleeping position, try lying on your back with your legs straight, placing a thin pillow under your head and another one under your knees. This posture should be the least painful for you. “It promotes optimal spinal alignment,” says Culbertson. Don’t give up if you struggle to switch positions. “When you’re used to sleeping in a certain position, you may return to that position while you sleep without even realizing it,” says Culbertson. “Placing pillows strategically along the sides of your body may keep you from rolling to your side.”

Get a firmer mattress.

Your bed might also be part of the problem. Firmer mattresses support your spine while you’re asleep, so if you can, swapping out your bed might bring some relief if your mattress is currently on the softer side, research suggests. “A soft mattress may feel good at first, but it offers less support when sleeping on your back,” says Culbertson. “You end up sinking into the mattress.”

Speak up.

If none of these options work, don’t just suffer silently. Talk with your doctor about trying different treatments or exercises until you find what helps your nights—and days—go better.


This is only for your information, kindly take the advice of your doctor for medicines, exercises and so on.   


Labels: , , , , , , ,

Friday, November 01, 2024

No Need to Get Out of Bed to Do These 6 Exercises

A hectic life has become the norm these days. And it all starts from the moment we get out of bed, launching right into our busy day. But, taking just a few minutes for yourself before you race to get into the shower, have breakfast and start plowing through your to-do-list can be beneficial for both body and mind. Try these 6 simple stretches before you crawl out from under the covers to help you set the right tone for the day ahead. 
 
1. Full-Body Stretch
bed exercises

Benefits: Releases tightness throughout the entire body.
 
Here's How
Inhale, reach your arms over your head, clasping your fingers together. Flip your palms out toward the wall behind you, pushing your palms away from you. 
 
• At the same time, stretch your toes away from your arms, keeping your knees straight. 
 
• Hold the stretch for 5 counts, then exhale and release. Repeat for a total of three times, releasing tightness throughout the entire body. 
 
 
2. Figure-Four Stretch
 bed exercises
Benefits: This stretch helps lubricate the hip joints, thighs, and glutes. 
 
• Here's How: 
 
Cross your right foot over your left knee, making the shape of a number 4 with your legs.
 
 • Slowly bend your left knee taking it up towards the ceiling, keeping the left foot on your mattress, or hugging it towards your chest. Keep the right knee bent out to the right as you try to maintain this shape. 
 
• Hold the pose for 5 deep breaths then switch sides. 
 
 
3. Bed-To-Floor Stretch
bed exercises
 Benefits: Helps stretch the back, helps you wake up and provides you with a fresh supply of oxygen to the brain. 
 
 • Here's How:  
Swing your feet over the side of the bed, allowing your feet to touch the floor. 
 
• Keep your knees bent, hang your head and arms down to the floor, rounding your back over your knees. 
 
• Let your head and arms dangle to the floor and hold for 5 breaths.


4. Knees-to-Chest- Stretch
bed exercises
Benefits: Gently stretches the lower back, stimulating the mind and body, helping you feel ready to start your day. 
 
• Here's How: 
From a supine position, bend your knees until the soles of your feet are on the bed. 
 
• Use your hands to draw one knee in towards your chest at a time and wrap both of your arms around your shins. 
 
• Relax your head on the pillow and hold this hug for 10 deep breaths. 
 
 
5. Supine Twist
bed exercises
Benefits: Twists awaken the body, increasing circulation and stretching the spinal muscles. 
 
• Here's How: 
From the above pose, release the grip of your shins allowing your arms to fall out to a T shape on either side of your body. 
 
• Using your core, guide your legs, resting them on one side and keeping your knees bent and shoulders planted down into the mattress. 
 
• If it's easy on your neck, gaze toward the opposite side of your legs, staying here and holding the pose for 10 deep breaths, then repeat on the other side. 


6. Seated Forward Bend
bed exercises 
Benefits: This pose is beneficial after resting all night and before having to stand or sit for the most part of your day. It stretches the hamstrings, pelvis, and spine. 
 
• Here's How: 
Lift your torso upright from a reclined position. 
 
• Keep your legs straight. Then inhale and lengthen through your spine. As you exhale walk your fingertips toward your feet. 
 
• Keep lengthening your spine with your inhalation, sinking a bit deeper into this seated forward fold as you exhale. 
 
• At your furthest point allow your neck to hang heavy toward your legs, releasing any tension in the body. 
 
• After 10 rounds of breathing, slowly lift your torso up.


This is only for your information, kindly take the advice of your doctor for medicines, exercises and so on.   

https://gscrochetdesigns.blogspot.com. one can see my crochet creations  
https://gseasyrecipes.blogspot.com. feel free to view for easy, simple and healthy recipes    
https://kneereplacement-stickclub.blogspot.com. for info on knee replacement
https://cancersupportindia.blogspot.com  for infor on cancer and health related topics
https://GSiyers home remedies.blogspot.com   is the latest addition to my blogs. I'm going to add posts there, do give me your valuable feed back on my blogs. Thanks a lot, take care, be healthy and be happy.

Labels: , , , , ,