Friday, March 17, 2023

5 Turmeric-Based Facial Masks For Removing Hair

Some people go to a beautician every single week for hair removal, but there’s actually a much simpler and cheaper way of removing hair in the comfort of your own home. These four methods will show you how to use turmeric, the Indian spice, in a face mask for hair removal purposes:


Turmeric for hair removal mask No. 1 

turmeric
Ingredients 
• ½ cup of milk 
• ½ cup of flour 
• 2 tablespoons of turmeric powder 
• 1 teaspoon of salt 
 
Method 
1. Stir the mixture in a bowl until smooth. Add more turmeric to the mixture if it’s runny. 
2. Apply the paste to the area that you want to remove hair from. Rub it into the area in a circular motion for 10 minutes. 
3. Allow the paste to dry for 10-15 minutes, then wash off with warm water. Both turmeric and salt dissolve hair by thinning them.


Turmeric for hair removal mask No. 2

Ingredients 
 
 • ½ bowl of sugar 
 • 1 cup of water 
• 2 tablespoons of turmeric 
• 2 tablespoons of lemon extract 
5 Turmeric-Based Facial Masks For Removing Hair
Method 
1. Boil the water and add sugar. Leave the sugar to boil with the water until you’re left with a sticky syrup. 
 
2. Allow the sugar syrup to cool, then add the turmeric and lemon extract. Stir the ingredients until the mixture becomes thick. 
 
3. Apply the paste on the area that you wish to remove hair from and scrub it in a circular motion. Do this for five minutes and rinse off the paste. 
 
4. Repeat this three times per week for the best results.


Turmeric for hair removal mask No. 3 
 
Ingredients 
 
• 1 teaspoon of turmeric 
 • 1 tablespoon of flour 
• 2 tablespoons of milk 
 
 Method
1. The ingredients for this mask are the same as the ones for the first mask, minus the salt. Simply add the ingredients to a bowl and whisk until you get a thick paste. 
 
2. Apply the mask in the same direction as the hair growth in the area that you wish to remove, then scrub in the opposite direction. 
 
3. Scrubbing will disturb hair growth, making it fall out at the root. You can also replace flour with oats for this particular face mask. 


Turmeric for hair removal mask No. 4 
 
Ingredients  
 
• 1 cup of chickpea flour 
 
• ½ tablespoon of turmeric 
 
• ½ cup of milk 
 
Method  
1. Add the chickpea flour to a small mixing bowl, then add the turmeric and stir for a just a few seconds. 
 
2. Add the milk and stir the mixture until it turns into a thin paste. 
 
3. Apply a thin layer of the mixture to the area you wish to remove hair from, applying in the same direction as the hair growth, and leave to dry for 20-25 minutes. 
 
4. Use a washcloth and rub the area in the opposite direction to the hair growth. Use warm water to remove any remaining residue from the mask and apply moisturizer to soothe the area.


Turmeric for hair removal mask No. 5 
 
Ingredients  
 
• 3 teaspoons of turmeric

• 1 teaspoon of milk  
 
Method 
 
1. You don’t need to worry too much about the measurements for this one, other than that you’re using three parts turmeric to one part milk. Mix the two ingredients into a paste and spread it on your skin. 
 
2. Allow the mask to dry on the area you wish to remove hair from for 20 minutes. 
 
3. Use a dry washcloth and scrub your skin in a circular motion to remove the mask. 
 
4. Repeat this process every two to three days for the best results. 


Bonus Tips  
1. It’s possible that your face might turn a little yellowy after using these masks, but you can use an apple cider vinegar toner to correct this. Coconut oil is also good for moisturizing the skin after hair removal. 
 
2. Don’t repeat the treatment two days in a row, because it’s too much for your skin to handle. 
 
3. Baking soda and soap are also good for removing yellow turmeric stains from your skin. Watch this video to find out more:


This is only for your information, kindly take the advice of your doctor for medicines, exercises and so on.  

https://gscrochetdesigns.blogspot.com. one can see my crochet creations  
https://gseasyrecipes.blogspot.com. feel free to view for easy, simple and healthy recipes    
https://kneereplacement-stickclub.blogspot.com. for info on knee replacement
https://GSiyers home remedies.blogspot.com     is my latest addition to my blogs. I'm going to add posts there, do give me your valuable feed back on my blogs. Thanks a lot, take care, be healthy and be happy. 

Labels: , , , , , , , , ,

Friday, July 29, 2022

Shaving and Hair Removal - 7 Things We All Get Wrong

Fashion trends come and go, but the idea of hair removal for both women and men seems to stick around. The first copper razors ever unearthed date back to 3,000 BC in Ancient Egypt and India. Since then, the hair removal game has advanced quite a lot. We now have several gadgets and methods at our disposal: razors, waxing, sugaring, electric epilators, hair removal creams, derma planing, and even laser hair removal. 
 
But even with thousands of years of experience behind our backs, there’s still so much we get wrong about hair removal. Here are 7 myths about shaving and other hair removal methods that seem so common sense that they couldn’t be wrong. Alas, they’re as wrong as 2 + 2 = 5. Read on to know what they are. 
 
Myth 1: Shaving makes your hair grow darker and thicker

Let’s begin by debunking the biggest shaving myth out there. Shaving will not make your hair grow back thicker, denser, or darker. And it doesn’t matter what area in the body you’re shaving either - the legs or the face. Your hair may appear thicker while it’s short, but if you were to let it grow out, you’d notice that it’s the same as it once was. 
 
If you think about it, this makes sense. When we’re shaving, we’re simply using a sharp razor to trim the hair. So there’s no way for a razor to alter the hair root. As Dr. Rebecca Marcus, a dermatologist, pointed out to Huffington Post, “Shaving cuts the hair shaft at the surface of the skin and has no effect on the hair follicle, where the hair is produced.” 
 
If you’re still unconvinced, just think about bald men that shave their heads to catch any stray hairs - wouldn’t they all have a full head of hair after shaving daily by this flawed logic?

Myth 2: Razor bumps cannot be treated
Wrong again. But before we explain how to make these pesky bumps go away, we’ll need to understand what causes them. Razor bumps are small red or white dots created by either ingrown hairs that struggle to break through the surface of the skin or germs accumulating in the hair follicle (folliculitis). 
 
The best way to reduce all that inflammation around the hair follicle is by exfoliating. Dermatologists recommend using cotton pads soaked in toner with active exfoliating ingredients like salicylic acid, glycolic acid, or mandelic acid to improve this condition. These acidic ingredients go into the hair follicle and clean it out, reducing the inflammation and redness instantly and preventing skin infections. 
 
On your body, you can also try manual exfoliation with a scrubby loofah, a shower scrub, or a brush. We wouldn’t recommend physical exfoliation for the face because the skin there is thinner and more delicate.  
 
Myth 3: Shaving makes your hair grow back faster
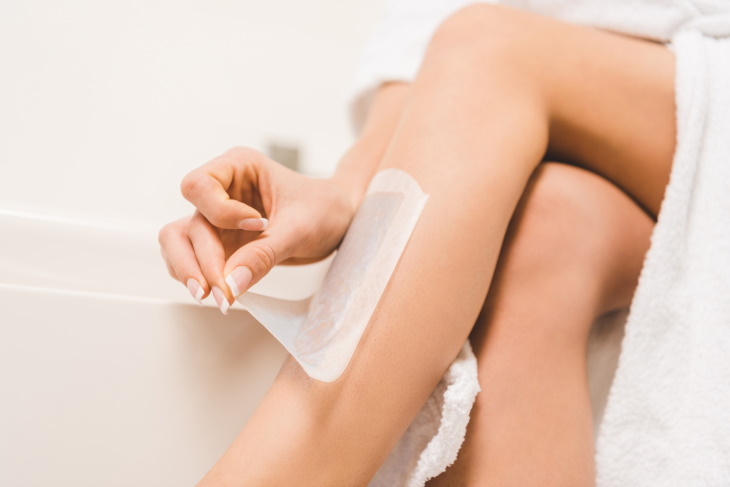
Hair Removal Myths waxing
Unless you’re using a permanent hair removal method like a laser, getting rid of hair on the face and body doesn’t speed up hair growth. According to the Trichological Society, hair grows between 0.2 to 0.7 inches per month irrespective of shaving, waxing, or any other hair removal. This rate varies slightly across the body - hair tends to grow faster on the body than on the face and scalp. 
 
What about waxing versus shaving - do either of these methods provide longer-lasting results? When you wax your hair, you’re plucking out the entire hair follicle, but with shaving, you’re only trimming the hair back to the surface of your skin. 
 
Hence, it takes a longer time for the brand new hair to emerge from deep under the skin after waxing compared to shaving which only superficially cuts the hair. Experts say that, depending on the person, results from shaving usually last from 2-7 days, and waxing will keep the skin smooth for 3-6 weeks. 
 
Myth 4: Laser hair removal cannot be done in the summer
Hair Removal Myths Laser hair removal on face
There’s actually no time limitation for laser hair removal, you can do it all year round. The reason why some laser hair removal technicians recommend doing it in the winter is that lasers work best when there’s a color contrast between the skin and hair - the paler the skin and darker the hair, the better. 
 
Therefore, a tan can interfere with the effectiveness of the treatment, especially in people with darker skin tones. So if you enjoy getting a tan in the summer, you may run into some minor issues if you do laser hair removal.  
 
Myth 5: The same hair removal method should be used all over the body
Generally speaking, tailoring hair removal methods to different areas of the body is found to be both gentler on the skin and more effective. As we explained above, different parts of the body grow hair at different rates. Hair in the bikini area and the underarms tends to grow the fastest, followed by the legs and arms, and then the face and head. Hence, waxing the areas that grow back the fastest may give you more time in-between hair removal. 
 
In addition, waxing is said to work better for sensitive areas of the skin like the underarms and the bikini line because it is less likely to irritate the skin. So for people with sensitive skin, waxing may be a better choice, especially in those more delicate areas.
 
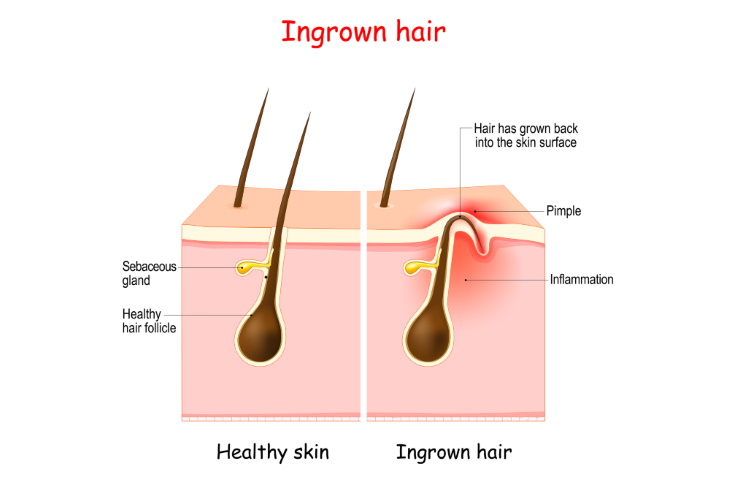
Myth 6: Ingrown hairs are caused by shaving
Hair Removal Myths Ingrown hair
Any hair removal method can cause ingrown hairs. And among them all, shaving is actually the least likely to result in ingrown hairs. Other methods, such as waxing, sugaring, tweezing, and electric epilators create ingrown hairs more easily because they weaken the hair strands and make it more difficult for them to break through the skin. So if you’re concerned about ingrown hairs, shaving may be the best method for you. 
 
No matter which hair removal method you choose, however, you can prevent ingrown hairs by a combination of exfoliation and moisturization. Using a loofah, scrub, or chemical exfoliator the day after shaving will help remove dead skin cells from the surface of the skin, and daily moisturizing will soften the skin. Together, this will make it easier for new hairs to penetrate the skin surface instead of getting stuck inside the skin. 
 
Myth 7: Results from laser hair removal are permanent
Laser hair removal is considered permanent because it works by killing the hair follicles in the skin. However, your skin always has many inactive hair follicles that don’t grow hair actively left. For this reason, a laser hair removal treatment usually requires several monthly sessions - enough to catch the majority of hair follicles in their growth stage and eradicate them. 
 
But even after a full year of treatments, there may be some inactive hair follicles left, so you may need to follow up on your treatments even after your laser hair removal course is complete.
 
This is only for your information, kindly take the advice of your doctor for medicines, exercises and so on.   

https://gscrochetdesigns.blogspot.com. one can see my crochet creations  
https://gseasyrecipes.blogspot.com. feel free to view for easy, simple and healthy recipes    
https://kneereplacement-stickclub.blogspot.com. for info on knee replacement
 
 
 H/T: Huffington Post, Glamour Magazine


Labels: , , , , ,

Sunday, November 28, 2021

5 Turmeric-Based Facial Masks For Removing Hair

Some people go to a beautician every single week for hair removal, but there’s actually a much simpler and cheaper way of removing hair in the comfort of your own home. These four methods will show you how to use turmeric, the Indian spice, in a face mask for hair removal purposes:

Turmeric for hair removal mask No. 1
Ingredients
• ½ cup of milk •
½ cup of flour
• 2 tablespoons of turmeric powder
• 1 teaspoon of salt
Method
1. Stir the mixture in a bowl until smooth. Add more turmeric to the mixture if it’s runny.
2. Apply the paste to the area that you want to remove hair from. Rub it into the area in a circular motion for 10 minutes.
3. Allow the paste to dry for 10-15 minutes, then wash off with warm water. Both turmeric and salt dissolve hair by thinning them.

 turmeric

Turmeric for hair removal mask No. 2 
Ingredients 
• ½ bowl of sugar 
• 1 cup of water 
• 2 tablespoons of turmeric 
• 2 tablespoons of lemon extract  
 
Method 
1. Boil the water and add sugar. Leave the sugar to boil with the water until you’re left with a sticky syrup. 
2. Allow the sugar syrup to cool, then add the turmeric and lemon extract. Stir the ingredients until the mixture becomes thick. 
 3. Apply the paste on the area that you wish to remove hair from and scrub it in a circular motion. Do this for five minutes and rinse off the paste. 
4. Repeat this three times per week for the best results.

Turmeric for hair removal mask No. 3 
Ingredients  
• 1 teaspoon of turmeric 
• 1 tablespoon of flour 
• 2 tablespoons of milk 
 
Method 
1. The ingredients for this mask are the same as the ones for the first mask, minus the salt. Simply add the ingredients to a bowl and whisk until you get a thick paste. 
2. Apply the mask in the same direction as the hair growth in the area that you wish to remove, then scrub in the opposite direction. 
3. Scrubbing will disturb hair growth, making it fall out at the root. You can also replace flour with oats for this particular face mask. 
 
 
Turmeric for hair removal mask No. 4 
Ingredients  
• 1 cup of chickpea flour / besan
 • ½ tablespoon of turmeric 
 • ½ cup of milk  
 
Method 
1. Add the chickpea flour to a small mixing bowl, then add the turmeric and stir for a just a few seconds. 2. Add the milk and stir the mixture until it turns into a thin paste. 
3. Apply a thin layer of the mixture to the area you wish to remove hair from, applying in the same direction as the hair growth, and leave to dry for 20-25 minutes. 
4. Use a washcloth and rub the area in the opposite direction to the hair growth. Use warm water to remove any remaining residue from the mask and apply moisturizer to soothe the area.


Turmeric for hair removal mask No. 5 
Ingredients 
• 3 teaspoons of turmeric 
 • 1 teaspoon of milk  
 
Method 
1. You don’t need to worry too much about the measurements for this one, other than that you’re using three parts turmeric to one part milk. Mix the two ingredients into a paste and spread it on your skin. 
2. Allow the mask to dry on the area you wish to remove hair from for 20 minutes. 
3. Use a dry washcloth and scrub your skin in a circular motion to remove the mask. 
4. Repeat this process every two to three days for the best results.

Bonus Tips 
1. It’s possible that your face might turn a little yellowy after using these masks, but you can use an apple cider vinegar toner to correct this. Coconut oil is also good for moisturizing the skin after hair removal. 
2. Don’t repeat the treatment two days in a row, because it’s too much for your skin to handle. 
3. Baking soda and soap are also good for removing yellow turmeric stains from your skin.
Health Benefits of Turmeric  see my next post, thanks

This is only for your information, kindly take the advice of your doctor for medicines, exercises and so on.   

https://gscrochetdesigns.blogspot.com. one can see my crochet creations  
https://gseasyrecipes.blogspot.com. feel free to view for easy, simple and healthy recipes    
https://kneereplacement-stickclub.blogspot.com. for info on knee replacement


Labels: , , , , , , , , , ,