Tuesday, November 26, 2024

Lower Back Spasm Exercises
Lower back pain can be really debilitating, ruining your day and making you feel completely miserable, especially when it begins suddenly and you're not prepared to deal with it. In many cases, lower back pain occurs because you have a spasm in one of the muscles of the lower back, which can be very painful, but also quite easy to fix with exercise. This article offers you to try 5 simple exercises everyone can do at home to deal with a lower back spasm, which also double as great preventative exercises that will help you avoid lower back pain as well.

What Does a Lower Back Spasm Feel Like? 
A lower back spasm happens when a muscle in the lower back contracts and tenses up, which results in a sudden painful feeling that ranges from mildly annoying to very intense. The pain is usually localized to one muscle, but sometimes, the surrounding area can also be affected or the pain may radiate into the hip or leg. 
 
Lower back spasms are caused by acute trauma (when you turn suddenly or lift something heavy) or can become chronic, typically after a lower back injury. The condition often worsens after physical activities, such as walking, standing for long periods of time or exercise.

The symptoms of lower back spasms are as follows: 
Sudden onset of strong pain 
 
Tension 
 
Weakness 
 
Cramping that comes and goes 
 
Constant pain for a long time 
 
Stiffness 
 
Trouble moving after bending. 
 
Spasms can interfere with our daily lives and cause a lot of pain, so the best strategy is to relieve the pain that comes with the condition. Many people use over-the-counter or prescription painkillers, therapeutic massages or cold and hot compresses to deal with lower back cramps, but exercises and stretches are also effective at stopping the pain by relieving the tension in the muscles.

Here are 5 exercises that can help: 
 
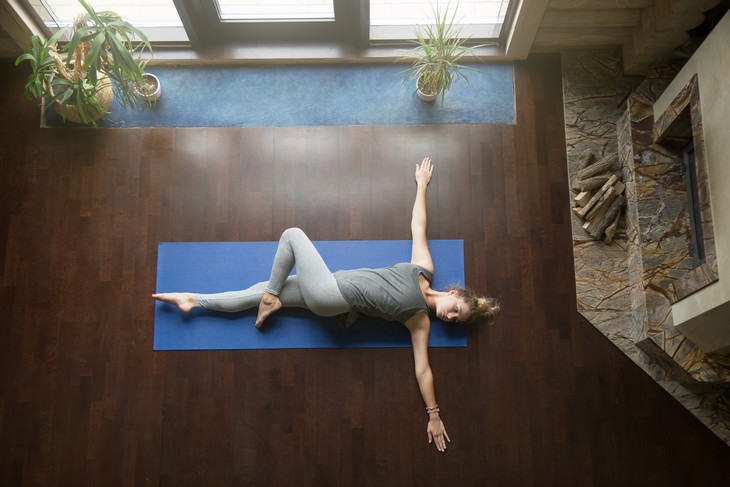
1. Supine Twist  
 Lower Back Spasm Exercises Supine Twist
This pose can help relax the side muscles in the lower back and increase the mobility of the spine in this area.

Step 1. Lie down on a mat with one knee bent (a carpet or blanket will do just as well). 
 
Step 2. Rotate your legs left towards the floor until you feel a stretch. Hold for 5-10 breaths, gradually deepening the stretch. 
 
 Step 3. Return to the initial position and repeat on the opposite side. 
 
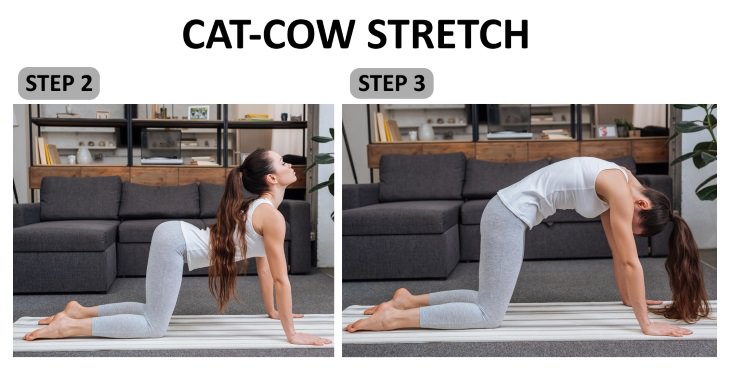
2. Cat-Cow Stretch 
 Lower Back Spasm Exercises cat-cow stretch
This stretch can help you regain the mobility of the spine and strengthen the muscles of the back and abdominal muscles.

Step 1. Start on all fours on the floor. If your knees are sensitive, you can pad them up with a towel or a blanket. Make sure your knees are directly under your hips and your wrists are in line with the shoulders.  
 
Step 2. Inhale deeply and arch your back as slowly and mindfully as you can, raising your head at the very end. 
 
Step 3. When you exhale, round your back and lower your head. Repeat 7-10 times.


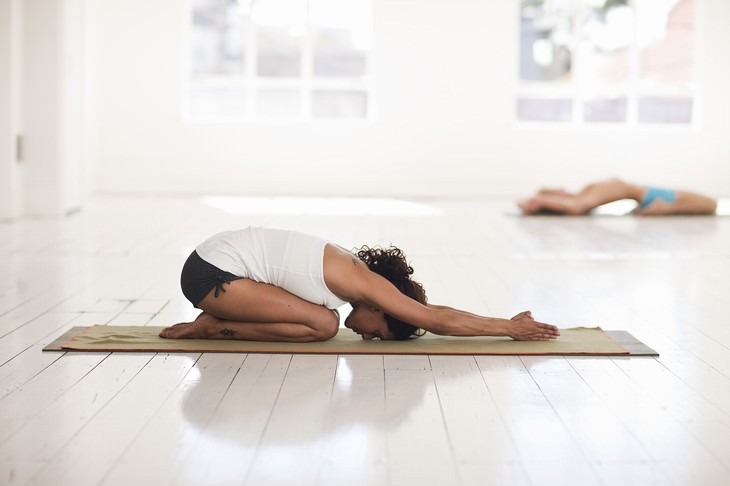
3. Child's Pose 
 Lower Back Spasm Exercises Child's Pose
This is a very mild and relaxing stretch that will gently increase the mobility of the back and help your lower back muscles relax.

Step 1. Just like the previous stretch, start on all fours, but here the hips can be placed as wide or as close together as you want, so experiment with what feels best for you. 
 
Step 2. Sit down on your feet, stretching your arms forward and lowering your chest on your thighs. When you got yourself situated in this pose, relax your arms and rest your elbows on the floor. Stay in this position for at least a few minutes, breathing slowly and deeply. 
 
 
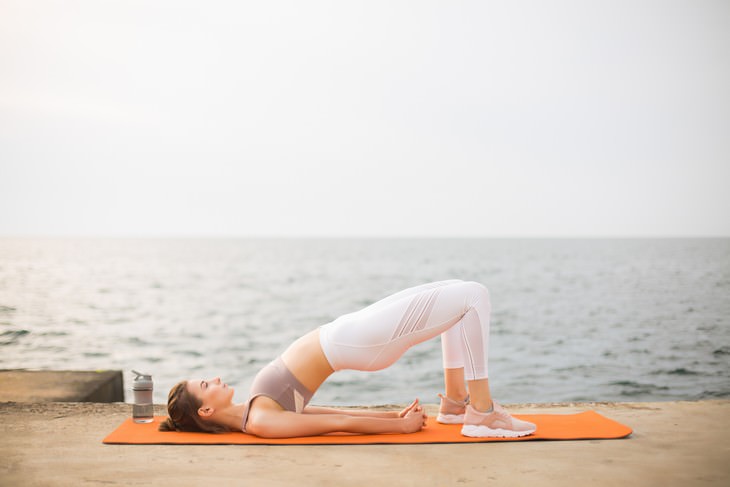
4. Hip lifts
Lower Back Spasm Exercises Hip lifts
When you get a lower back spasm, it might be because your hips are tight and pull on your lower back muscles. You have to stretch your hamstrings and activate your hip muscles to relieve lower back pain.

Step 1. Start lying on your back with your knees bent and the feet on the floor. Rest your hands along the body. 
 
Step 2. Now tense up your abdominals and glutes to protect the lower back and raise your hips slightly off the ground, holding this position as long as you can. 
 
Repeat 7-10 times.


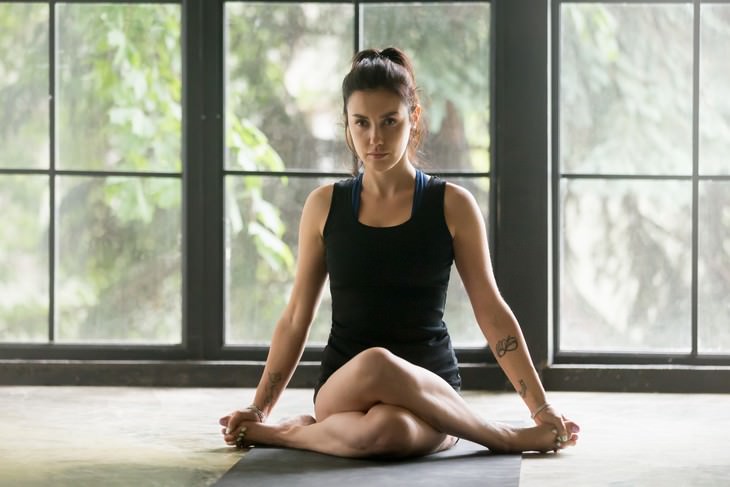
5. Shoelace Stretch 
 Lower Back Spasm Exercises Shoelace Stretch
 This last stretch seems more complex than it is, and it’s a great exercise to release the tension of both the hip muscles, the glutes, and the lower back.

Step 1. Start on all fours and cross one knee over the other. 
 
Step 2. Slowly sit down until your sitz bones reach the ground and sit up straight and tall if you can. 
 
Step 3. Set your hands on your feet or whatever feels comfortable. You should feel a stretch in your glutes and lower back. If not lean forward and bring your torso towards your legs until you feel a stretch. Hold for at least a minute or two. 
 
Step 4. To get out of this pose, simply raise your sitz bones back up and return to all fours, switch legs and do the same on the other side. 
 
You can mix and match these exercises as you like, and you will recover much sooner from a back spasm, but you can also repeat these exercises daily as a great preventative measure as well.


This is only for your information, kindly take the advice of your doctor for medicines, exercises and so on.   

https://gscrochetdesigns.blogspot.com. one can see my crochet creations  
https://gseasyrecipes.blogspot.com. feel free to view for easy, simple and healthy recipes    
https://kneereplacement-stickclub.blogspot.com. for info on knee replacement
https://cancersupportindia.blogspot.com  for infor on cancer and health related topics
https://GSiyers home remedies.blogspot.com   is the latest addition to my blogs. I'm going to add posts there, do give me your valuable feed back on my blogs. Thanks a lot, take care, be healthy and be happy.

Labels: , , , , ,

Thursday, August 12, 2021

7 Hip & Back Exercises Performed On a Chair

From reduced stress, to improved strength and flexibility, the benefits of yoga have made it an increasingly popular form of exercise in the West. But, it can be rather intimidating to some too. Perhaps you may feel that you just 'don't bend that way', or you might find it difficult to keep up with others in class, or maybe, you have a physical limitation that prevents you from attempting a yoga class for a full hour.

Whatever your reason may be, using a prop, such as a chair, will help change your perception of yoga. Chair Yoga, as it is justly named, adapts traditional yoga poses so that they may be done from a (predominantly) seated position, offering support to people who cannot stand for long periods of time. Despite the extra hold you get from using a chair, the mind-body benefits of a traditional class are still incorporated into the 'chair pose'.  
 
Who can do Chair Yoga? 
 
This form of yoga practice is generally targeted at senior citizens, however, it may also be adopted by obese people and people with neurological diseases. Office workers may also take advantage of Chair Yoga, enabling them to sneak in a couple of stretches at work too. The particular chair you use is not important, however, it goes without saying that chairs with wheels are not ideal. 
 
So, whatever your reason, this series of seated yoga exercises can be a great addition to your daily routine. 
 
Disclaimer: Whilst the following poses are suitable for most people (including seniors), people living with chronic pain and/or those who use a wheelchair should consult with their healthcare provider before beginning any new physical activity.

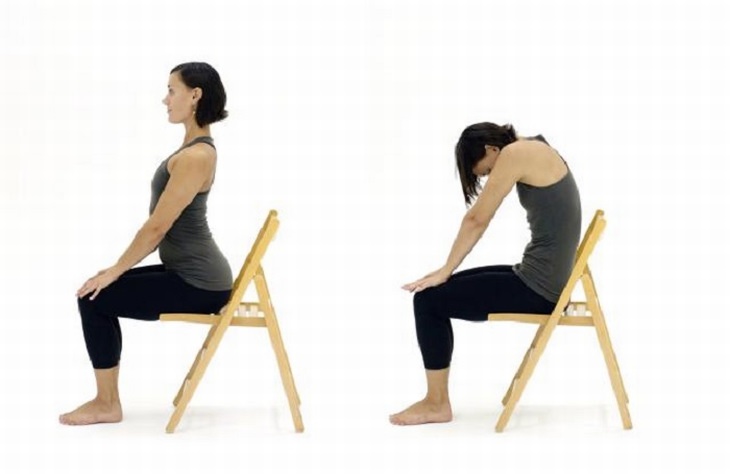
1. Chair Cat-Cow Stretch
yoga
Keep your spine long, both feet planted flat on the floor. 
 
• Inhale, come into cow position, arch your back and drop your shoulders. 
 
• Exhale, round your spine, allowing the shoulders and head to come forward into cat position.
 
• Continue to move between cow on the inhalations, and cat on the exhalations for five breaths. 
 
Benefits: This posture improves spine flexibility and abdominal strength. 
 
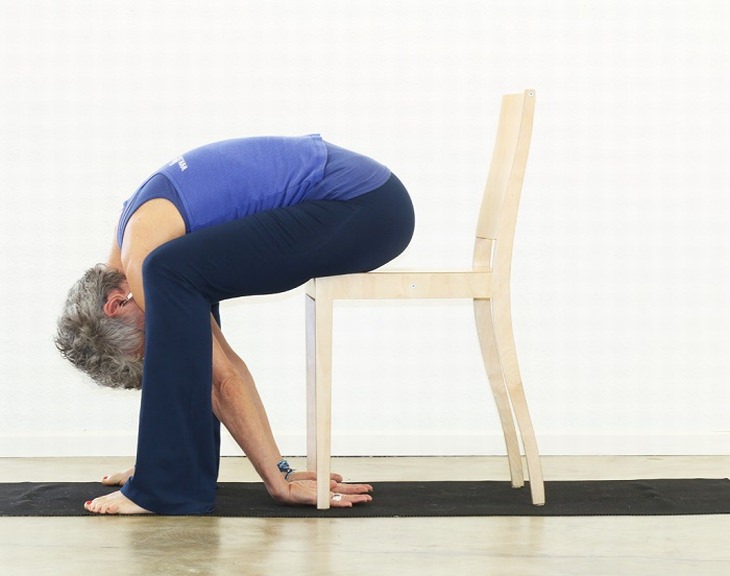
2. Chair Forward Bend
yoga
Spread your feet hip-distance apart. 
 
• Exhale, coming into a forward bend, resting your torso over your thighs. 
 
• Let your hands rest on the floor (if you are able to reach it. If not, keep your hands on your thighs). 
 
• Let your head hang heavy between your legs. 
 
• Inhale, raising your arms up over your head. 
 
• Repeat this sequence five times, moving slowly as you breathe.

Benefits: Relieves tension from the head, neck and shoulder region. This pose also helps sooth the nervous system and relieves stress.  
 
3. Chair Spinal Twist

Keep your spine straight, knees together, feet planted on the floor.
 
• Twist your torso towards the left. 
 
• With your left hand hold the back of the chair, placing your right hand on your left thigh.
 
• With each inhale, lengthen your spine and with every exhale twist as deeply as you can. 
 
• Hold this posture for five breaths, then repeat on the right side.

Benefits: Opens the shoulders and neck, whilst stretching the spine. 
 
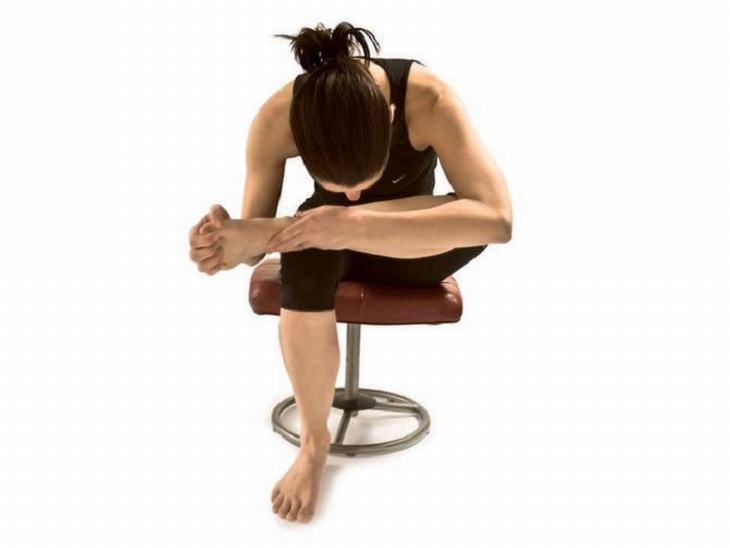
4. Chair Thread the Needle
yoga
Sit up straight. 
 
• Bring your left ankle to rest on your right thigh, keeping your knee in line with your ankle as much as possible. 
 
• Hold for three to five breaths. 
 
• If you would like to intensify the stretch, proceed with a forward bend, holding for a further three to five breaths. 
 
• Repeat with your right leg up.  
 
Benefits: Stretches the thighs, groins, back and psoas muscles. 
 
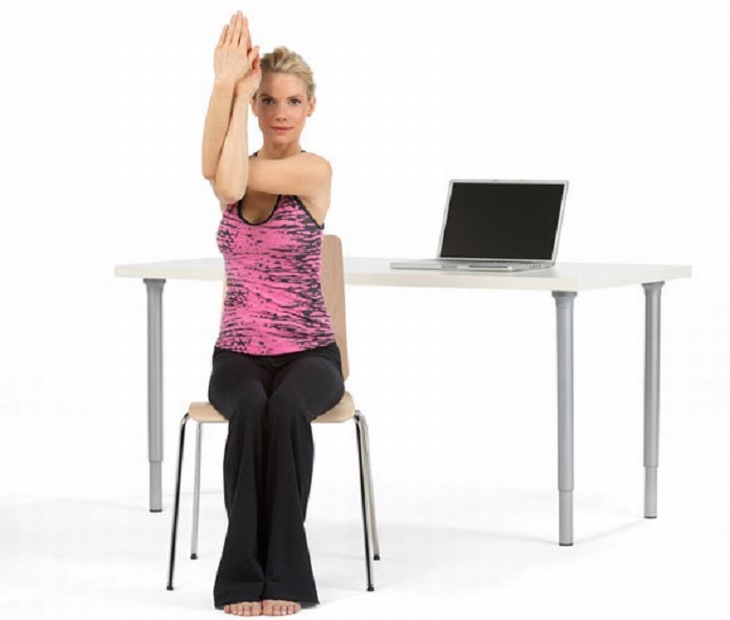
5. Chair Eagle Arms
yoga
Lengthen your spine and stretch your arms out in front of you. 
 
• Cross your left arm over the right, at the elbow. 
 
• Bend the elbows and bring your palms together until they touch. 
 
• Lift the elbows while dropping the shoulders away from your ears. 
 
• Hold the pose for three to five breaths and repeat on the other side. 
 
Benefits: This pose provides a deep stretch in the shoulders. 
 
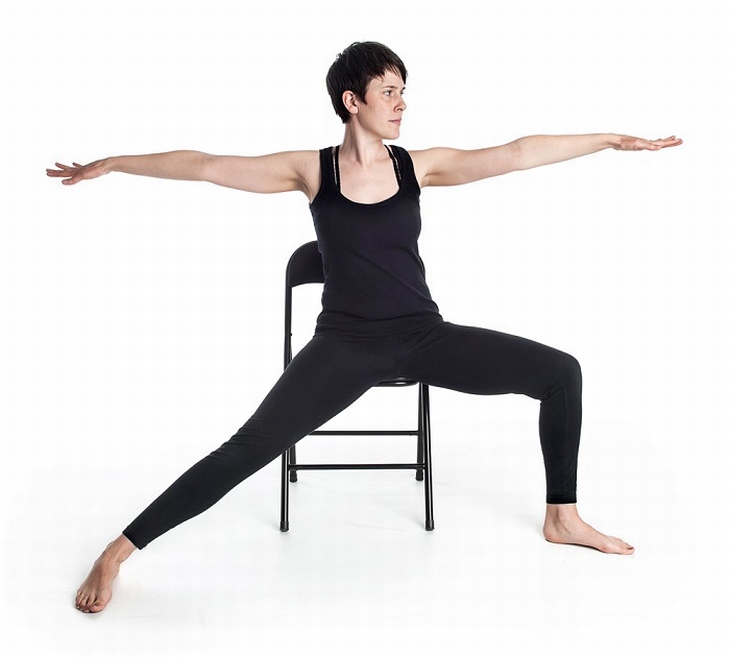
6. Chair Warrior II
yoga
Position your right leg over the chair and swing your left leg behind you. 
 
• Plant the sole of your left foot on the floor and straighten your left leg.
 
• Let your torso turn to the left, aligning your hips with the front of the chair. 
 
• Exhale, open your arms out to the side, with your right arm extending forward, and your left, back. 
 
• Gaze out over your right fingertips and hold for three breaths. 
 
• Repeat on the other side. 
 
Benefits: Strengthens the legs and arms, opens the chest and shoulders and tones the abdomen.
 
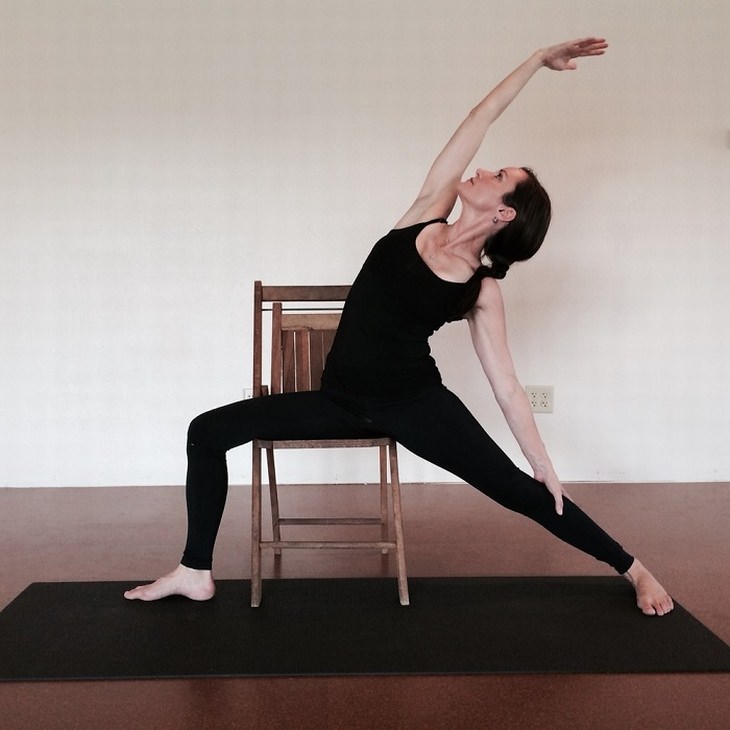
7. Reverse Chair Warrior
yoga
Position your body in Warrior II, as described above. 
 
• Let your left arm come down your left leg and lift your right arm up towards the ceiling as you inhale. 
 
• Hold for three breaths. 
 
Benefits: Strengthens the legs, improves flexibility of the spine.

This is only for your information, kindly take the advice of your doctor for medicines, exercises and so on.   

https://gscrochetdesigns.blogspot.com. one can see my crochet creations  
https://gseasyrecipes.blogspot.com. feel free to view for easy, simple and healthy recipes    
https://kneereplacement-stickclub.blogspot.com. for info on knee replacement

Labels: , , , , , , , , , ,

Wednesday, June 12, 2019

5 Scoliosis Exercises That Will Improve Your Posture

Bad posture in general and scoliosis, in particular, are the plight of today. We spend so much time sitting in front of computers and staring into our devices that our spines become weak and crooked. Both adults and children spend hours upon hours every day hurting our spines, which inevitably causes pain, weakness, changes in posture and poor self-esteem.
Whether or not you suffer from scoliosis, which is a sideways curve of the spine that can be painful and cause other health problems, your posture will benefit from these simple exercises you can do at home. Doctors recommend these 5 stretches and exercises for scoliosis patients and point out that they are vital components of the treatment.

1. Opposite Arm and Leg Raise

One of the best ways to strengthen your back muscles is through arm and leg raises. And strengthening your muscles is key, as they can help stabilize your spine and will do wonders at relieving you of back pain. The version we will talk you through is the simplest one because you’re laying on the belly and don’t have to maintain your balance, but you can also do it on all fours or even from a plank position if this is too easy.
Step 1. Lie on your belly, forehead resting on the floor and arms extended over your head, legs straight.
Step 2. Raise your left arm and right leg off of the ground. Hold for one or two breaths, and then return to the initial position.
Step 3. Now repeat the same with the right arm and left leg. This is one rep.

2. Cat-Cow Stretch

Everyone can and probably should try this yoga pose, as it is excellent at increasing the mobility and flexibility of the entire spine. In the long run, it can help you get rid of back and shoulder pain as well. You can read the directions and watch the video to learn this stretch.
Step 1. Start on all fours, with your shoulders directly under your wrists and hips under the knees, torso and hear parallel to the floor.
Step 2. On an exhale, suck your belly in (this will activate your abs) and arch your back like an angry cat, head looking down.
Step 3. Now inhale and return to the initial position. Then slowly release your abs and drop your belly and arching the back the other direction, lifting the head up. This is 1 rep.
Repeat 10 times.

3. Standing Lat Stretch

The lat muscle (which is short for the latissimus dorsi muscle) is the longest muscle of the upper body, and it often gets compressed or affected otherwise when you’re experiencing back pain, have scoliosis or bad posture. Stretching this muscle can cause a feeling of instant relief in the back and shoulders. Here’s how to do this stretch:
Step 1. Stand up straight, with your shoulders relaxed and feet shoulder-width apart. Don’t lock your knees and bend them slightly.
Step 2. Raise your arms overhead and grab your left wrist with your right hand.
Step 3. Now bend your upper body to the left until you feel a stretch throughout the right side of the body. Hold this position for a few deep breaths. When you’re done, on an inhale, return to the initial position. 
Step 4. Repeat the stretch on the opposite side and don’t forget to now grab the right wrist with your left hand. You probably already know, this is 1 repetition.
Repeat 5-10 times.

4. Pelvic Tilt (or Bridge Pose)

If your lower back is bothering you or you have scoliosis in the lumbar region, a pelvic stretch will help train the lower back muscles and abs, which will relieve pain in the hips and the lower back. The video below will show you a yoga version of the pelvic tilt that is static, but you can also do a dynamic version of this exercise by simply repeating the movement several times instead of holding the pose.
Step 1. Lie down flat on your back with your knees bent and feet flat on the floor.
Step 2. Suck your belly in, tightening your abdominal muscles and raise your bottom off the floor as much as you can. Hold as much as you can if you’re doing the static version or for only 1 breath if you’re choosing the dynamic one, then return your bottom to the floor and relax your abs.
Repeat 10-15 times (dynamic) or 3 times (static).

5. Bird Dog

As you can probably guess from the name, the Bird Dog is a yoga-inspired exercise as well. It will strengthen your side muscles, abs and back muscles, so it’s excellent for the entire upper body, even though it’s a bit more challenging than the rest.
Step 1. Start on all fours, wrists directly under your shoulders, knees under the hips. You can keep your feet curled or straight, whatever feels more stable to you personally.
Step 2. Raise and extend the left arm parallel to the floor and raise the right leg up and back as well. Hold this position for 5 seconds and then lower your arm and leg.
Step 3. Repeat the exercise with the opposite leg and arm. If you feel stable and confident in this posture, you can try a more complicated version by taking the arm and leg you’ve initially extended and bring them close to your belly.
Repeat 10 times on each side.

THIS IS ONLY FOR INFORMATION, ALWAYS CONSULT YOU PHYSICIAN BEFORE HAVING ANY PARTICULAR FOOD/ MEDICATION/EXERCISE/OTHER REMEDIES.                                    PS- THOSE INTERESTED IN RECIPES ARE FREE TO  VIEW MY BLOG-                                                                                           https://gseasyrecipes.blogspot.com/                                                                                                                                                FOR INFO ABOUT KNEE REPLACEMENT, YOU CAN VIEW MY BLOG-                                                  https:// kneereplacement-stickclub.blogspot.com/  

                            FOR CROCHET DESIGNS                                                                                                                                                                                              https://gscrochetdesigns.blogspot.com


Labels: , , , , , ,