4 Pressure Points to Get Rid of a Blocked Nose
Nobody likes having a blocked, stuffy nose,
and I’m definitely down for the count on this particular ailment. I
can’t stand not being able to sleep or breathe properly, and all I can
think of is how to get rid of it.
While most of us would think of turning to
over-the-counter nasal sprays or drugs, the stark reality is that these
are chemical solutions, which have side effects and can be addictive,
resulting in you continuing to take them when you don’t need to.
stuffed-nose.
Consider an alternative approach that’s easy to master, is less invasive
and more effective. It is based on acupressure principles, and all you
need to do is apply gentle pressure to four points of the face to help
you clear your nose:
General Guidelines
1. Use your fingertips to apply gentle pressure.
2. Use rotational movements. In fact, it’s a pushing-releasing rotation that’s needed.
3. You should not feel any pain.
4. Repeat the cycle three times.


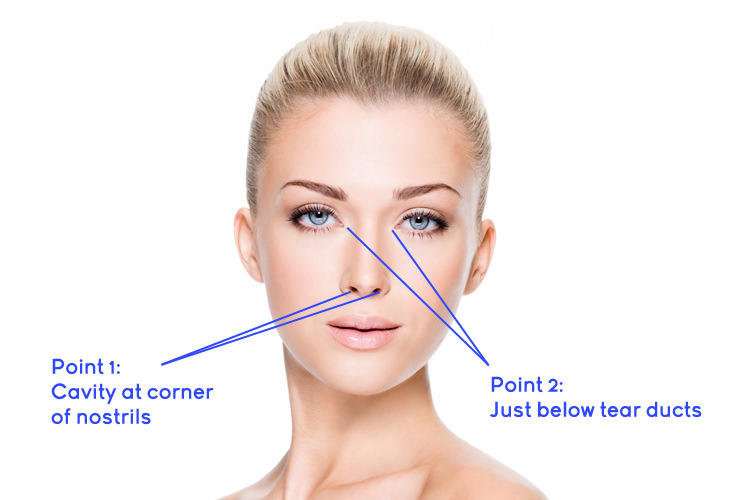
Pressure Point 1 – Cavity at the corner of
the nostrils
Instructions
1. Gently push your nostrils together using a rotating movement. As you
do this, you should almost be opening and closing them.
2. Repeat the movement 10 times over
Tip: Refrain from pushing on the nose cartilage. Your attention should
be focused on the bottom part of the nostrils.
Pressure Point 2 – Just below the tear ducts
Instructions
1. Perform a gentle rotation at this point 10 times over.
2. Do not lift your fingers while performing the rotation – simply move
the skin so you feel the corner of your eyes as you push.


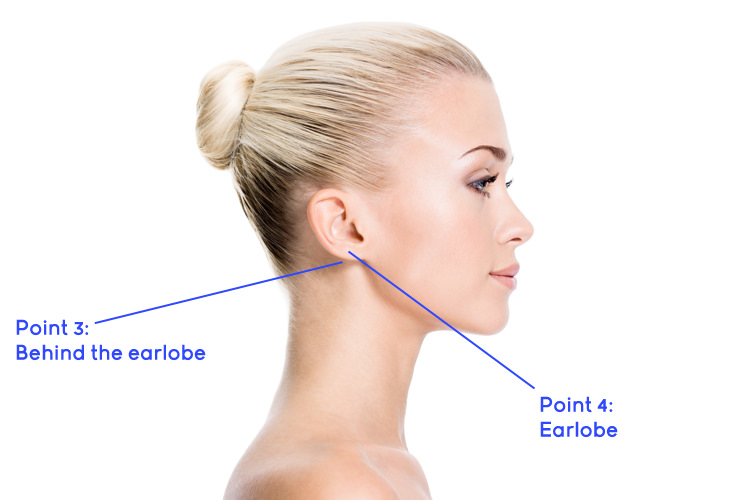
Pressure Point 3 - Behind the earlobe
Instructions
1. Find the pressure point correctly. It’s located behind your ear, in
the cavity just below the cartilage.
2. Push and release the point 10 times. Do not apply pressure to the
cartilage.
Tip: This needs to be a subtle movement.
Pressure Point 4 – Earlobe
Instructions
1. Gently massage the earlobe 10 times.
What’s next?
Go through all of the above pressure points three times over, and you
should feel immediate symptom relief. Should you require more relief,
repeat the entire process after 10 minutes.
Note that you can use this simple, safe technique anywhere, and at any
time. In addition to it being free, it’s also empowering to know that
there are simple ways of being able to heal yourself. Be sure to share
this knowledge with someone dear to you should it work for you.